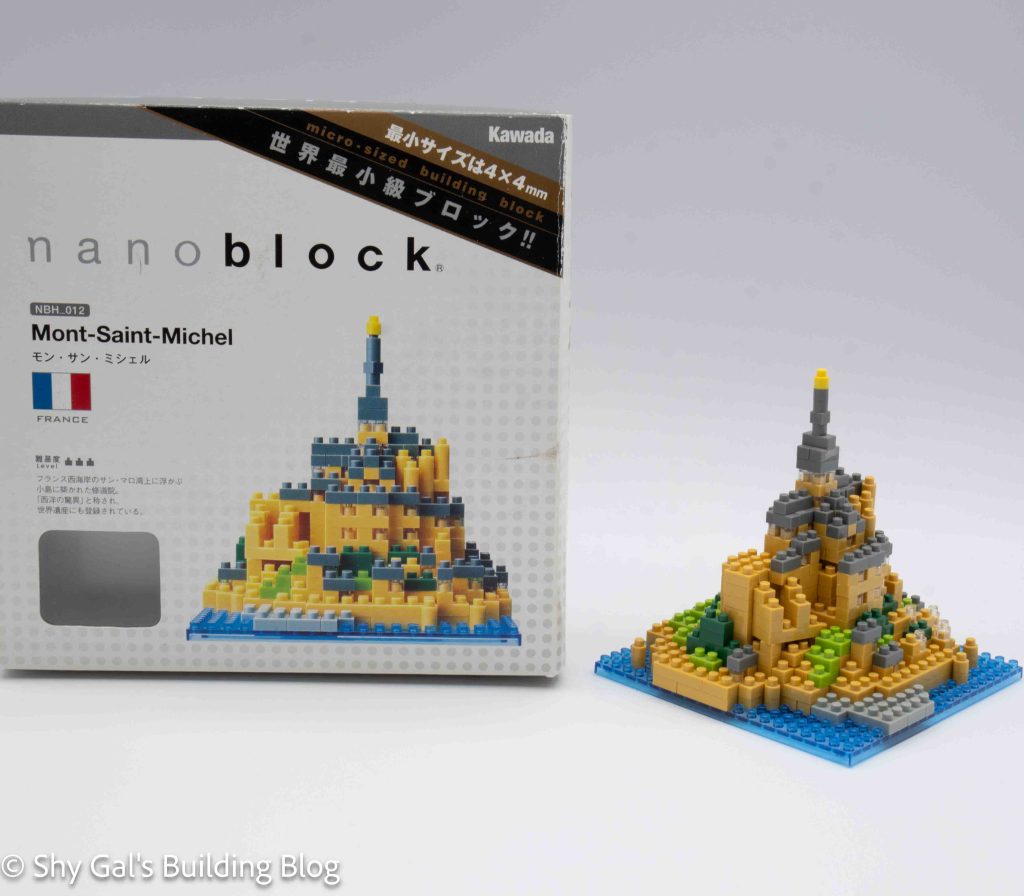
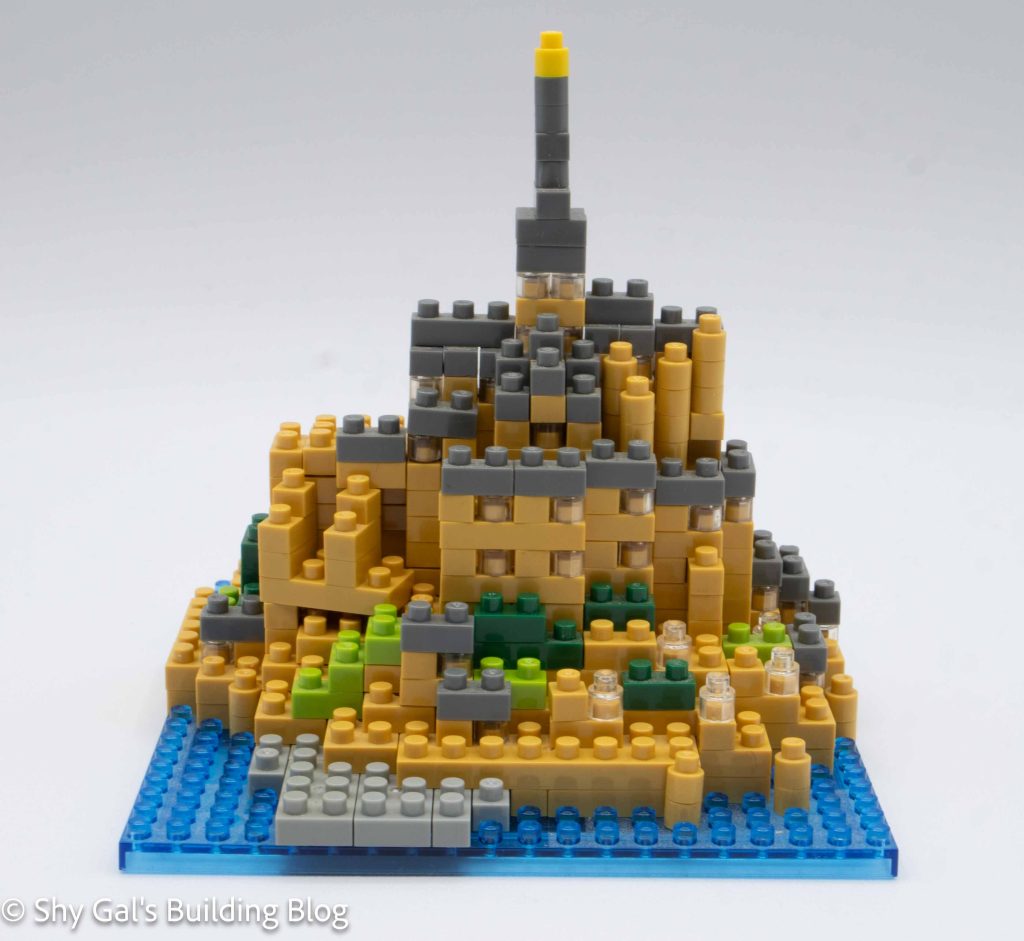
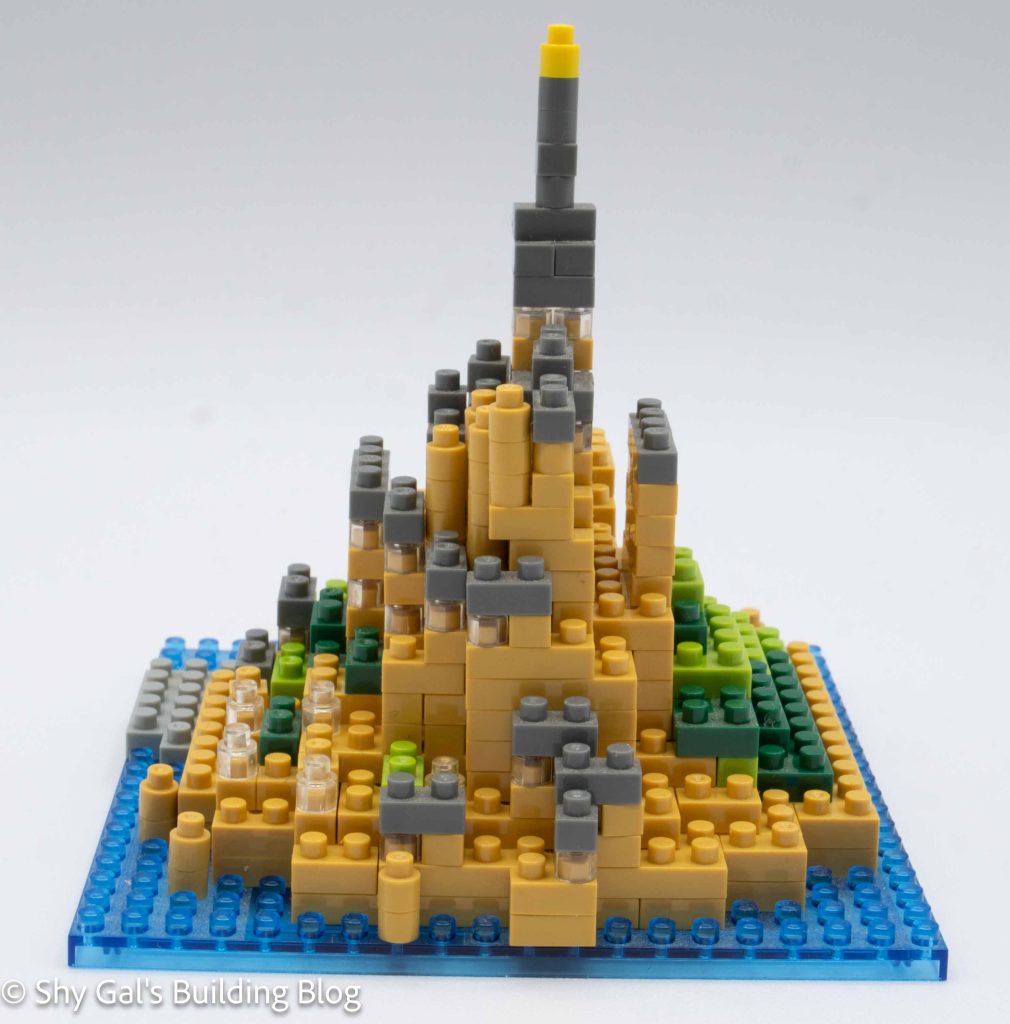
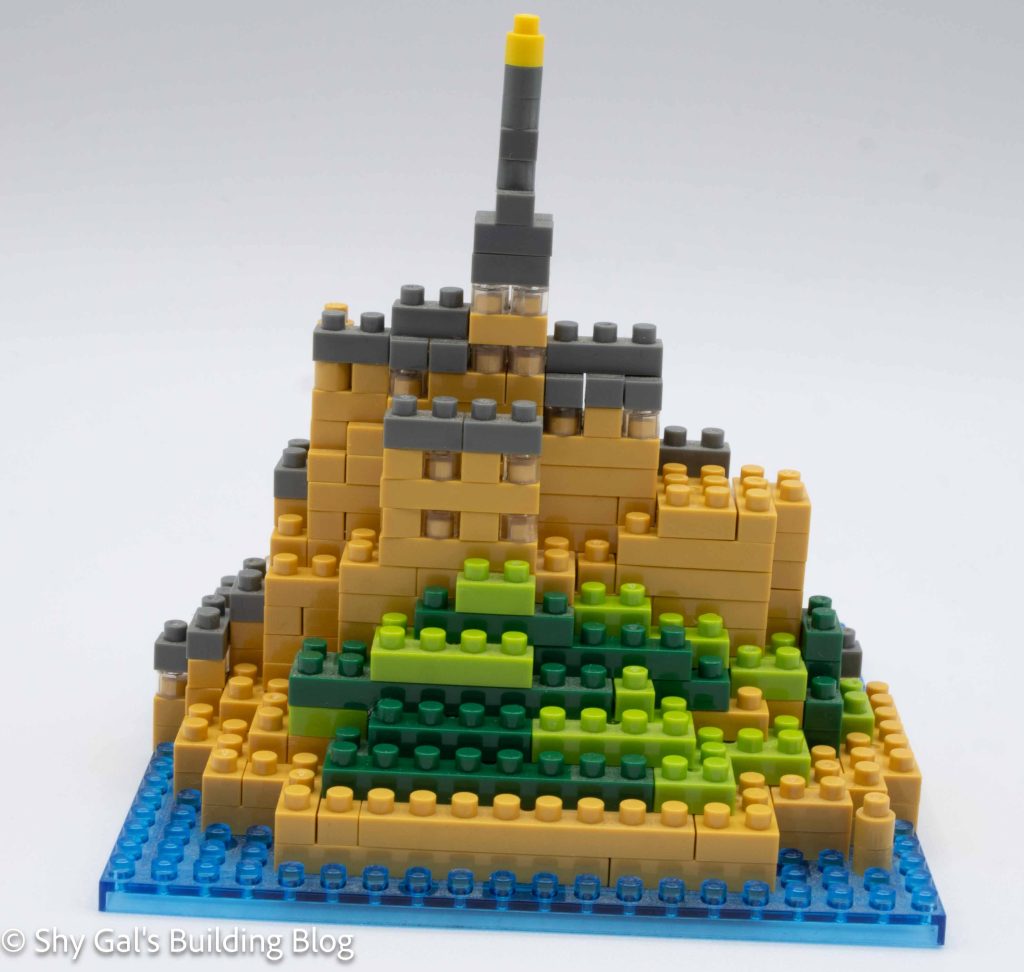
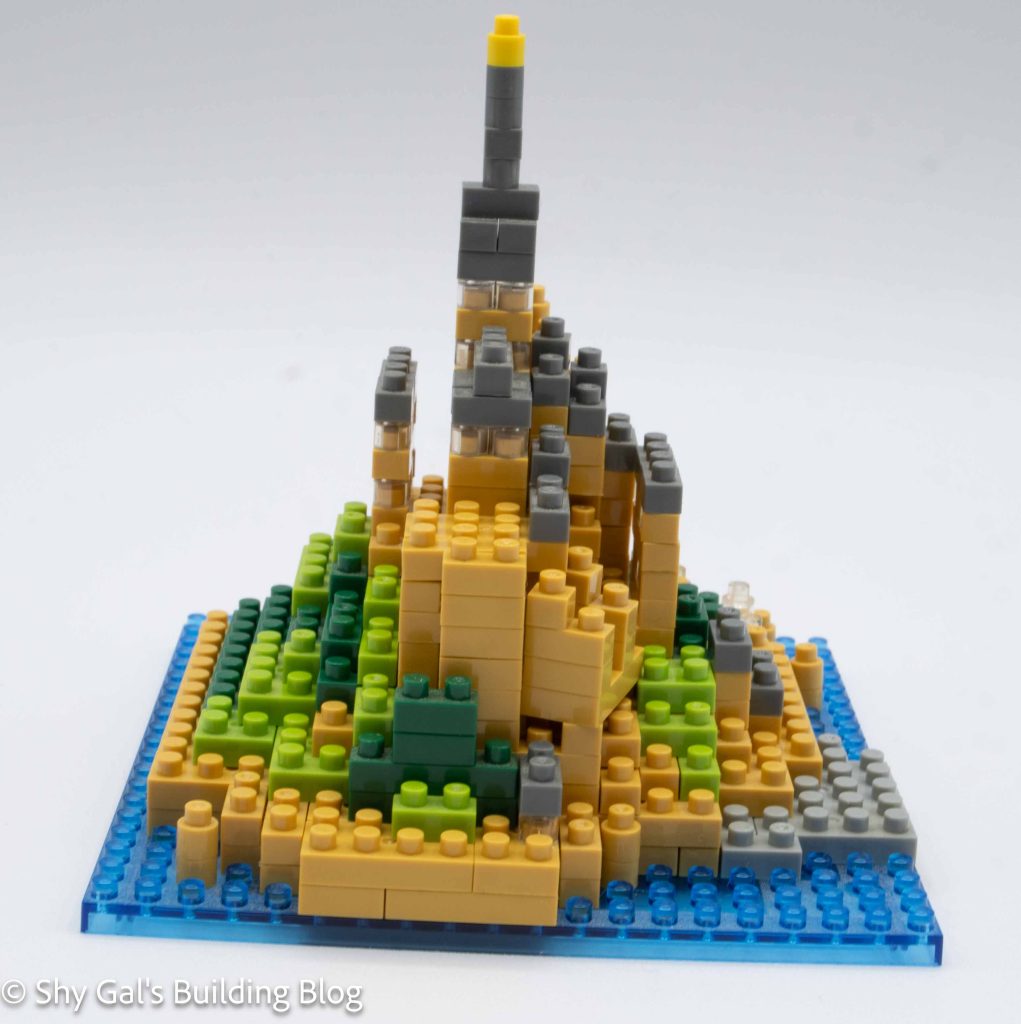
This post is a review of the nanoblock Mont-Saint-Michel build. Mont-Saint-Michel is part of the nanoblock Sights to See collection. Wondering what else is part of the Sights to See collection? Click here for a list.
Number: NBH_012
Country: France
Difficulty Rating: 3
Mont-Saint-Michel is an island off the coast of Normandy, France. It looks like a walled city.
The build begins with outlining the island on a 20×20 clear blue baseplate. The next few layers are rings that make the outline smaller. Then, the ring is closed off by placing a 10×10 plate in the center of the ring.
There are a couple more layers until there is another unique placement. A brick is placed at an angle. The studs on the layer below are properly placed so that when the angled brick is placed, the brick is sturdy.
The rest of the build is very straightforward, going up in layers.
Things I liked:
I like the use of clear blocks creating gaps and windows
Things I didn’t like:
I’m not sure what the one random yellow brick at the top of the spire is supposed to be
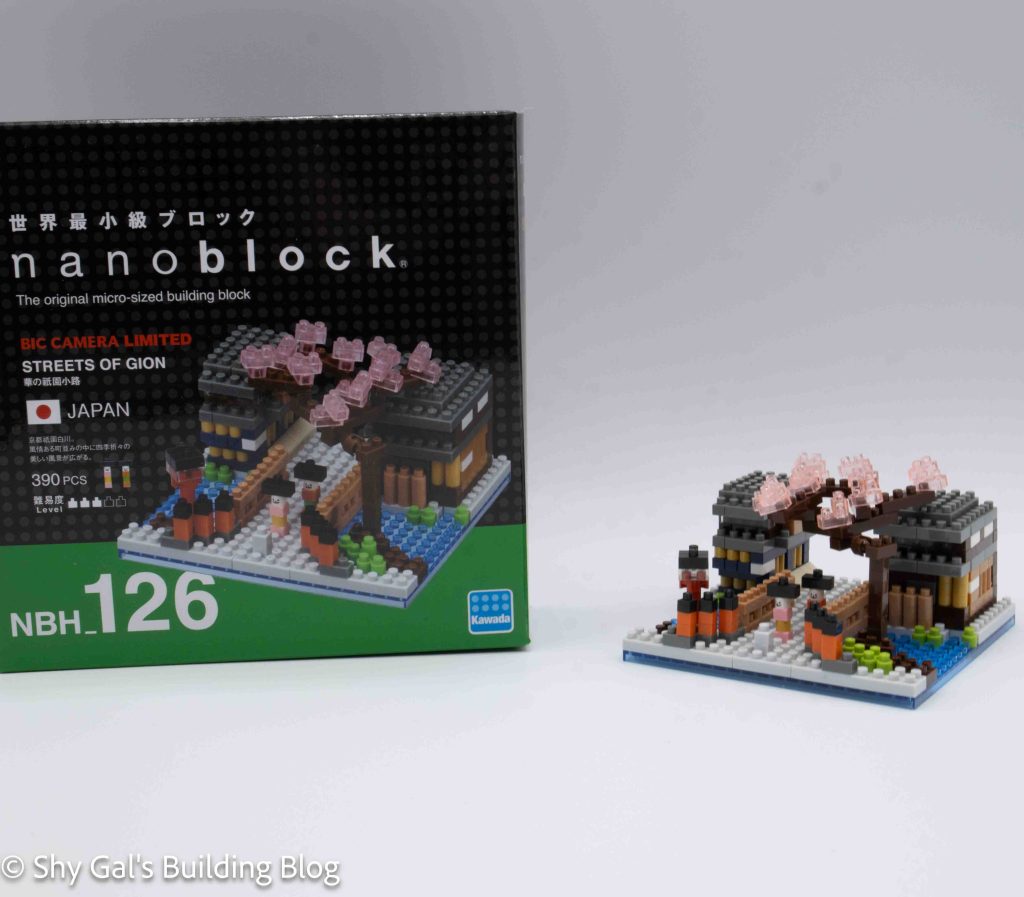
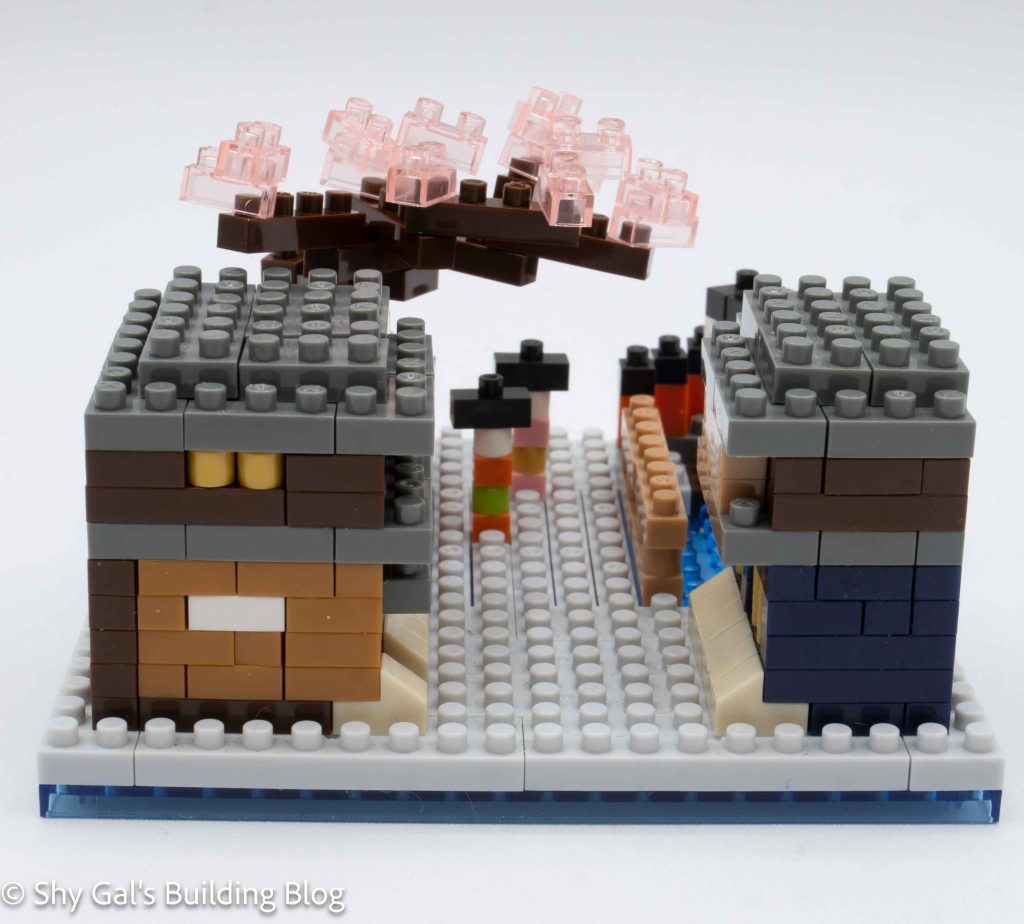
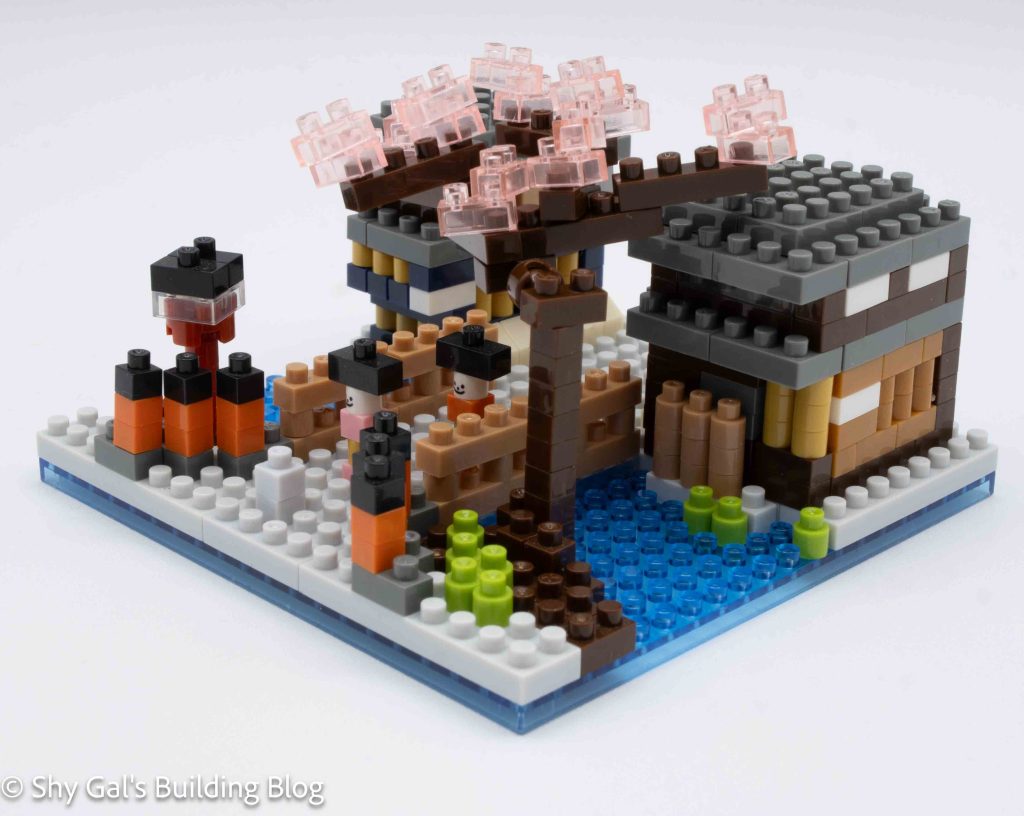
This post is a review of the nanoblock Streets of Gion build. Streets of Gion is part of the nanoblock Sights to See collection. Wondering what else is part of the Sights to See collection? Click here for a list.
Number: NBH_126
Country: Japan
Number of Pieces: 390
Difficulty Rating: 3/5
This kit is labeled as Bic Camera Limited. Bic Camera is a shop in Japan, so I’m guessing the set was only available there.
Gion is a region of Kyoto that is famous for having geisha. This build includes 2 nanoids that have white faces like the geisha would have when they go out in public. I did include the nanoids because I could tell they were on a similar scale to the buildings in the background.
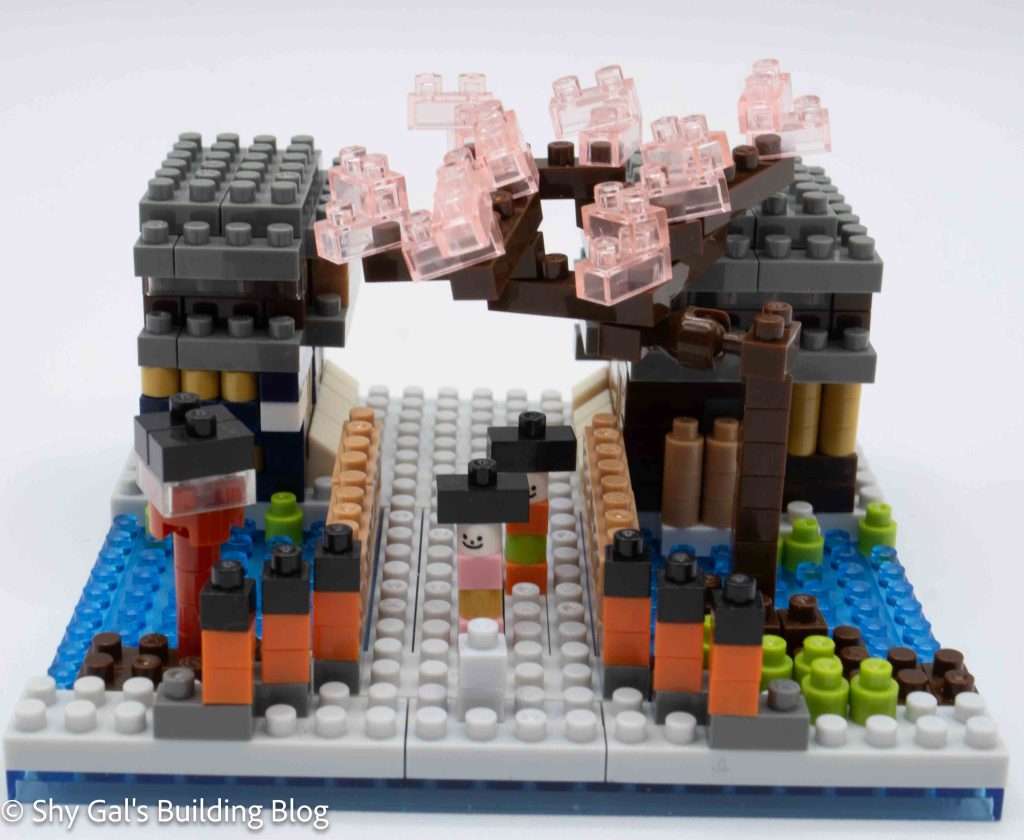
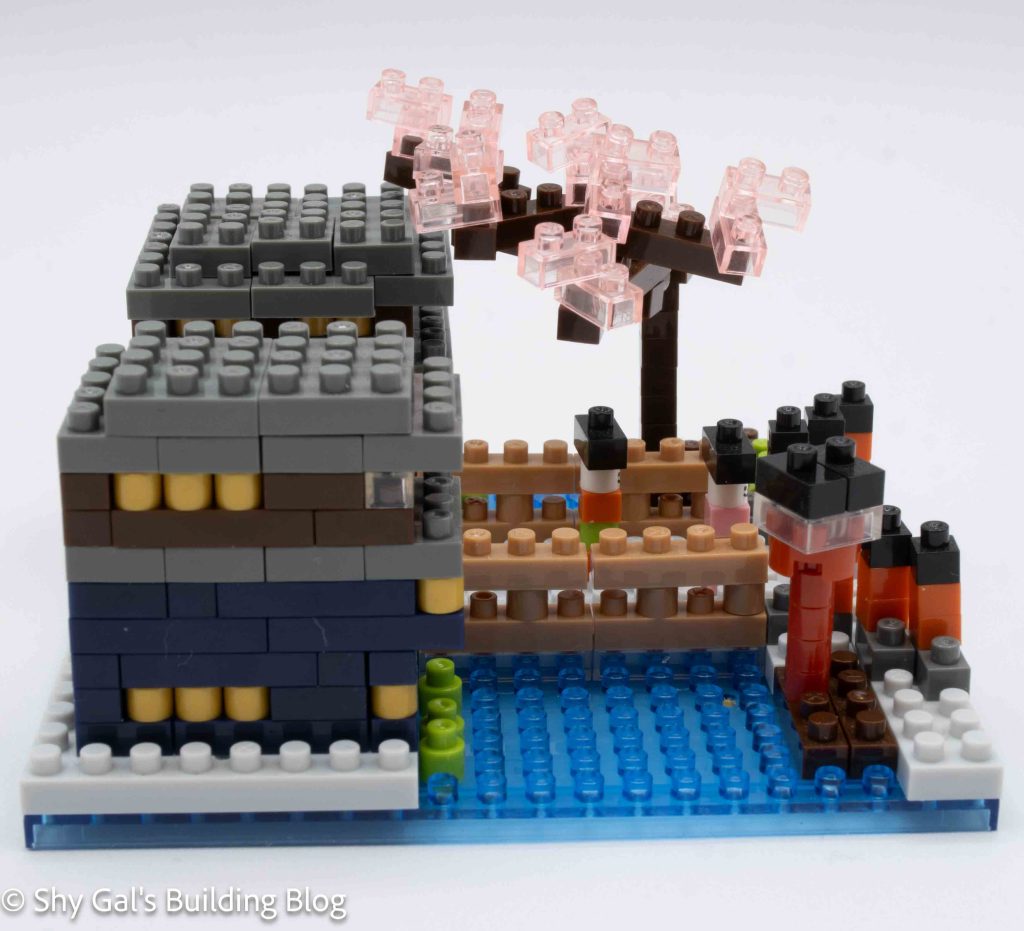
I bought this kit used so all the bricks were combined into 1 large ziplock bag. This kit uses several shades of brown, gold, and yellow. It was very difficult to tell which brown to use. I looked at the photos on the box to decide which color to use and when.
The build begins by laying out bricks on the clear blue 20x2o base plate. The next few layers add bricks all around the base, creating the nanoids, the bridge, and the foundation of the buildings.
The next step is to build the building. The two buildings are built in parallel and go up in layers. One building is blue and gold. The other building is brown and gold, and it was difficult to figure out the right colors.
Then, some details are added to the front of the build, including the trunk of the tree.
The final step is to build the top of the tree. There are 2 options for coloring. There is a spring version and a fall version. I built the spring version. I had a hard time following the directions and getting the branches correct. I did get a tree top that looked approximately correct, so I attached it to the top of the tree.
Things I liked:
I really like that the nanoids have white faces like geisha
I like that the trees can match the seasons
Things I didn’t like:
I wish the directions for the clear had been clearer for colors and the tree top
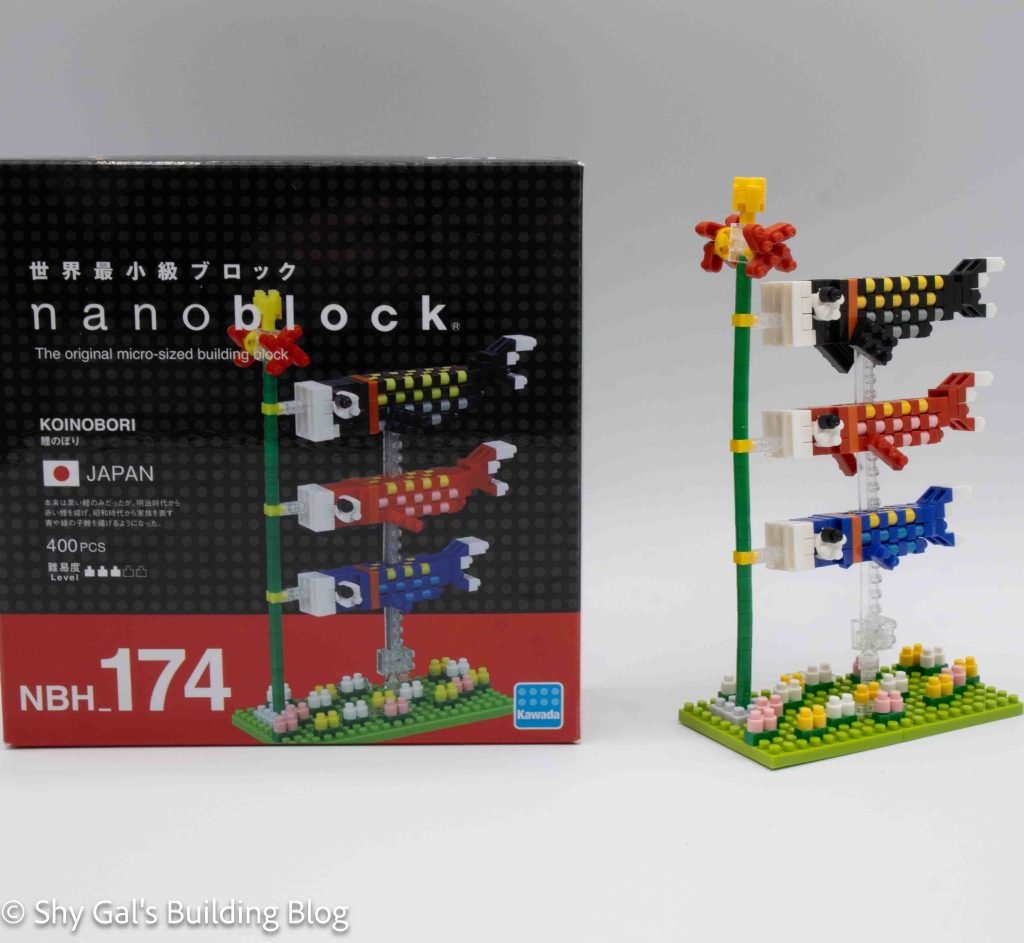
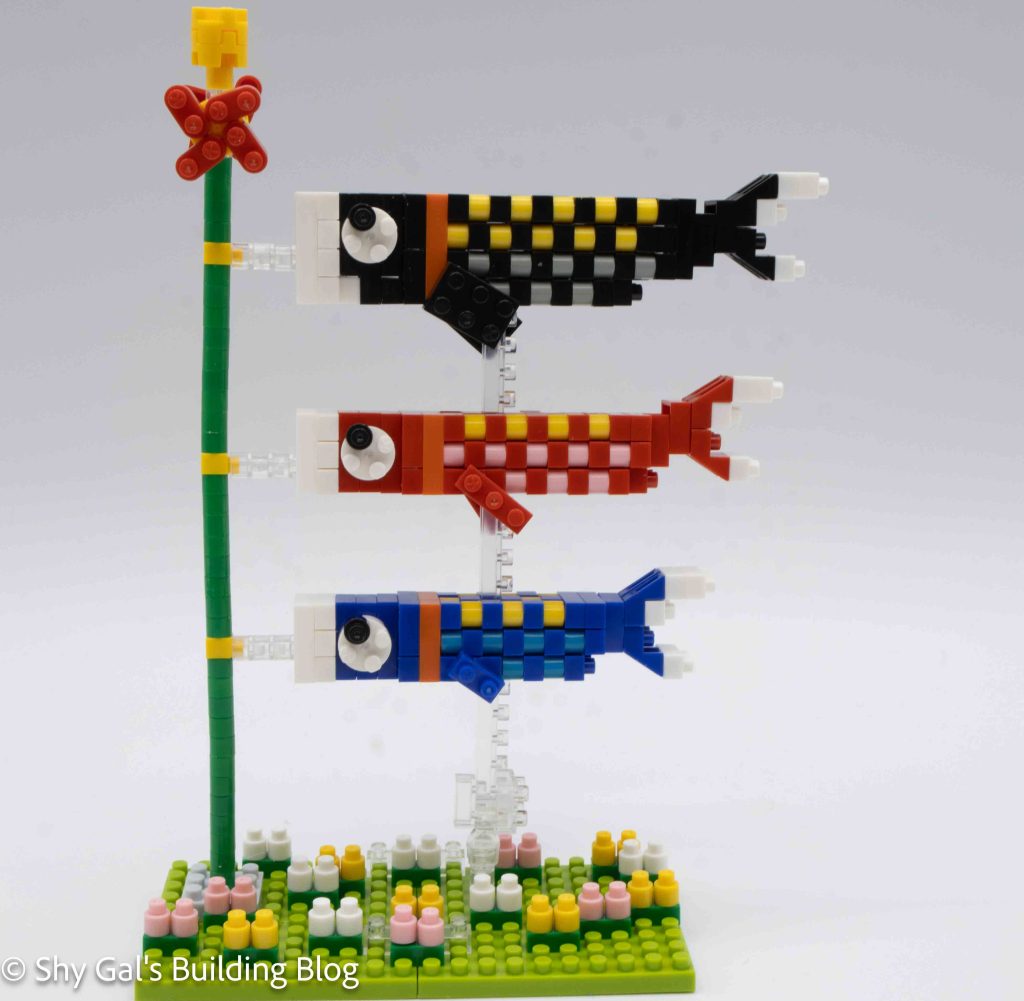
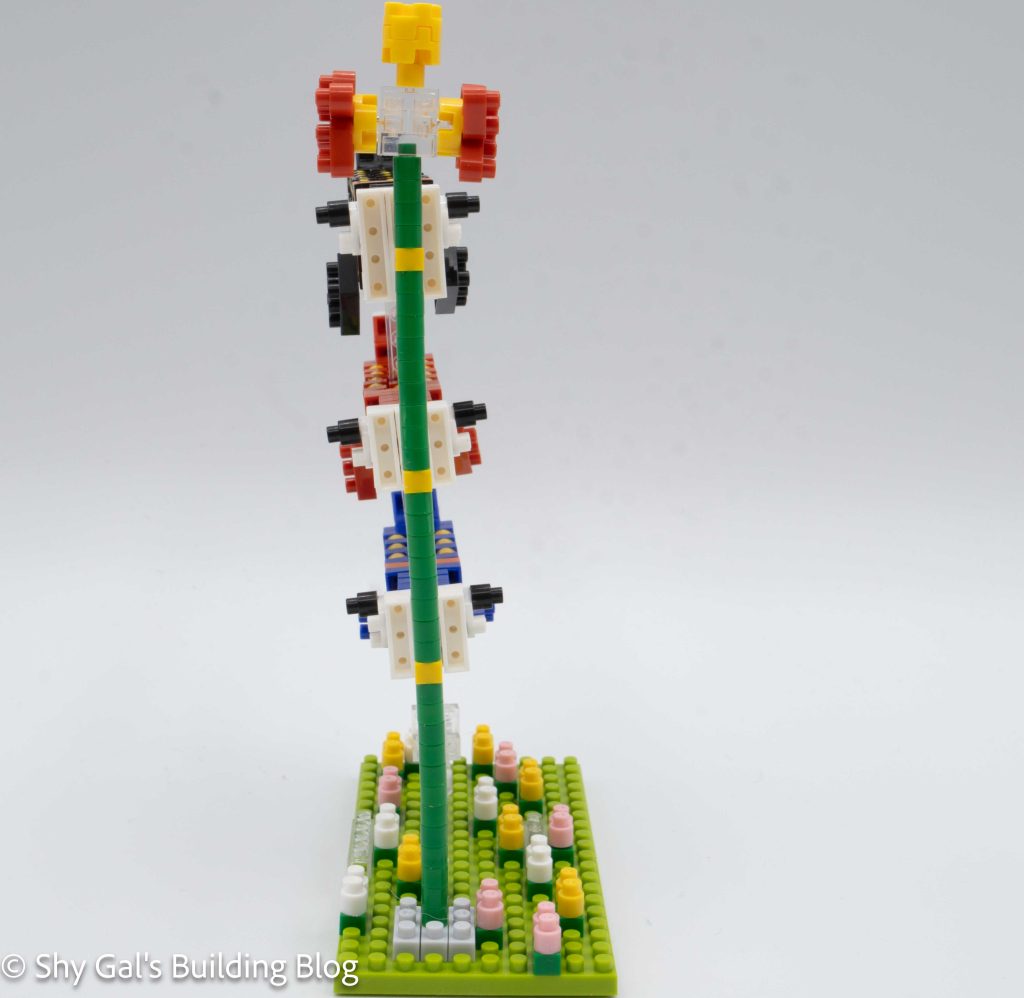
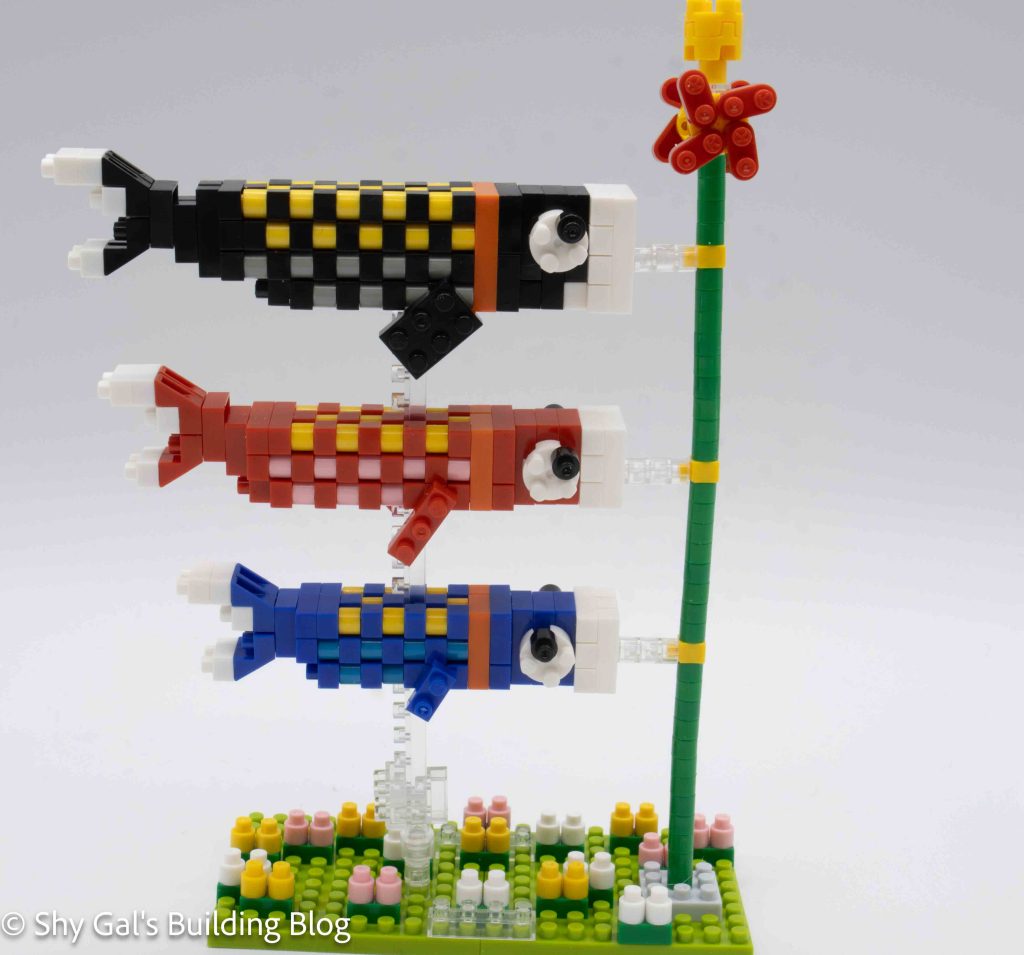
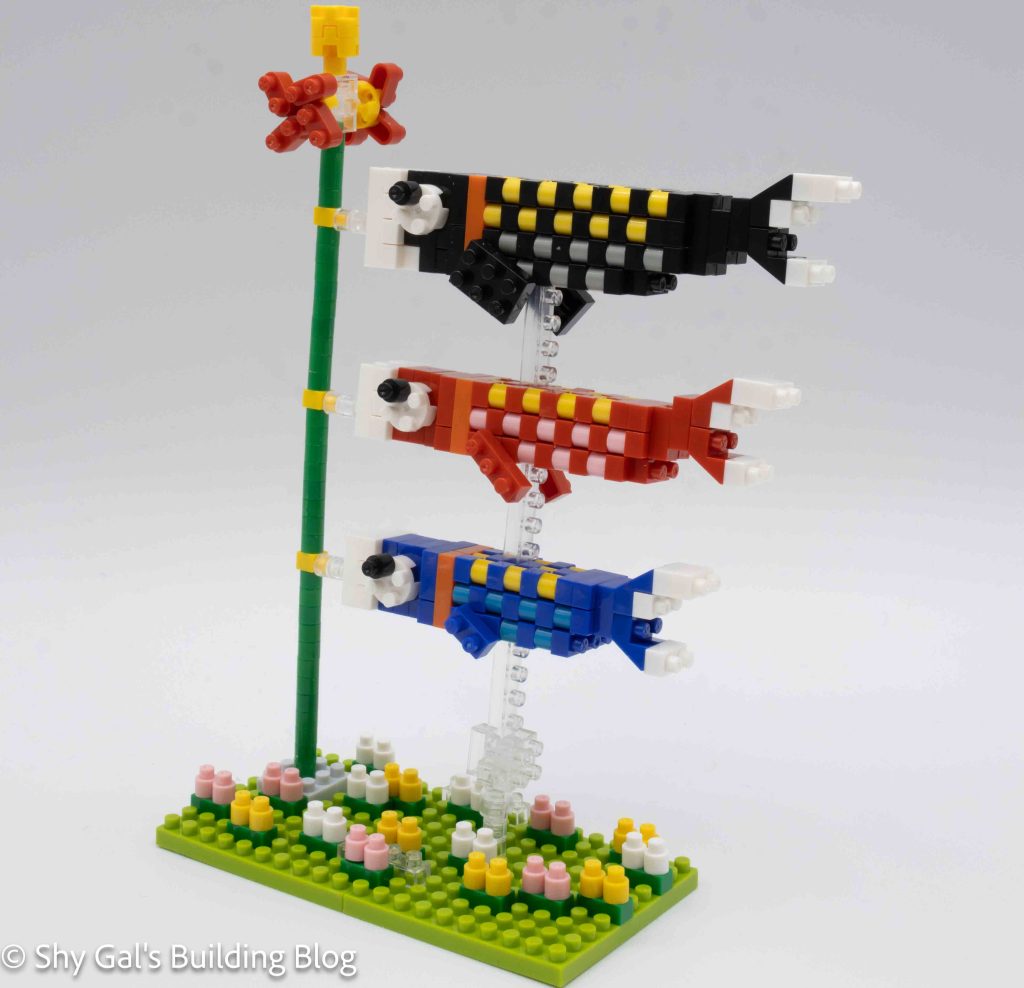
This post is a review of the nanoblock Koinobori build. Koinobori is part of the nanoblock Sights to See collection. Wondering what else is part of the Sights to See collection? Click here for a list.
Number: NBH_174
Country: Japan
Number of Pieces: 400
Difficulty Rating: 3/5
This kit was a lot more difficult to build than I had originally suspected. This is because of how the koi kites are built.
The kit begins with the black fish on top. After building the head, a connecter brick is added to the bottom of the fish. Then there are a bunch of steps creating the body of the fish flipping around where the scales are. It was tricky to keep track of which exact step I was on while building the body of the fish since lots of the steps were nearly identical. (It may have been easier if I had used a counter to keep track of which step I was on. Finally, the tail is added.
Then, the next 2 fish are added and chained together using the connection pieces. Overall, each of the fish is built in the same manner to create the scale patterns on the side of the fish.
The next step is to built the base. This was fairly straightforward since other than the pole base, the lone round clear brick, and the bricks holding the plates together it didn’t really matter where grass was added. I do like how the grass hides the other things on the baseplate so it appears the kites are floating.
The next step is to attach the fish to the base plate. I missed there is a 3rd clear brick originally so I needed to add that after adding the pole. Then the pole is attached to the base and the fish are attached to the pole.
Then, the fins on the sides of the fish are added. I needed to be really gentle so that the fish stayed centered.
The final step is to add the pinwheels on the top of the pole.
Things I liked:
I like how the grass hides things on the baseplates, so it looks more like the kites are floating
I like how the finished scales look on the fish. I feel that it catches the effect of the real kites
Things I didn’t like:
I wish the instructions for building the fish had been less cramped. I think it would be easier to keep track of where I was
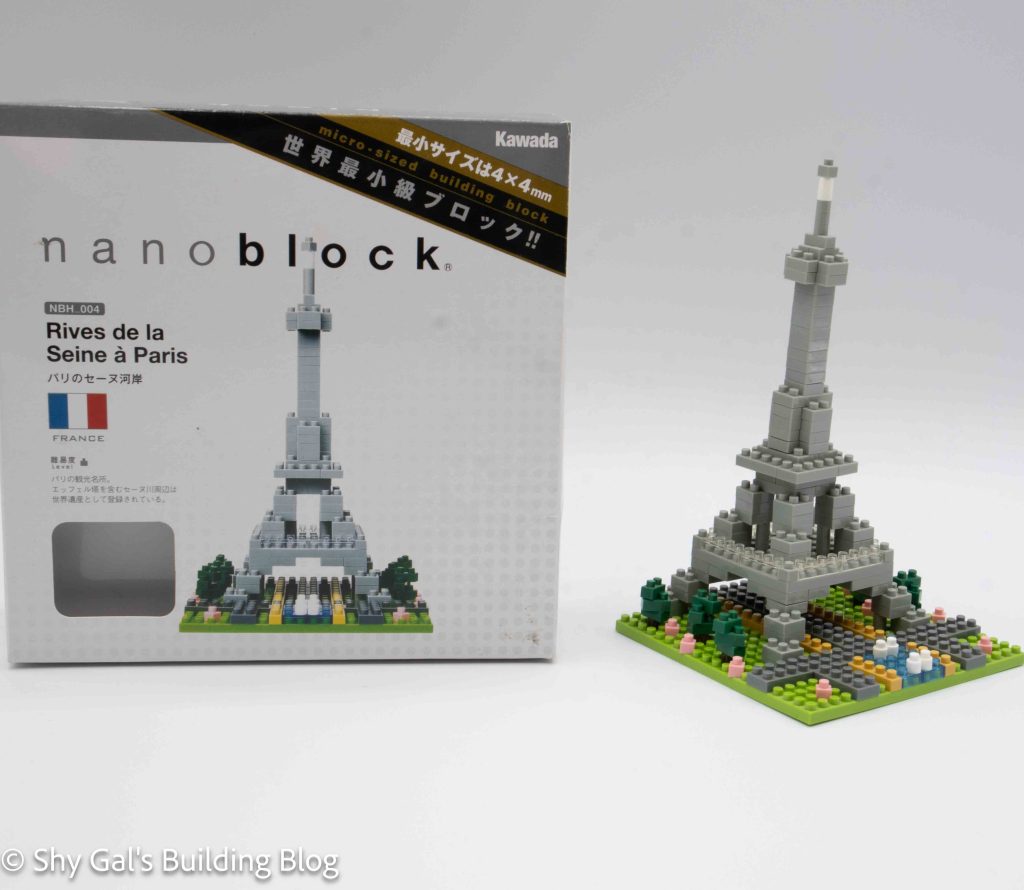
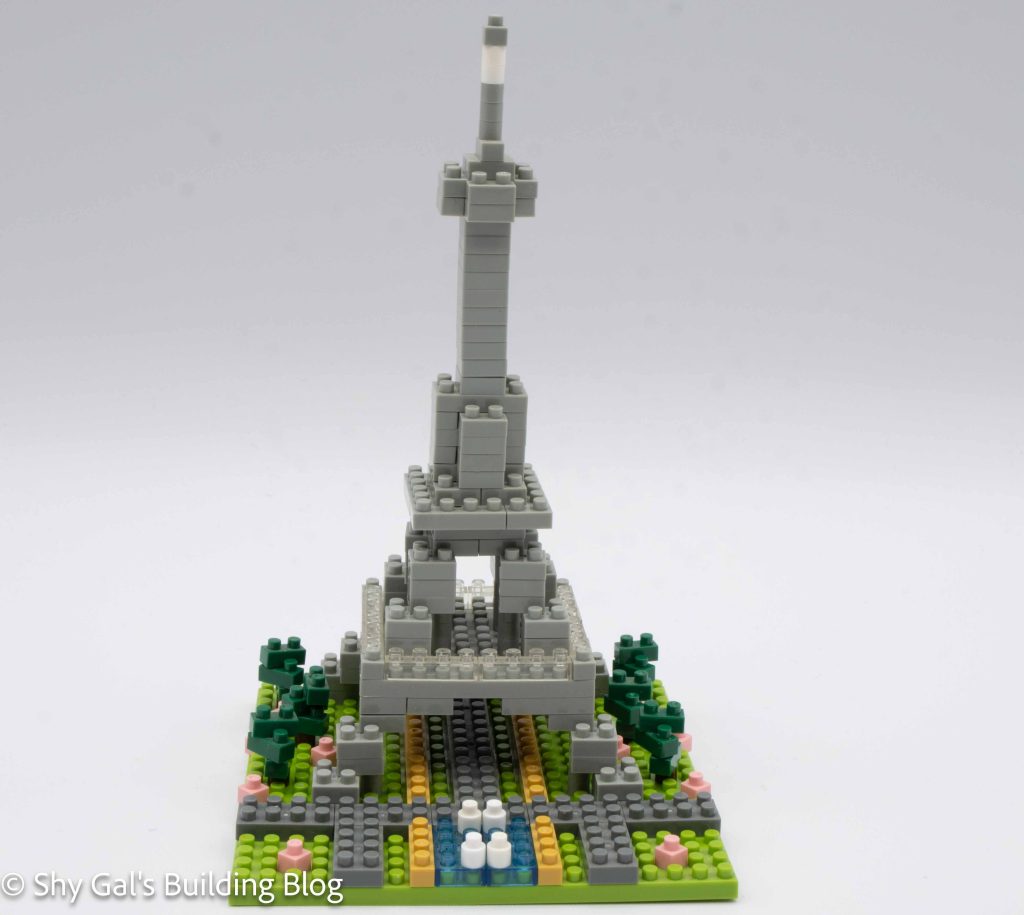
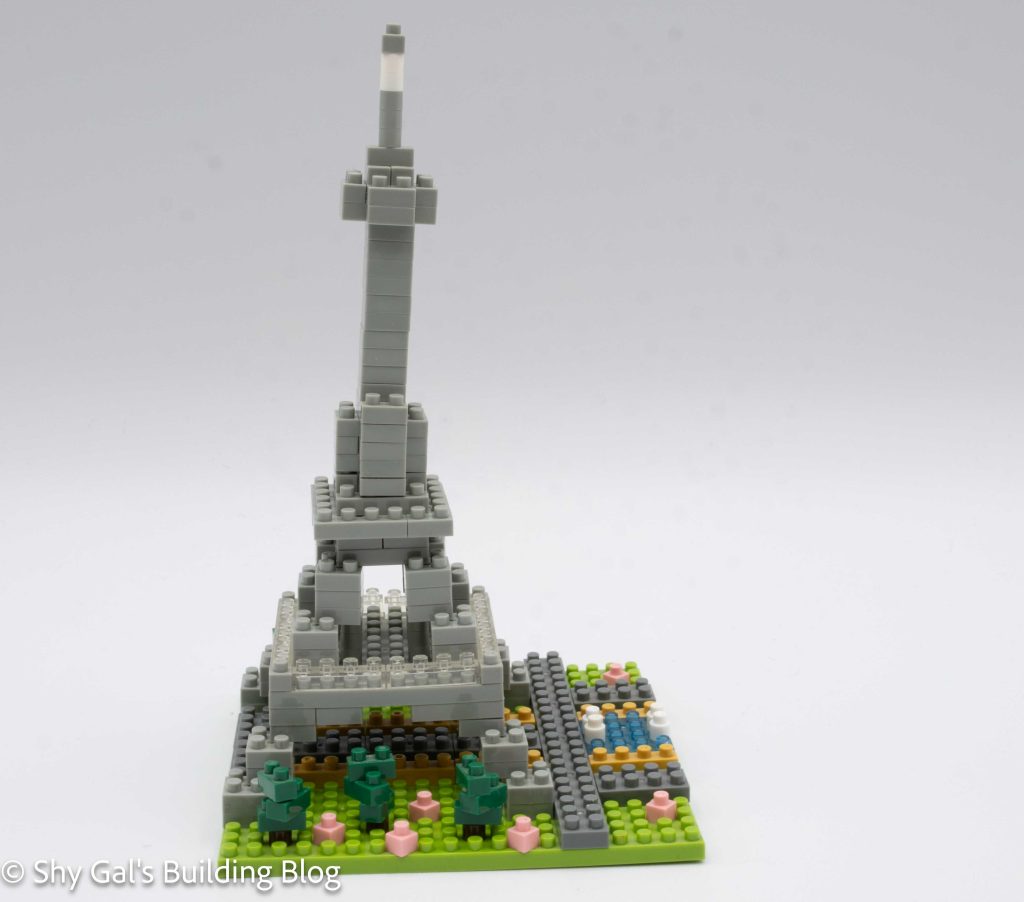
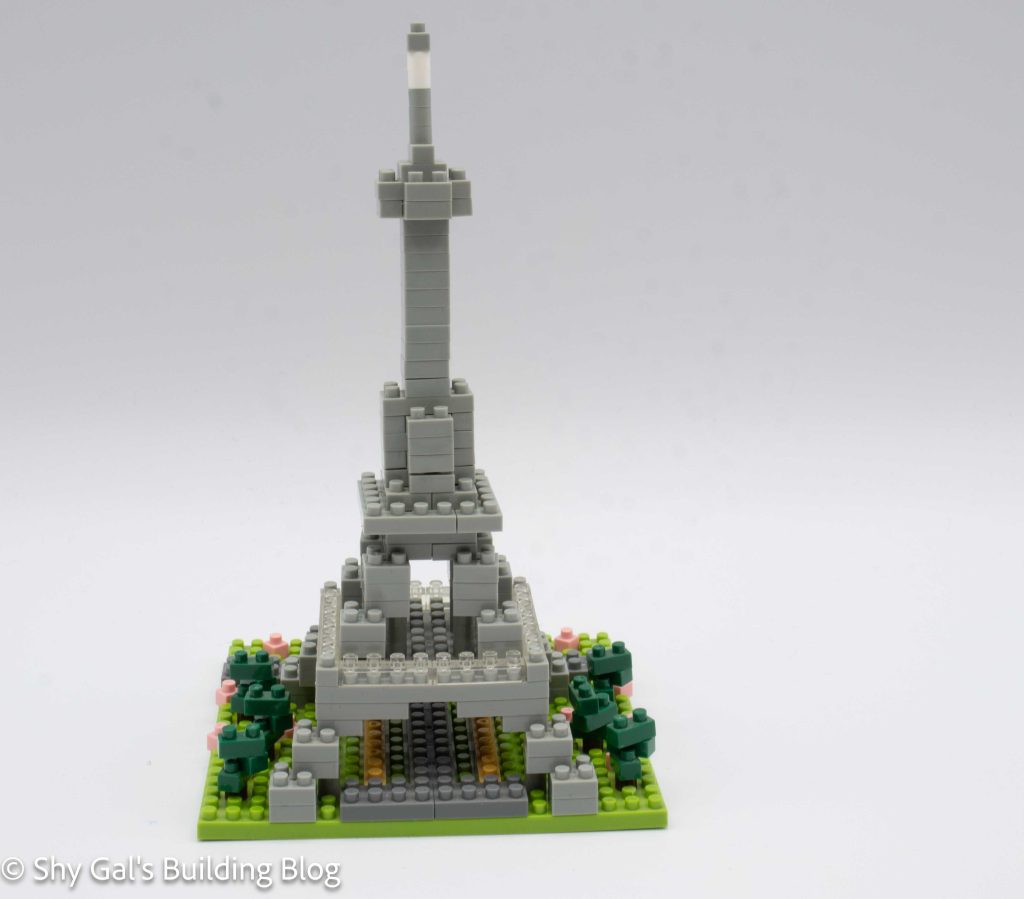
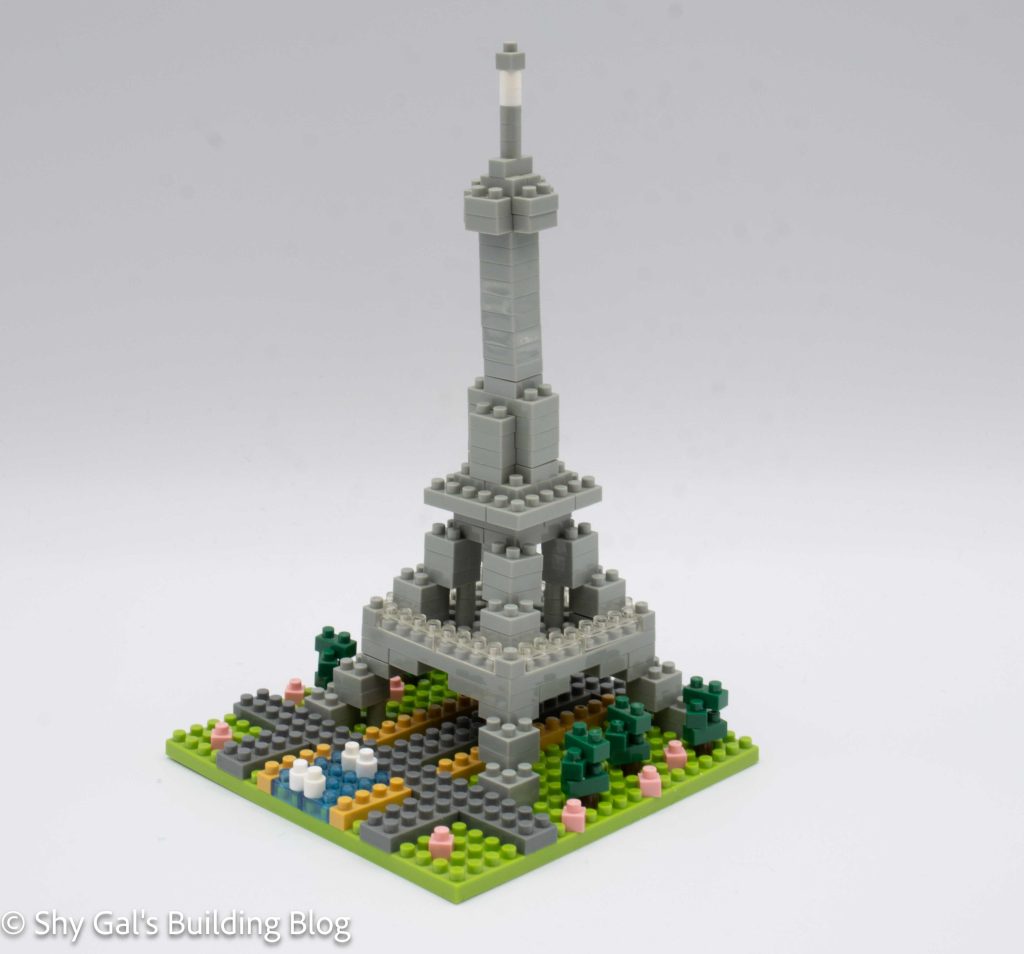
This post is a review of the nanoblock Rives de la Seine a Paris build. Rives de la Seine a Paris is part of the nanoblock Sights to See collection. Wondering what else is part of the Sights to See collection? Click here for a list.
Number: NBH_004
Country: France
Difficulty Rating: 1
Rives de la Seine a Paris translates to Banks of the Seine in Paris. This build is actually of the Eiffel Tower which is on the Seine.
The build begins with laying out the foundation bricks on the base plate. There are 2 images for how the baseplate should look after step one, which makes me confident I had the scattered bricks placed correctly.
The second step adds the trees and the second layer of bricks to the tower. I wish the trees had been added at the end because I kept knocking the trees as I added to the tower.
Then a smaller base plate is added to the tower to create the first viewing platform. I don’t really notice or see the clear the bricks on the outside of the tower so I’m not sure they add much to the build.
The rest of the tower goes up in very straightforward layers. The layers add the 2 additional viewing platforms and the radio antenna on the top of the tower.
Things I liked:
I like that the base platform appears to be a complete scene instead of having random things as an afterthought because the base is bare
Things I didn’t like:
I wish the trees had been added at the end instead of the beginning because I kept bumping them as I built the tower
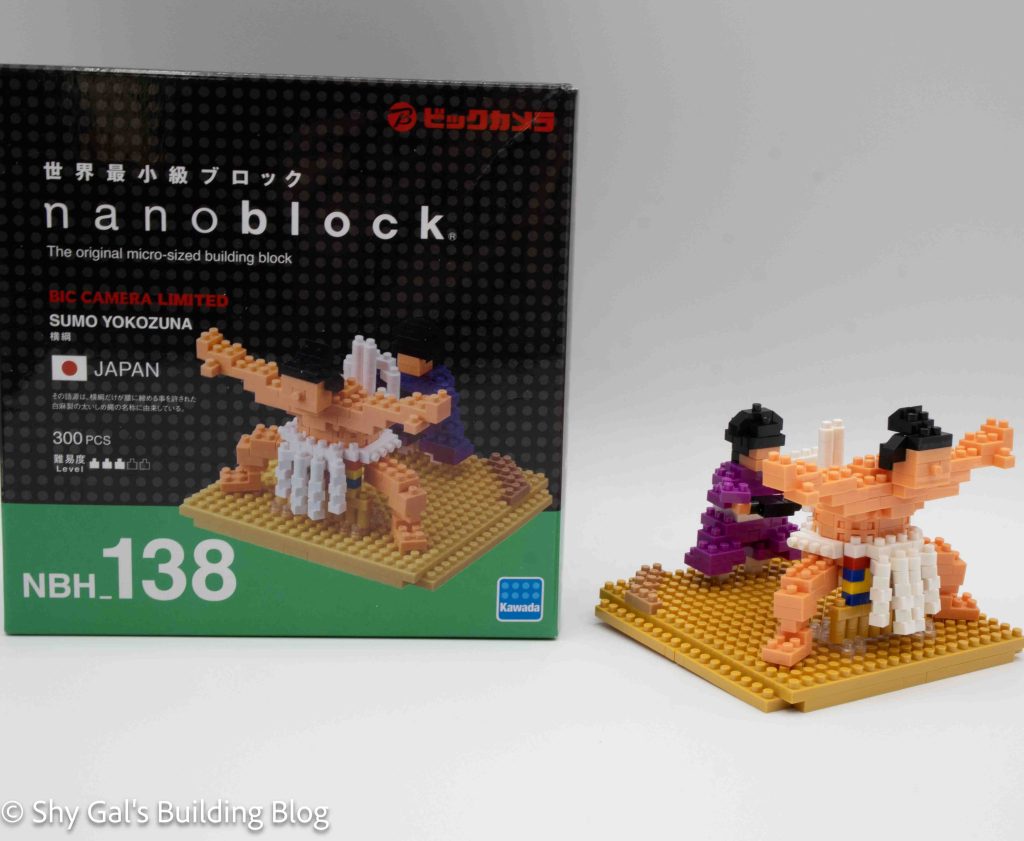
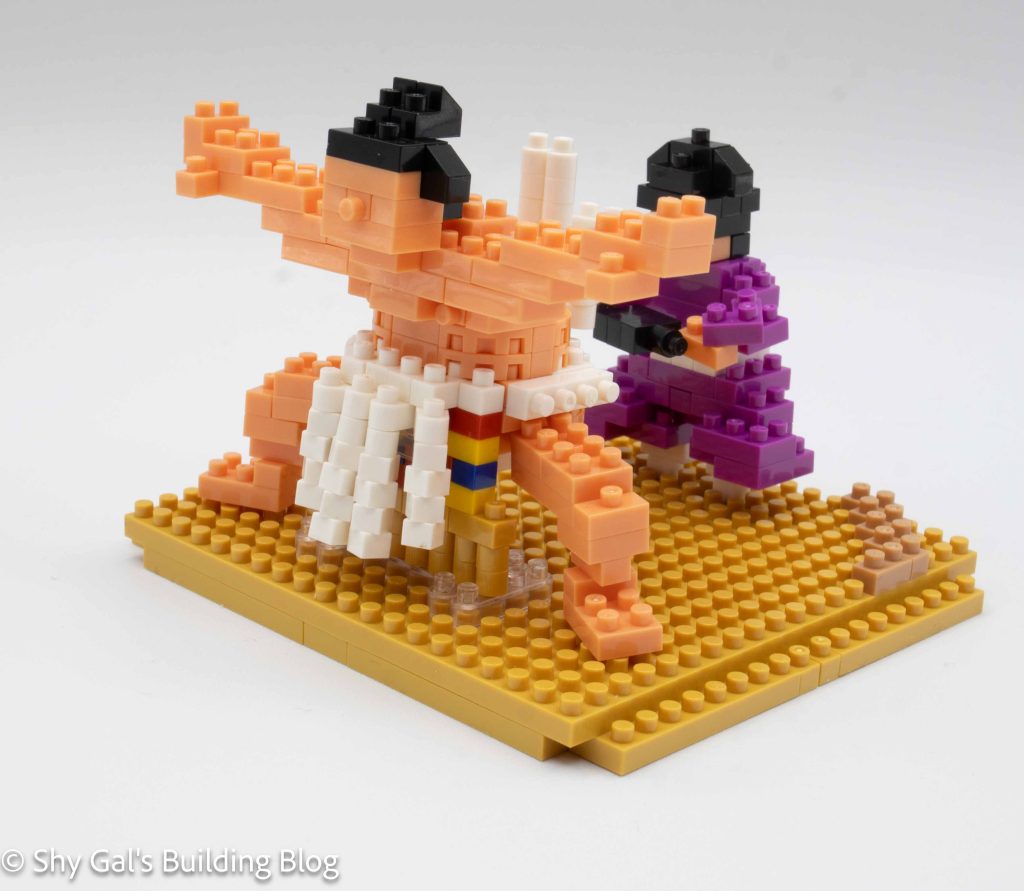
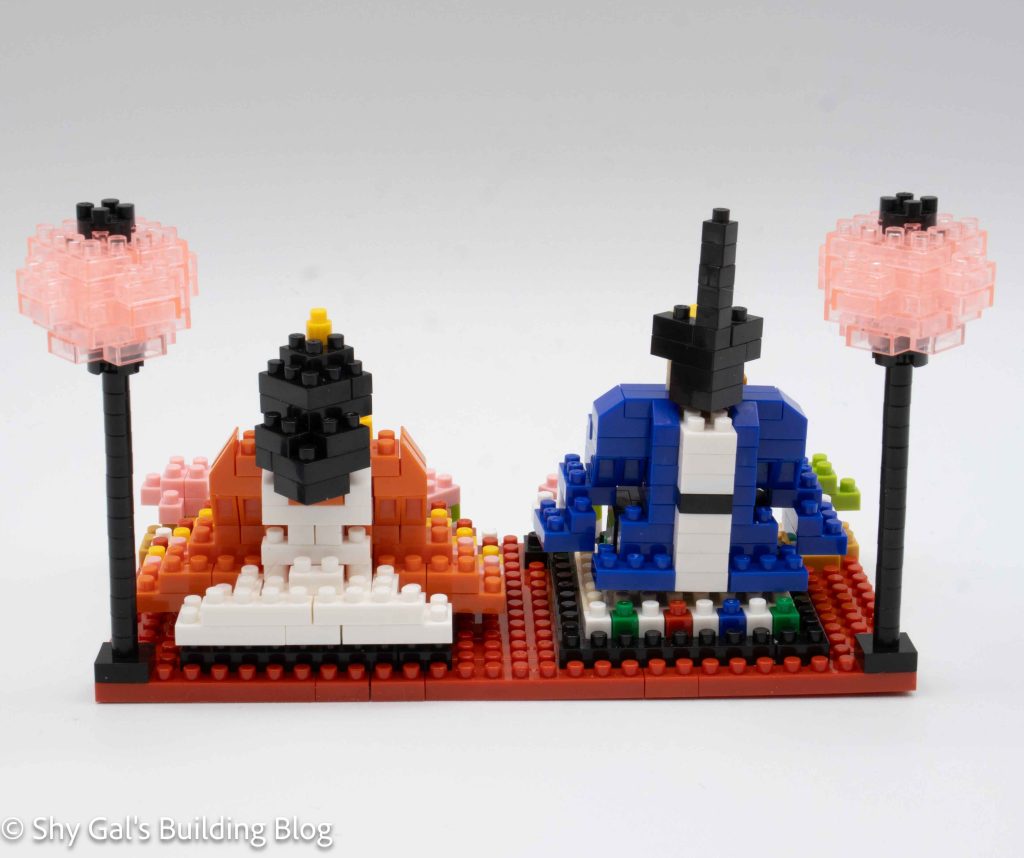
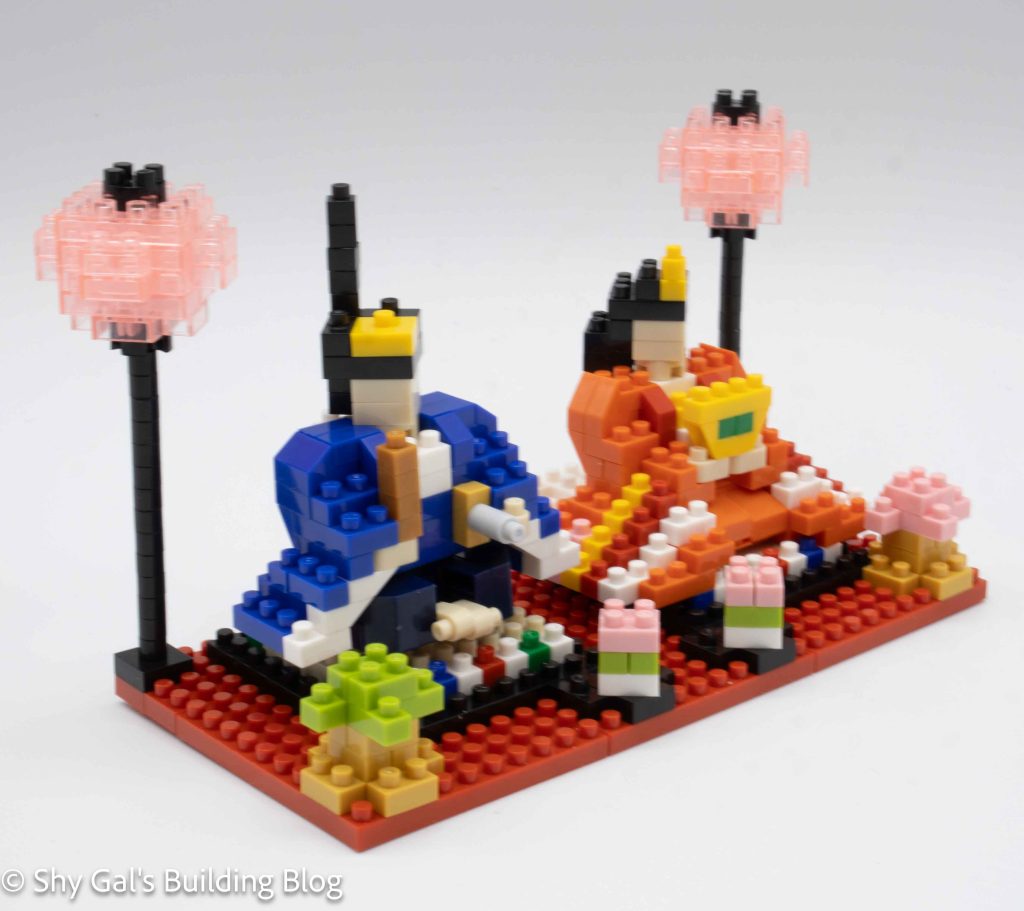
This post is a review of the nanoblock Sumo Yokozuna build. Sumo Yokozuna is part of the nanoblock Sights to See collection. Wondering what else is part of the Sights to See collection? Click here for a list.
Number: NBH 138
Country: Japan
Number of Pieces: 300
Difficulty Rating: 3/5
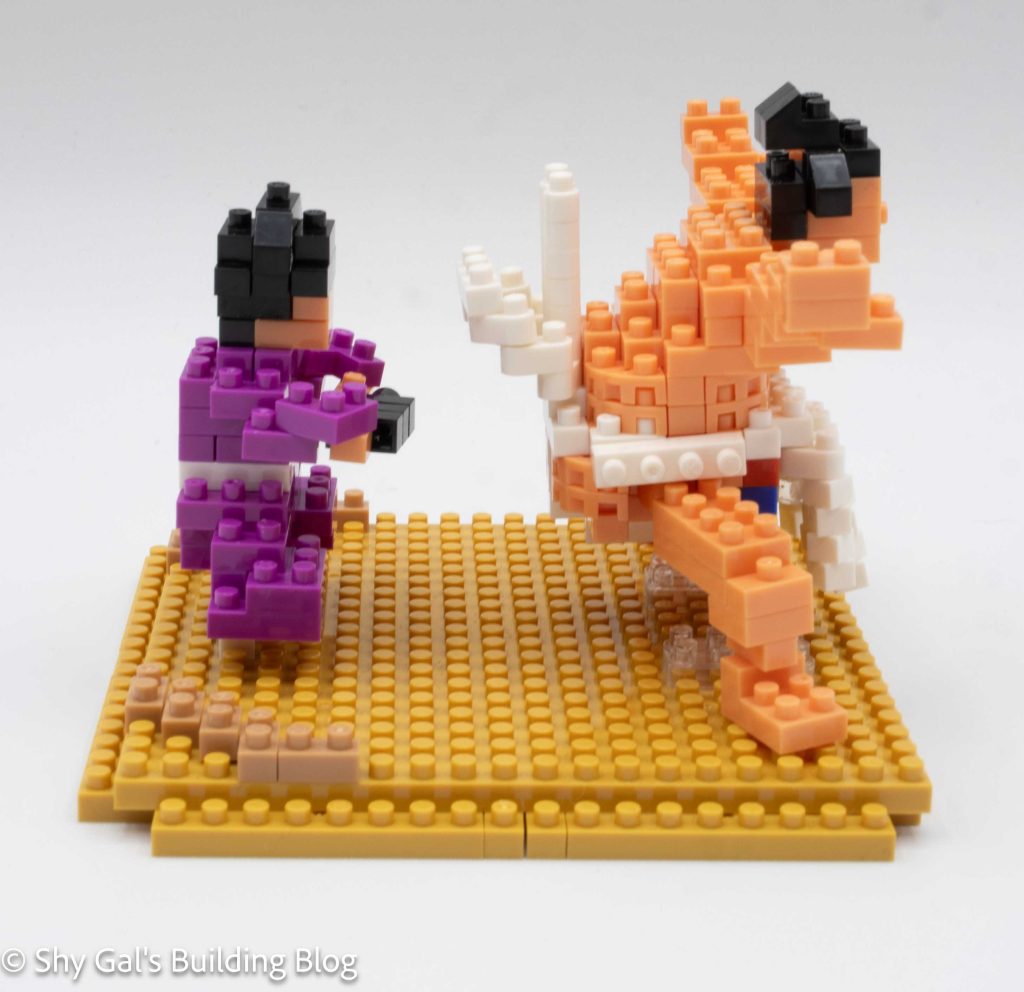
Yokozuna is the highest obtainable rank for Sumo wrestlers. I’m not sure why there are 2 people on this build, but I’m guessing the guy in purple is an aide or an assistant.
This kit is labeled as Bic Camera Limited. Bic Camera is a shop in Japan so I’m guessing the set was only available there.
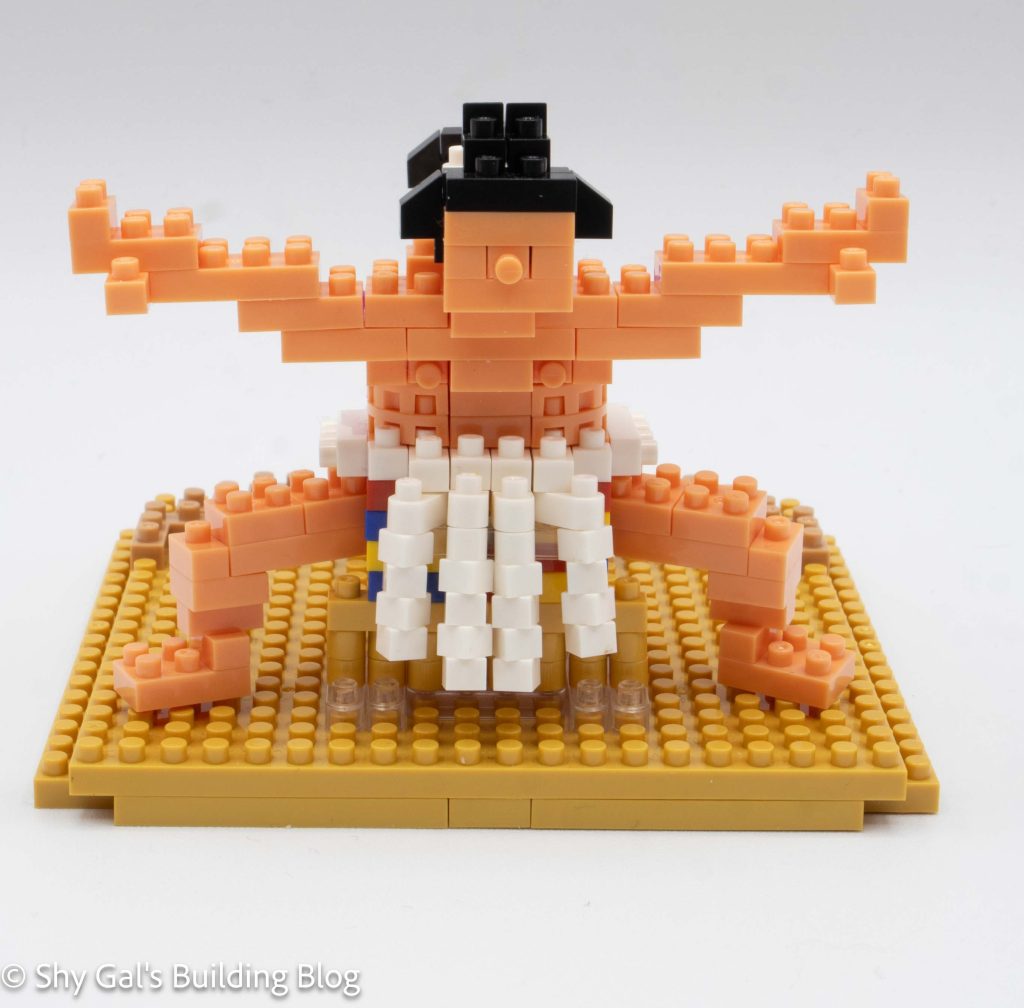
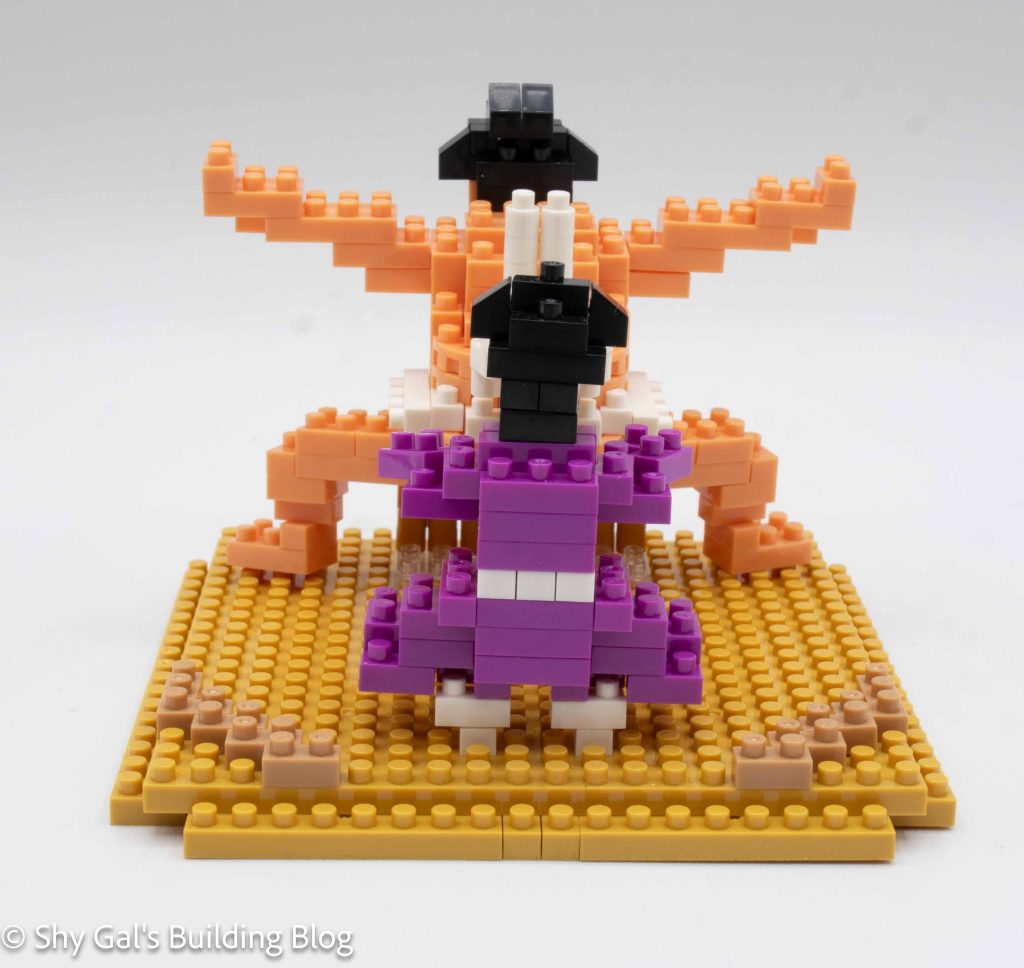
This kit has 3 different sections. There is the base, what I am calling the assistant and the sumo wrestler.
The base is very straightforward. I simply layered bricks around the outside of the 20×20 base plate to create the idea of a stage instead of just having a flat base. I also added the detail bricks to the top, along with bricks that would eventually hold the people in place.
The second section is the assistant. He begins with a layer of purple bricks. Overall he is very straightforward to build. There is some very unusual brick usage to create the idea that his arms are bent. This is achieved by using corner pieces and attaching bricks to just the ends of the corners. This creates a lot of movement in the arms.
The next step is to build the front of the mawashi (the traditional Sumo outfit). It begins with a simple stack of red, blue, and yellow bricks. Then, white ribbons are added in front of the rainbow stack, covering most of the colors.
Next is the actual sumo wrestler. He begins with a single white brick for the bottom of the mawashi. Then, skin tone and white bricks are added to the build to create the body. The body has some unique bricks, which are quarter circles I have never seen before. These unique bricks do a great job of creating curves for the stomach and back of the sumo wrestler.
Once the body and mawashi are completed, the head is built and attached. Then, the legs are attached. The legs are somewhat posable because they are attached to the body with ball and socket joints.
Once the legs are attached, the Sumo wrestler is attached to the front of the mawashi on the base.
The final step is to build the arms. When I was looking at the instructions I was a bit confused because it wasn’t super clear that there are 3 different ways to finish the build depending on how the arms are placed. All three poses are shown on the box but I had completely missed that until I was trying to figure out the instructions. I went with the first option for how to pose the arms.
Things I liked:
I really like how the unique bricks look and how they create the curve of the body
Things I didn’t like:
I’m not sure why the assistant is there, so I think I would rather it was just the sumo wrestler
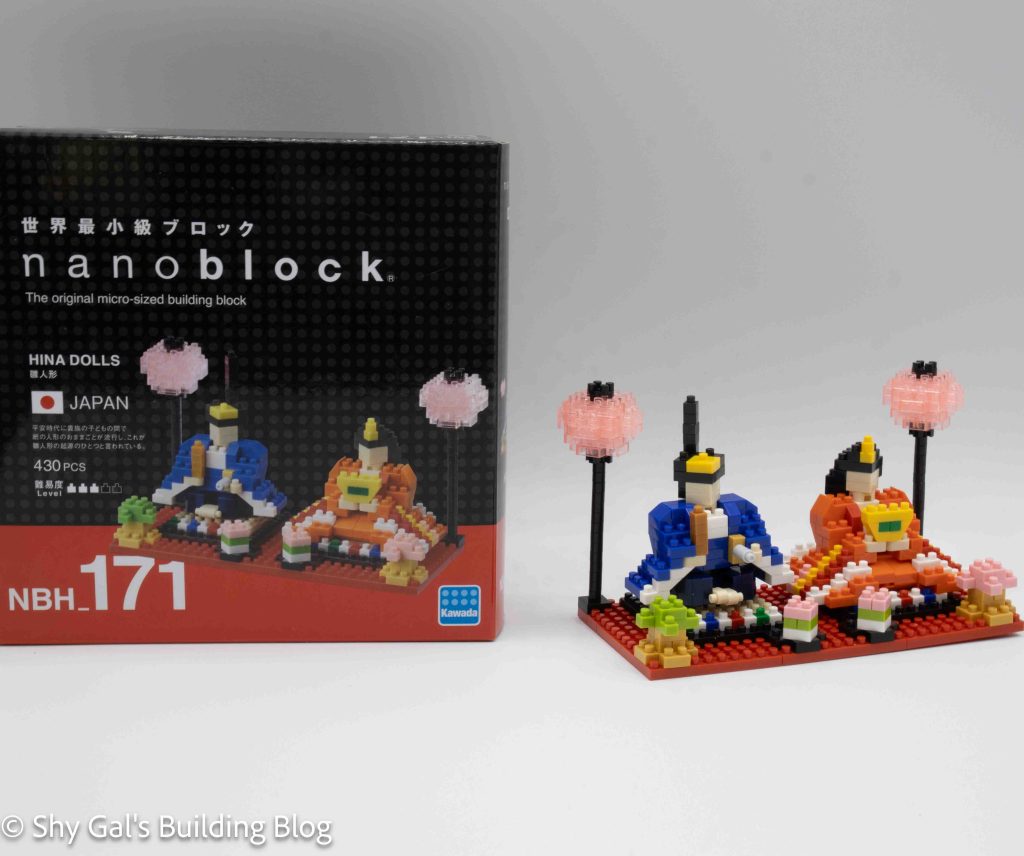
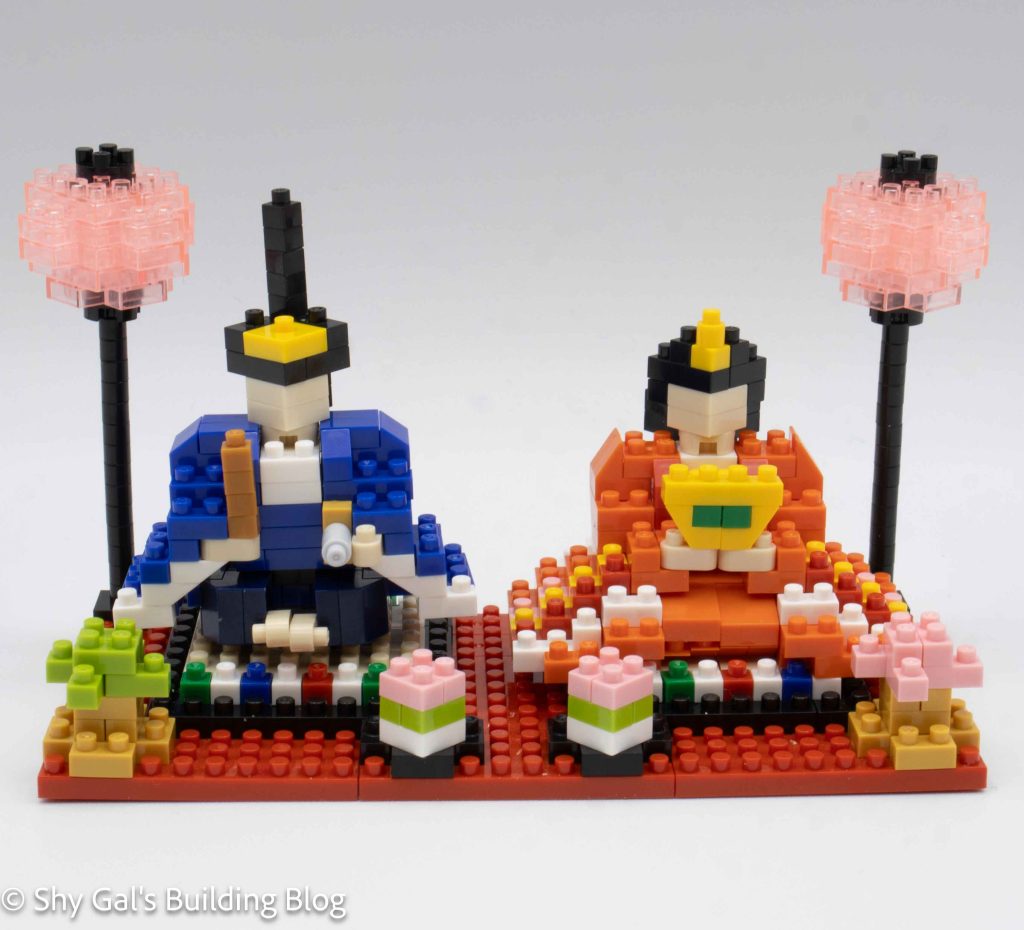
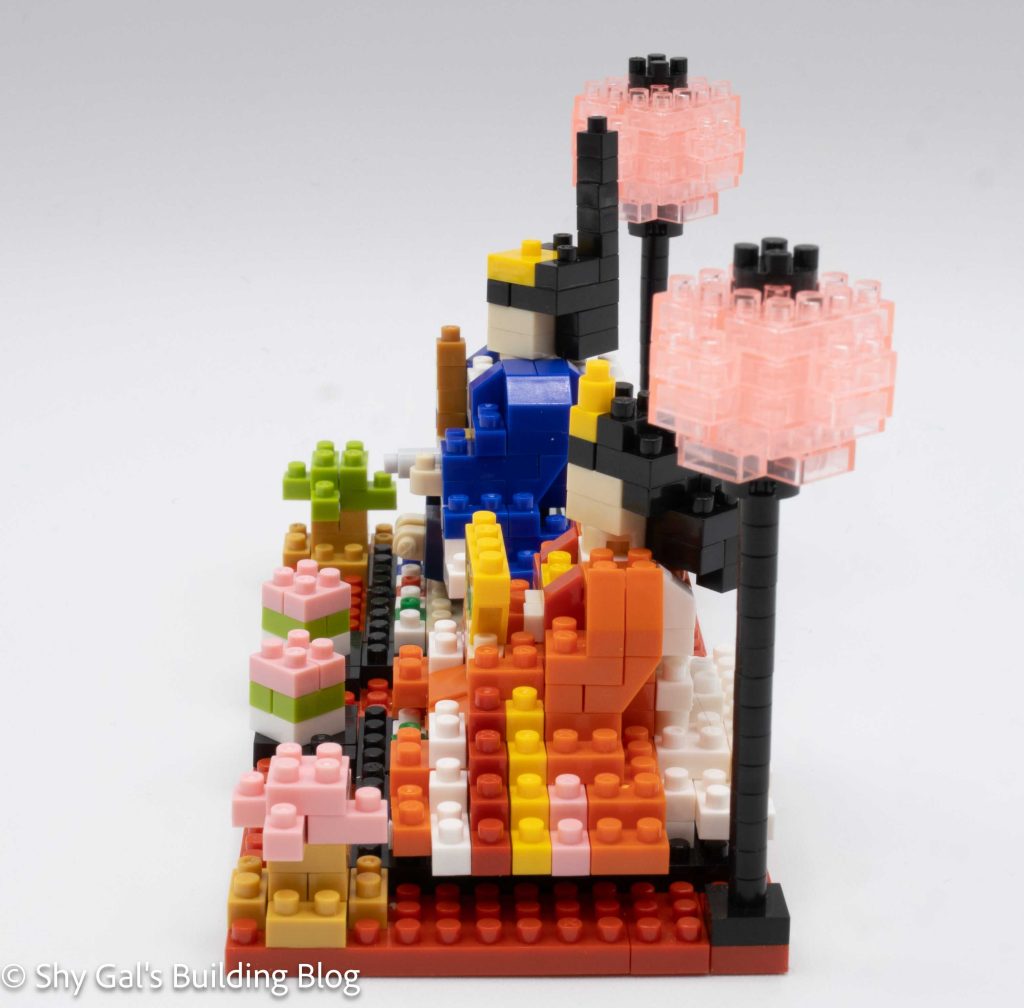
This post is a review of the nanoblock Hina Dolls build. Hina Dolls is part of the nanoblock Sights to See collection. Wondering what else is part of the Sights to See collection? Click here for a list.
Number: NBH_171
Country: Japan
Number of Pieces: 430
Difficulty Rating: 3/5
This build is for the emperor and empress dolls from the traditional girl’s day doll set. These dolls traditionally sit on top of the stand of dolls.
There are several sections to this build, including the base, the empress, the emperor, and the final details.
The base begins with 3 10×10 red square bases. The row took up most of my nanoblock pad, but I was still able to lay out the bricks. Then more red bricks are added to the back to create the entire base layer for the bricks. Next, the details for the pillows that the dolls sit on are added. These details are still visible on the final build so it didn’t feel like a waste adding the details.
The second section is the empress doll. She is built directly on the base in layers. There are a lot of details that make up her kimono, so I needed to be careful when adding each layer to make sure the stripes lined up. Other than the detail, the build was fairly straightforward other than the head. The instructions for the head were clear, but it was a bit challenging to see where the finished sections would end up.
The third section is the emperor doll. He is built off the base and added to the base once the doll is complete. I had a lot of trouble with the emperor. This is because of the Dark Blue bricks. The bricks looked black when I was building the kit, so I kept needing to take sections apart when I noticed I had used the wrong color. It was also very difficult to tell which shade of blue I was supposed to use when looking at the directions, and not every brick had a color pointing to it.
The emperor begins by putting the spine and upper torso together. Then, the legs and hips are built and attached to the main section. Finally, the head is built and attached to the body. I had a bit of difficulty figuring out where exactly the emperor went when I attached him to the base, but I think my final build looks fine.
The last set of steps is to build the details of the platform. This includes lanterns, bonsai trees, and mochi. Each section is very straightforward. The hardest part was moving the finished build once I attached the lanterns because they were so delicate.
Things I liked:
I really like the amount of detail that is added to each of the dolls in this build
Things I didn’t like:
I didn’t like how the multiple shades of blue were handled in the directions
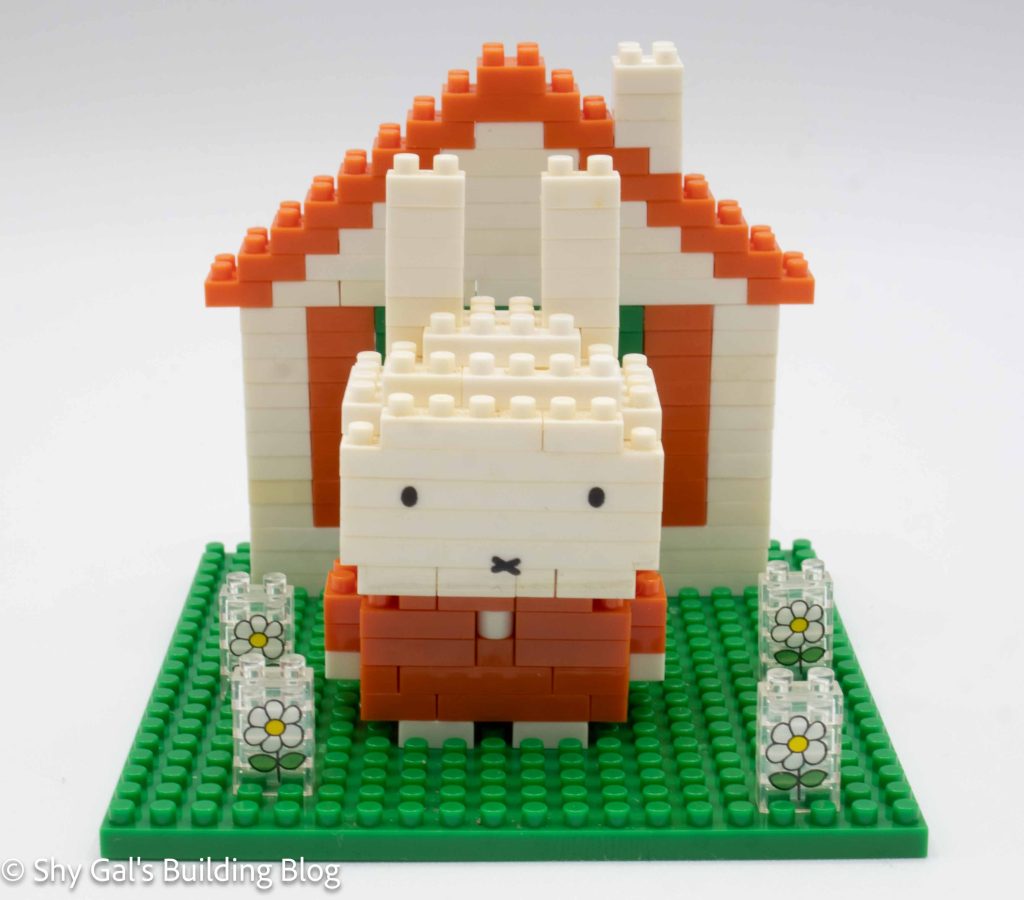
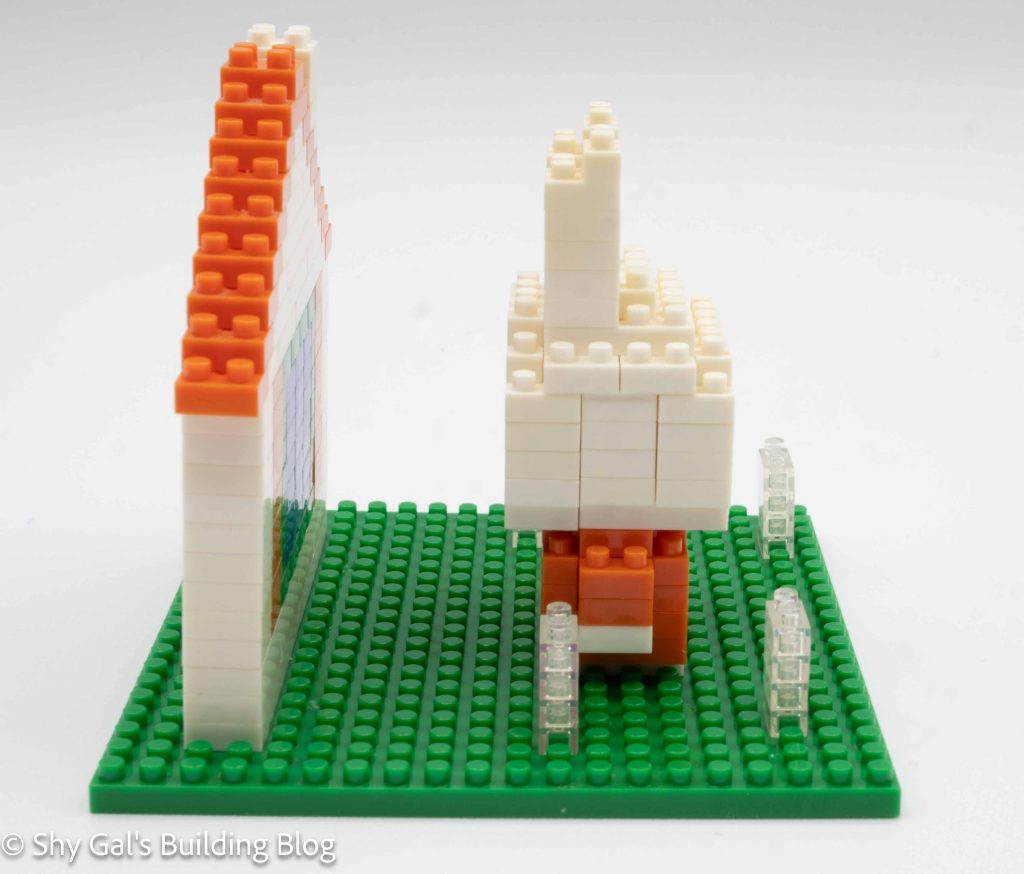
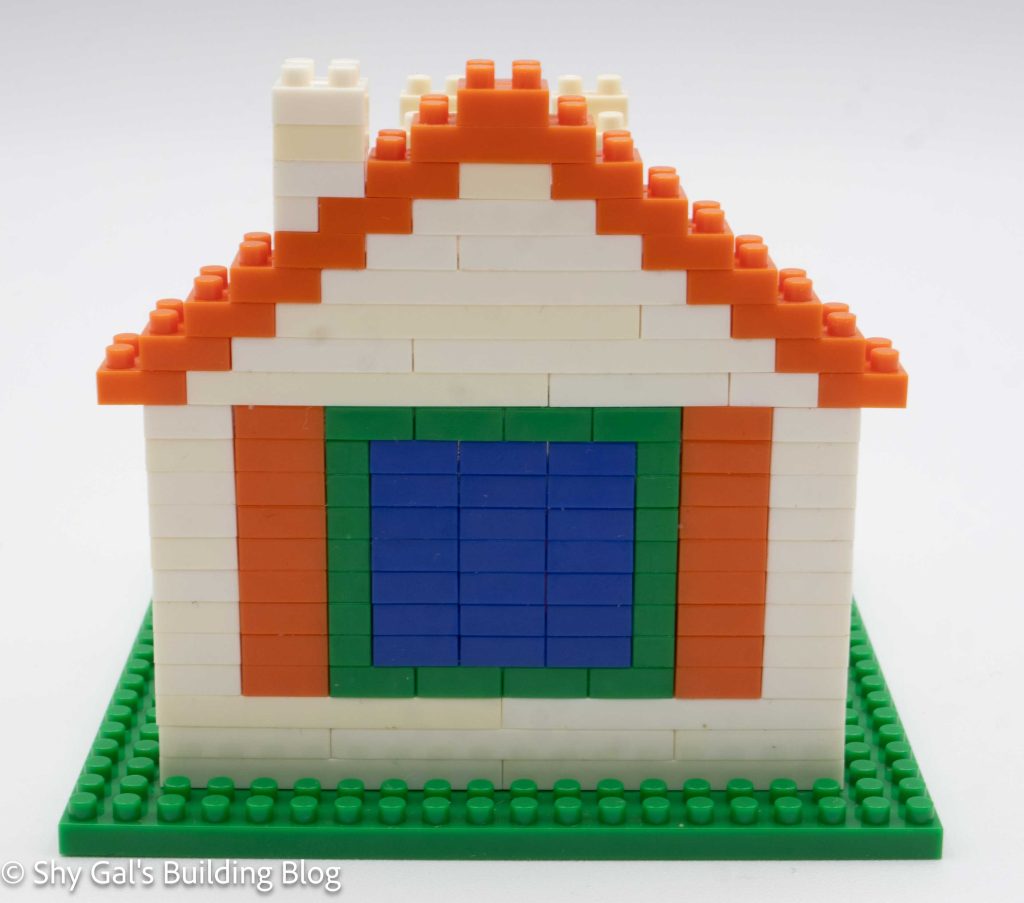
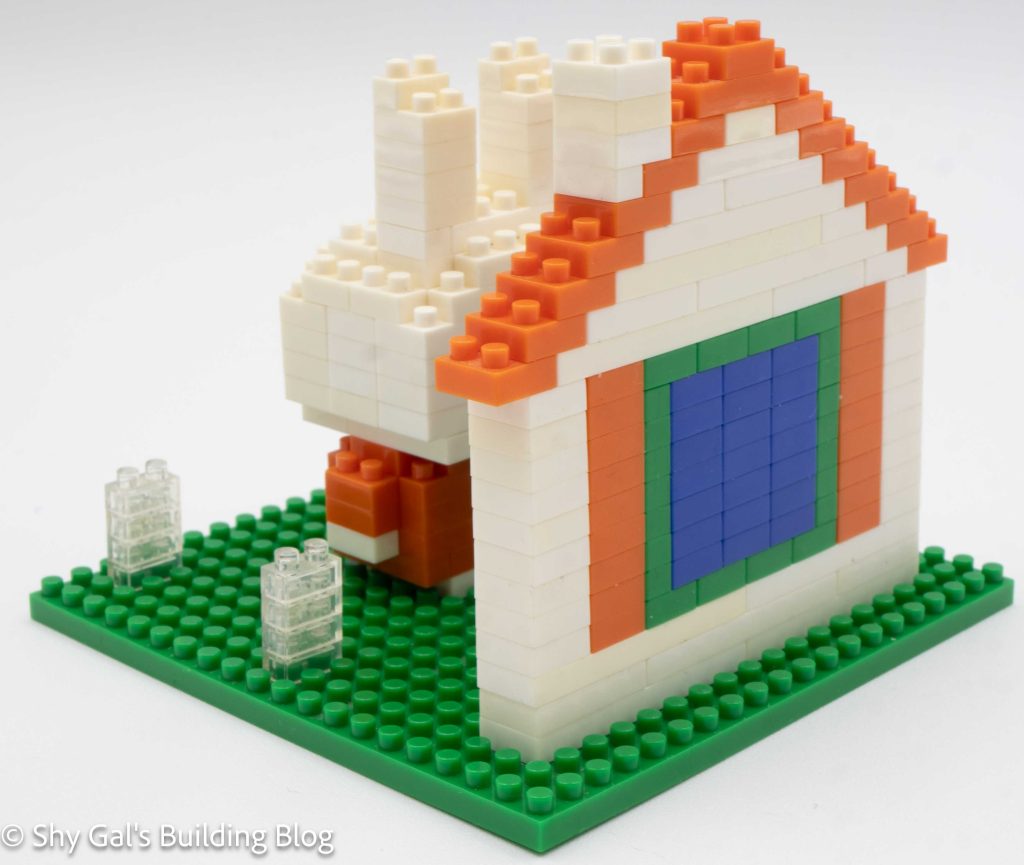
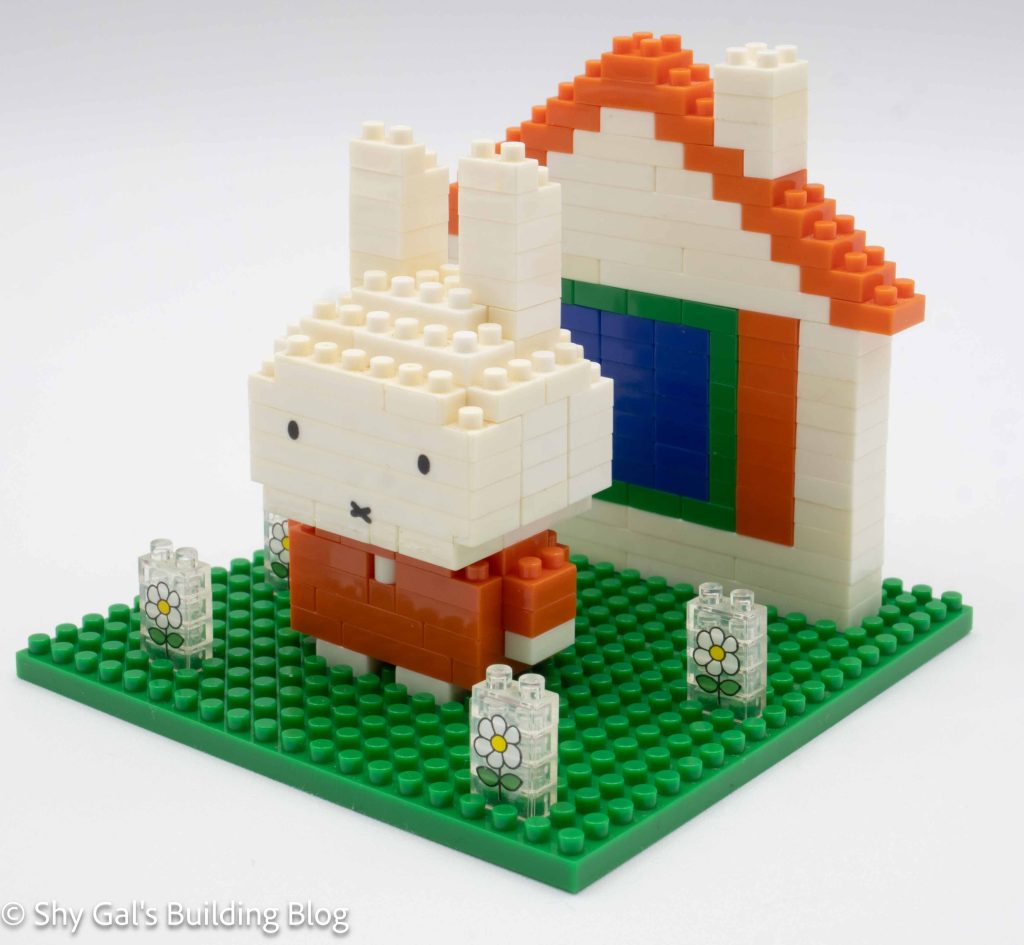
This post is a review of the nanoblock miffy & house build. miffy & house is part of the nanoblock Sights to See collection. Wondering what else is part of the Sights to See collection? Click here for a list.
Number: NBH_013
I bought this kit used. This means miffy had already been built because a sticker is used to create the face. I didn’t get a box when I bought this kit, so I don’t know how many pieces or what the difficulty is.
I bought this kit used, knowing I would at least get the instructions. I ended additionally getting all the bricks to complete the kit. Sadly, however, the white has become yellow with age. The discolored bricks may be visible in my photographs.
The instructions for this kit didn’t include the kit number, so I needed to look that up to get the correct number.
This build is miffy, standing on a green patch of grass with flowers and a house behind her.
Since this kit uses stickers to create the face, miffy came already built. I looked at the instructions to build her and they are very straightforward. The only thing that isn’t clear is when to add the sticker. This is because the kit is so old that there are no English instructions for how to complete the kit.
The house section of the build is also fairly simple. The hardest part is step 2, where several towers of bricks are added with no overlap so the tower can easily be pushed off. Once I added the first couple steps of the roof, all the towers were locked into place and no longer moved.
The flowers also came completed in my kit because they have stickers but were very straightforward if I needed to build them myself
Things I liked:
I like the flowers on the clear bricks and how they add some nice detail to the build
Things I didn’t like:
I’m not a fan of stickers that cover multiple bricks because it means I can’t take the build parts to store it
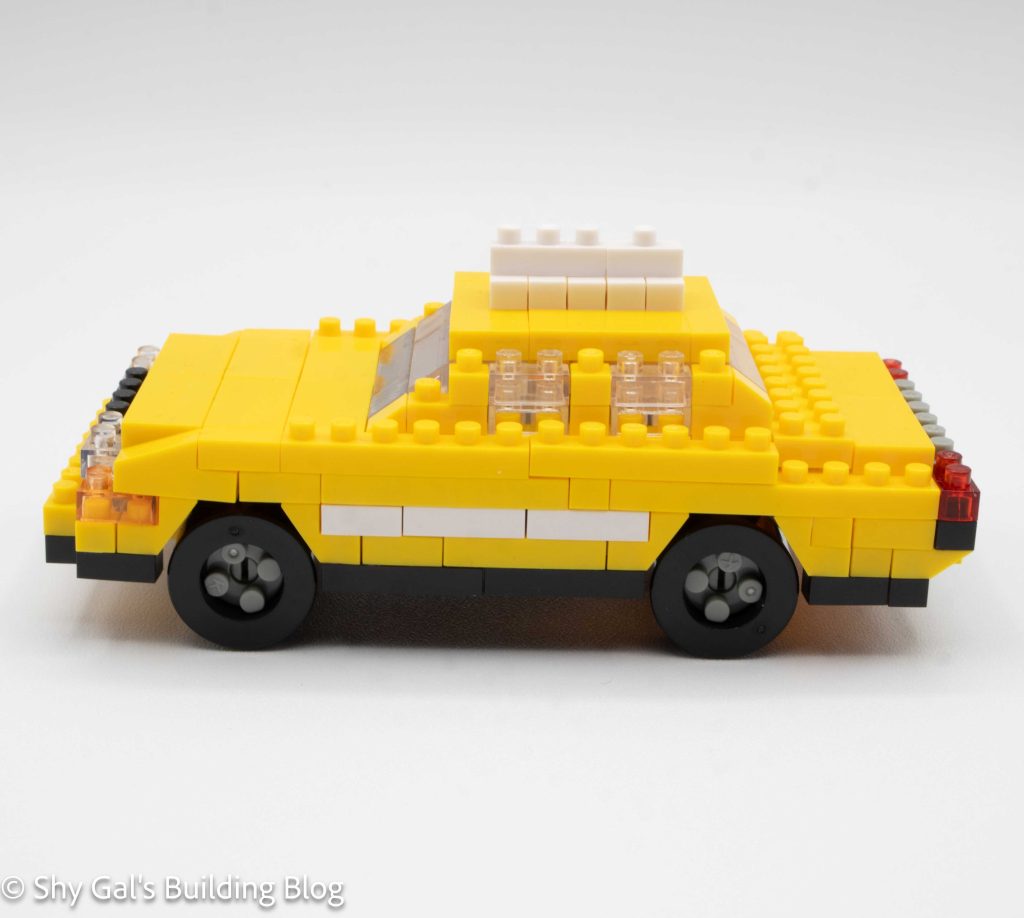
This post is a review of the nanoblock New York Taxi build. The New York Taxi is part of the nanoblock Sights to See collection. Wondering what else is part of the Sights to See collection? Click here for a list.
Number: NBH_114
Country: USA
Difficulty Rating: 2/5
I bought this kit in an auction containing several kits that didn’t have boxes so I don’t have the box for this kit.
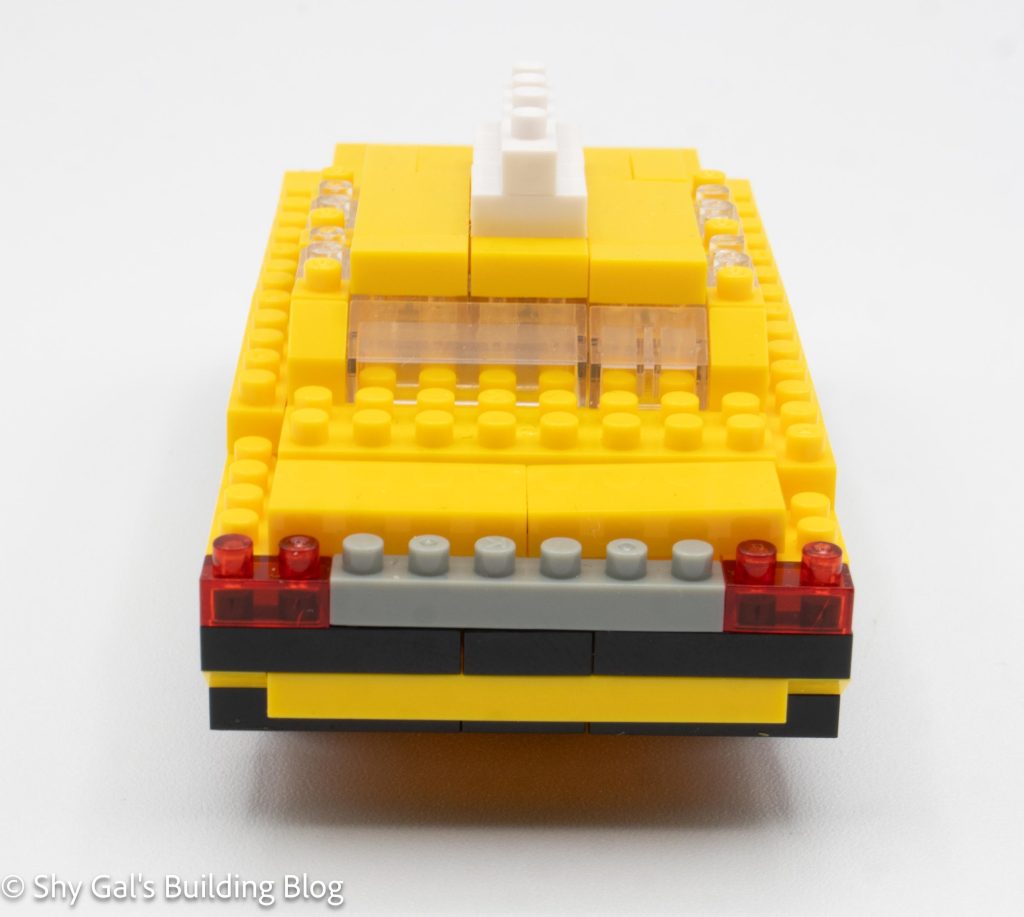
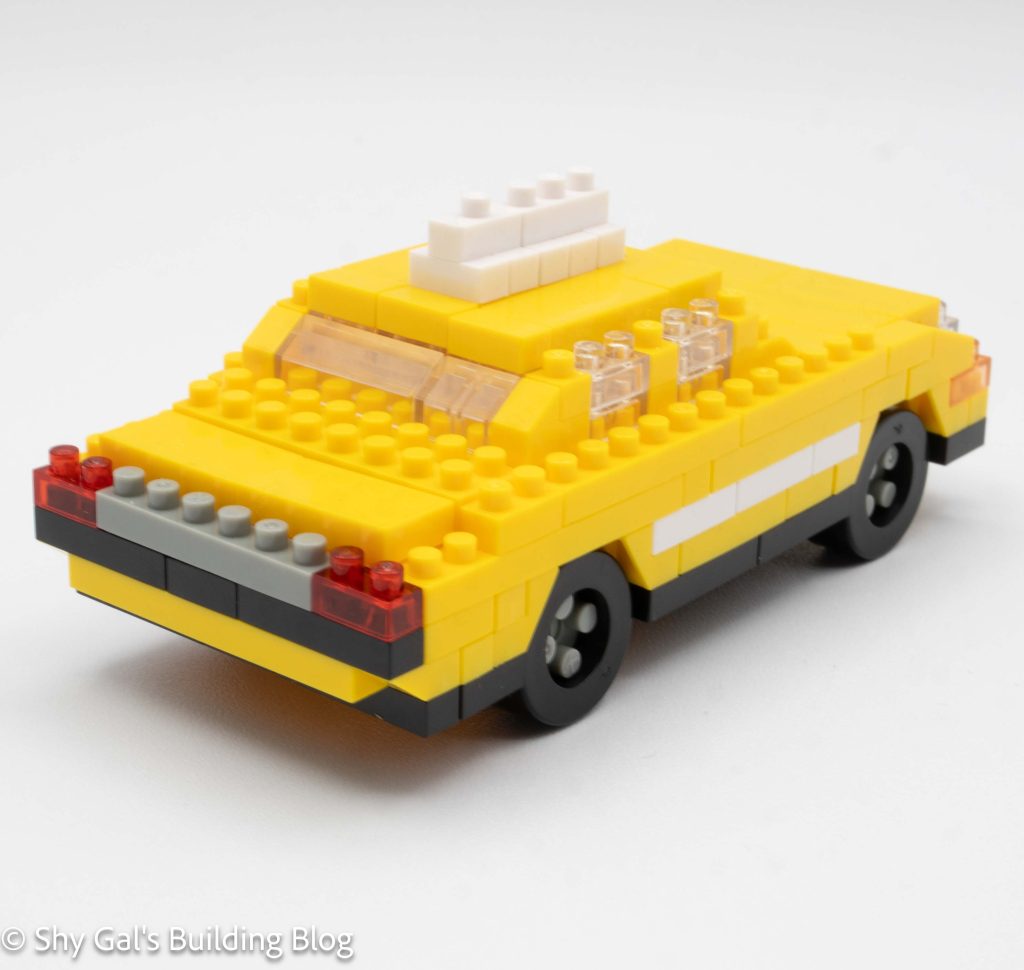
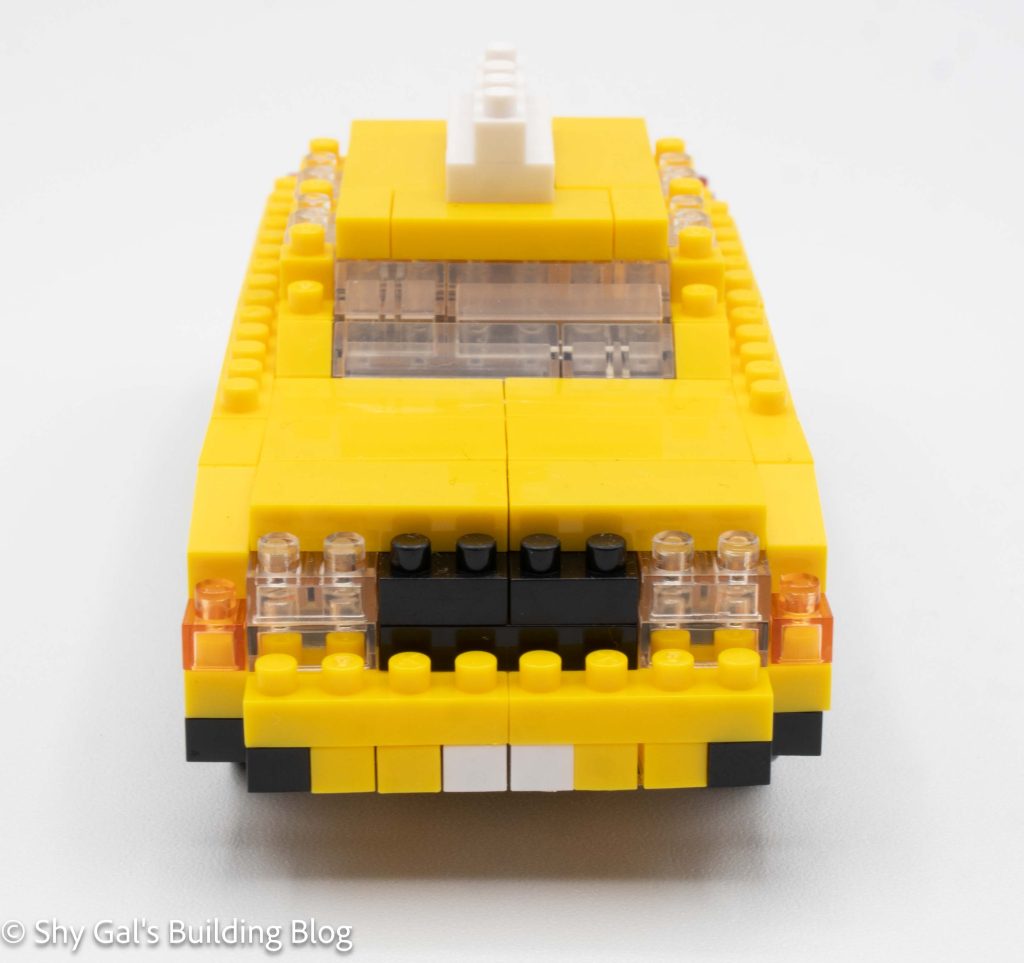
The build begins with building the front bumper of the taxi. The next several steps build up the front bumper some more and the main body of the car. After building the main body of the car, you build the back bumper of the car. At this point, the build is fragile because many little sections are connected, but there aren’t any bricks on top holding the sections in place.
The next step is to puts the hood on the car. It also places bricks on all the segments from the prior steps, holding them in place.
The next several steps add the windows and eventually the roof. I find that the area connecting the roof to the windows is awkward and blocky. Eventually, you add the sign on the top of the taxi.
The final step is to connect the wheels that move to the build.
Things I liked:
I really like that the wheels on the model move
Things I didn’t like:
Overall the build is blocky, which I don’t really like especially compared to the London Taxi
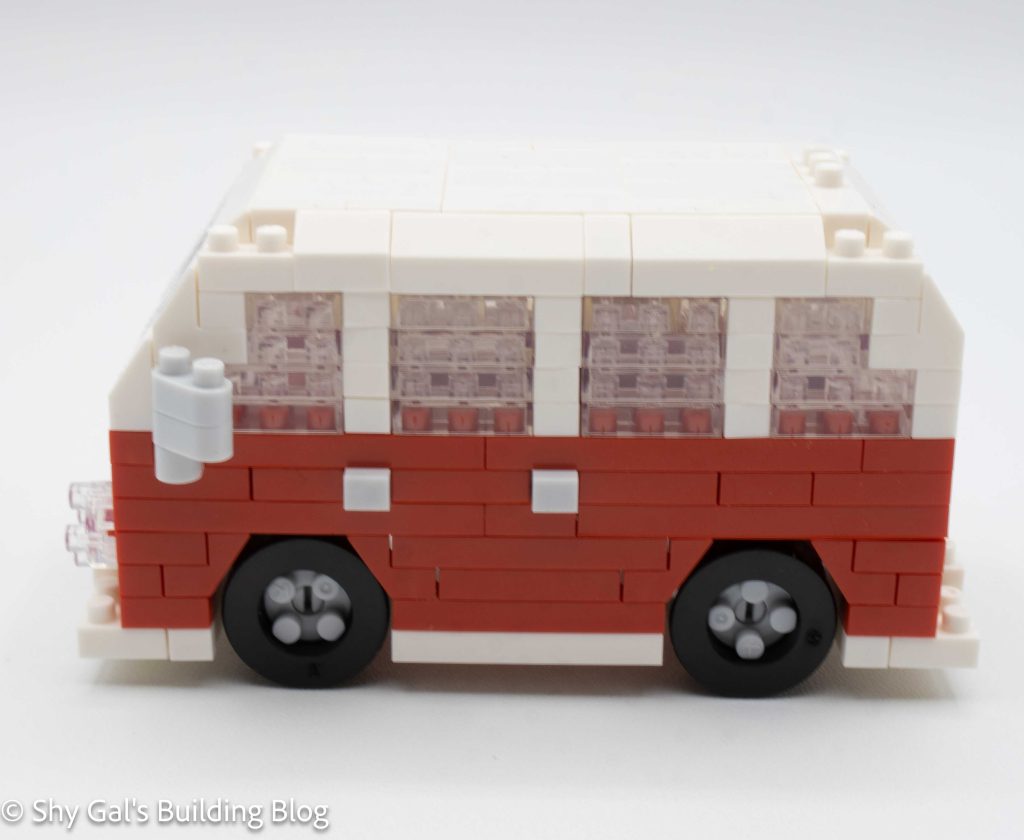
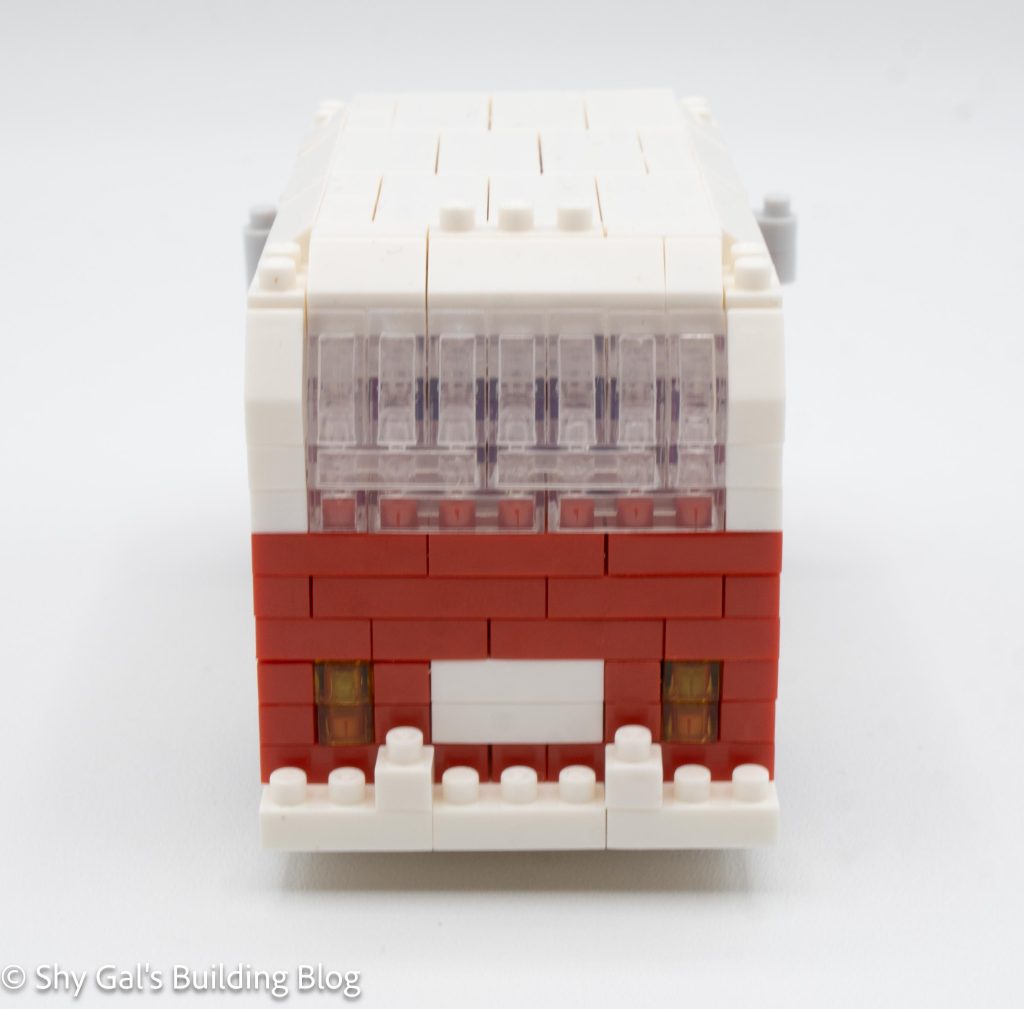
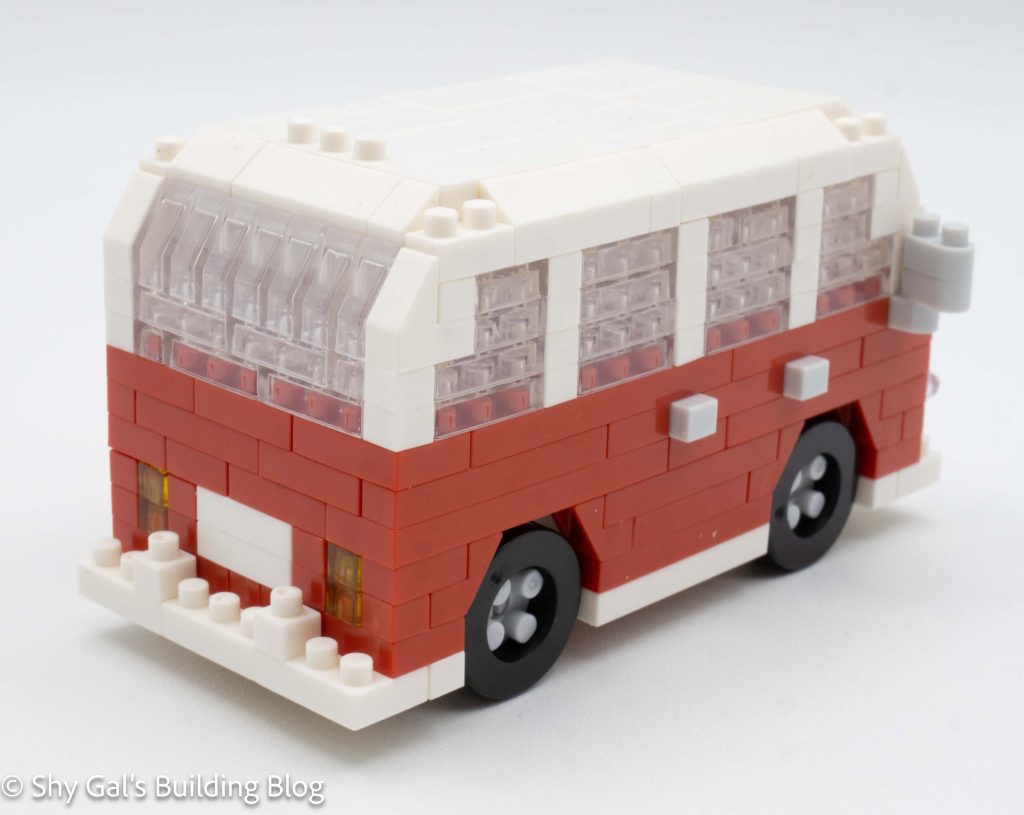
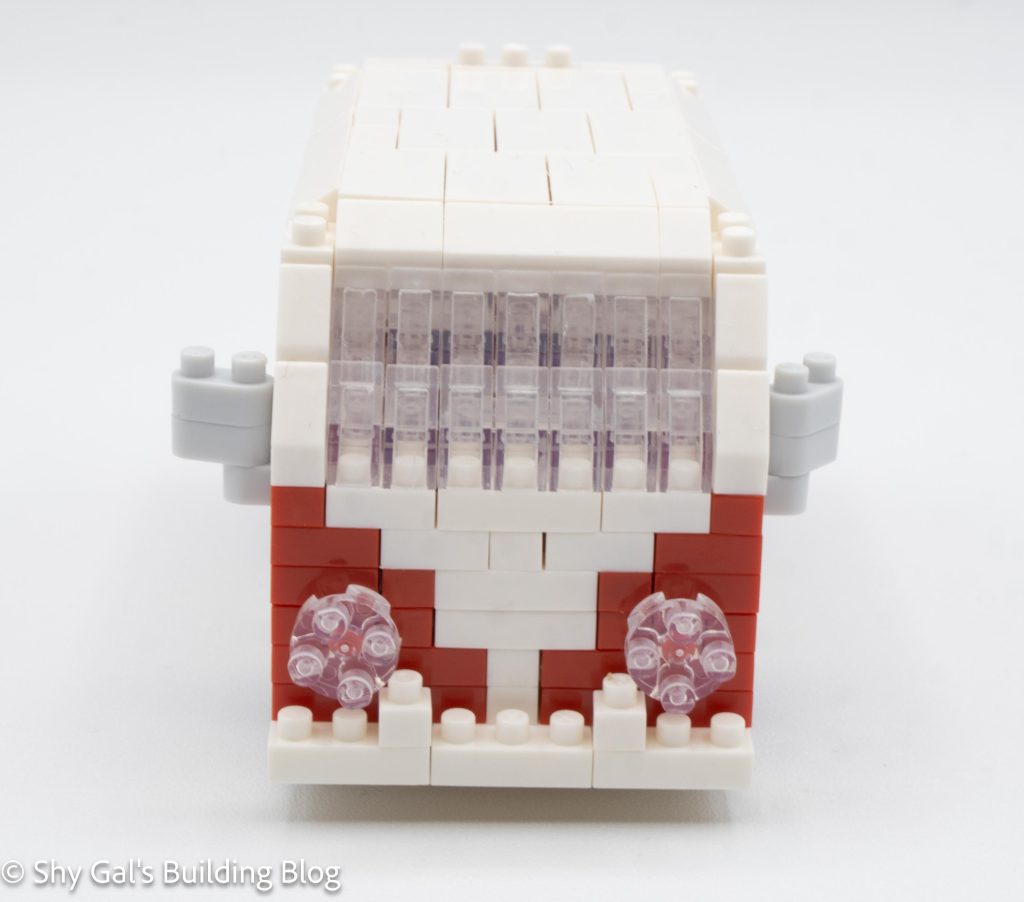
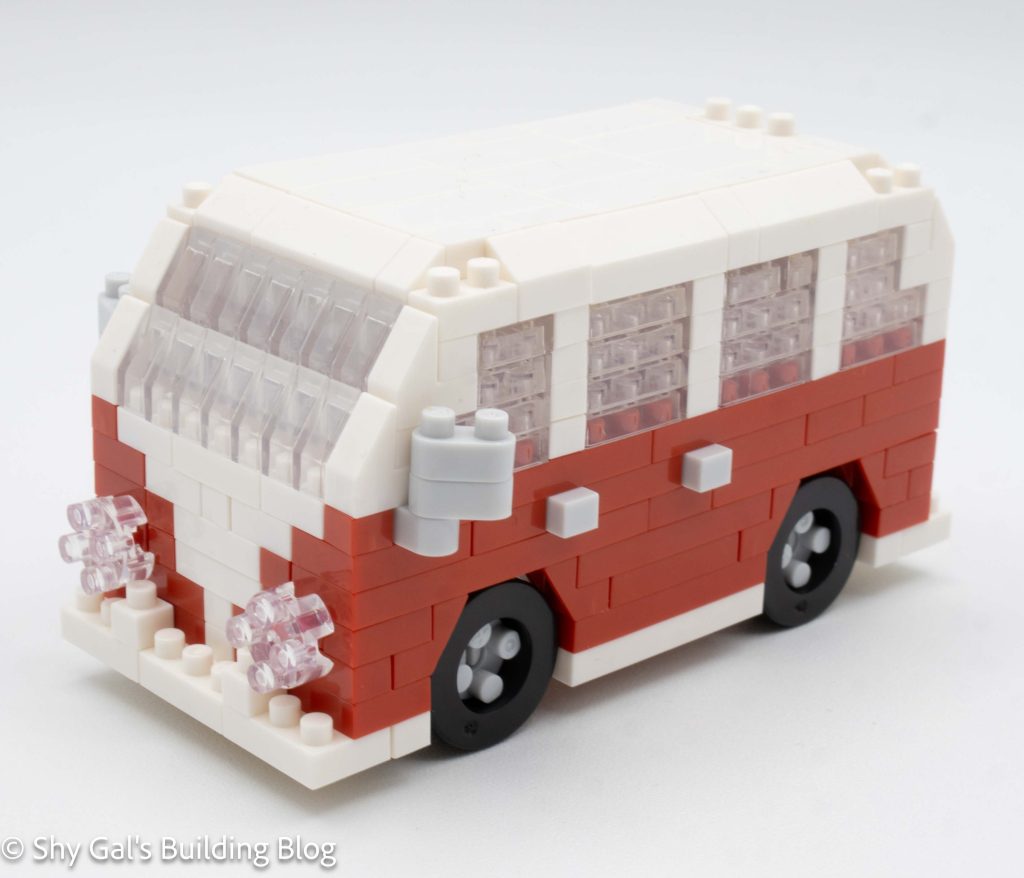
This post is a review of the nanoblock Minivan build. The Minivan is part of the nanoblock Sights to See collection. Wondering what else is part of the Sights to See collection? Click here for a list.
To me, this build looks like the classic Volkswagen vans. I really like how the build is shaped in the classic, familiar shape.
Number: NBH_142
Difficulty Rating: 3/5
I bought this kit in an auction containing several kits that didn’t have boxes, so I don’t have the box for this kit.
The first couple steps of the build are creating the outside frame of the minivan. This step is fairly straightforward as long as you make sure to follow the arrows. I really like the details of the door handles sticking out slightly from the build.
The next steps are to create the windows. On the edge of the windows is a white slanted piece. However, in the kit, there are 2 types of white slanted pieces, and it is hard to tell when to use each piece. Other than that, adding the windows is fairly straightforward for a few layers.
The next step is adding the side view mirrors (unique to this vehicle build) and the roof.
The next few steps create the wheel wells. This also adds the lights on the minivan.
The final step is to attach the moveable wheels to the build.
Things I liked:
I really like it when the vehicle models move like this one
Things I didn’t like:
Since the windows are stacks of not interlocked bricks, if you don’t put the bricks down just so the windows can fall out
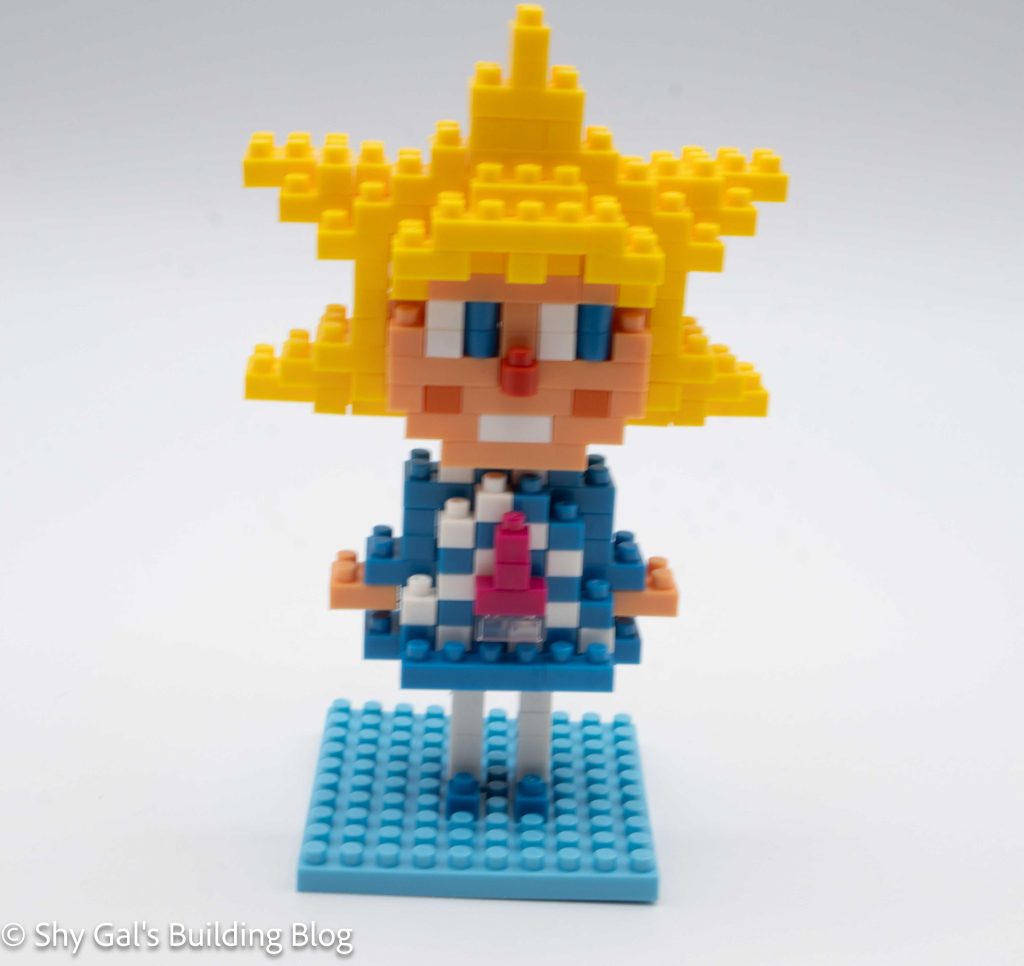
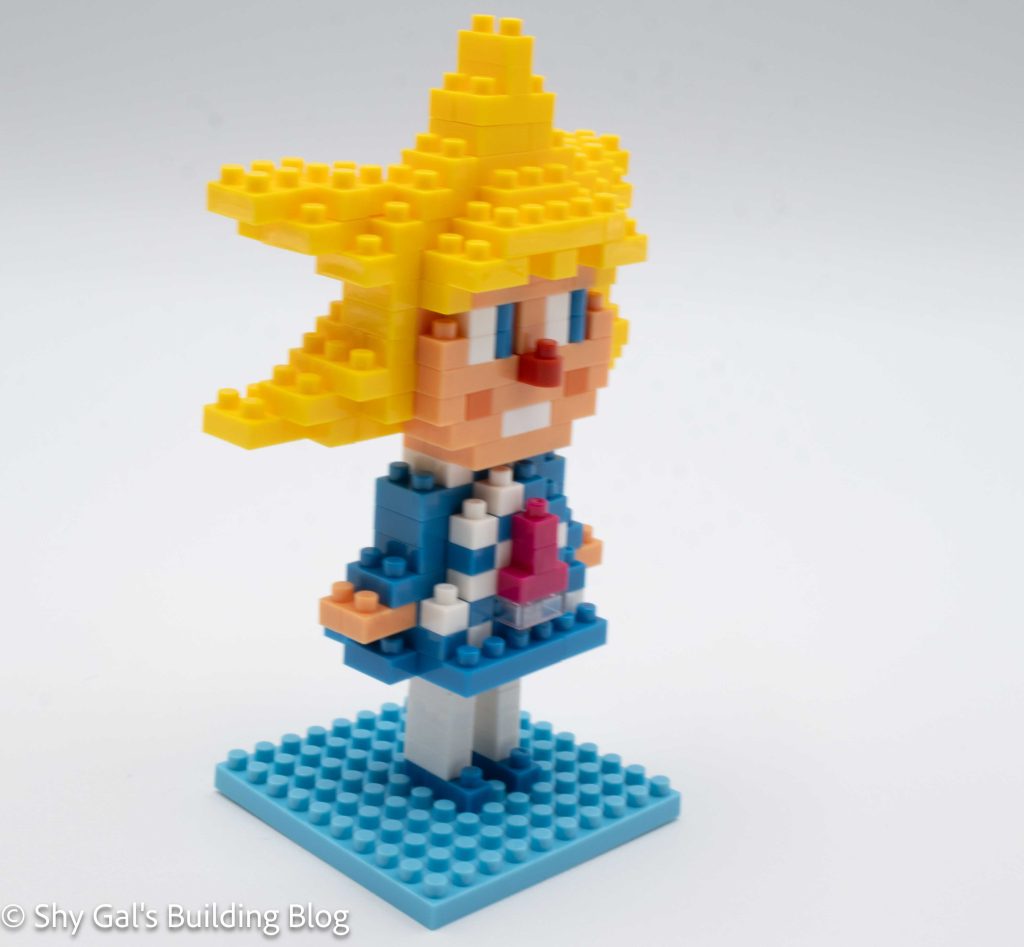
This post is a review of the nanoblock Sorakara-chan build. Sorakara-chan is part of the nanoblock Sights to See collection. Wondering what else is part of the Sights to See collection? Click Here for a list.
Sorakara-chan is the mascot from Tokyo Skytree.
Number: NBH_046
Difficulty Rating: 3
I bought this kit in an auction containing several kits that didn’t have boxes, so I don’t have the box for this kit.
This build is broken up into 3 sections. There is the head, body, and base.
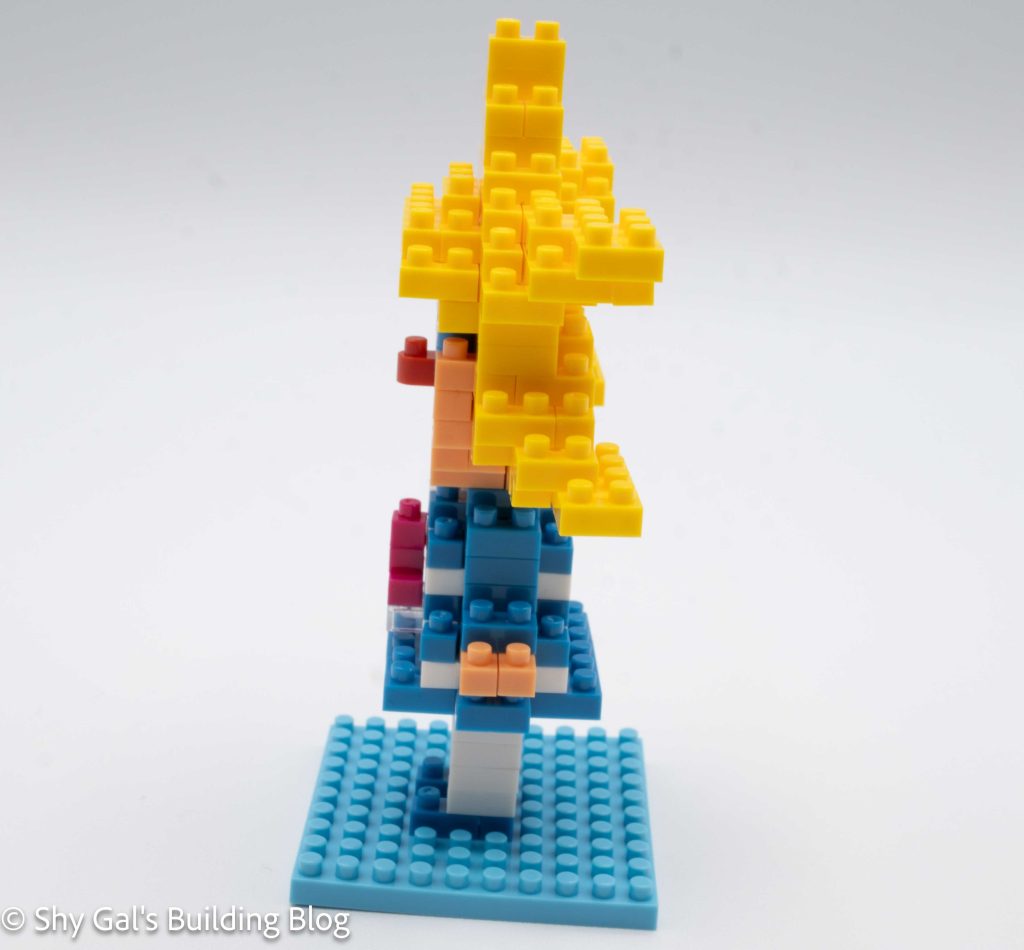
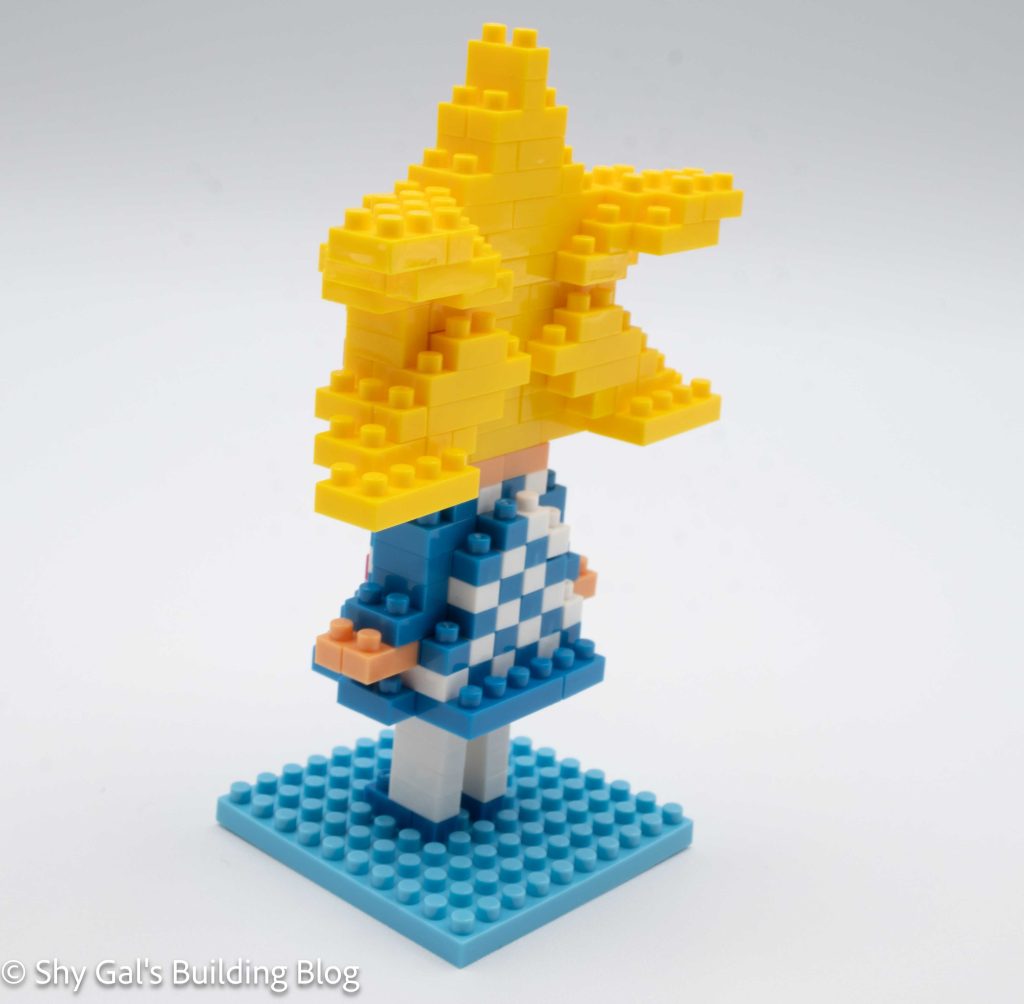
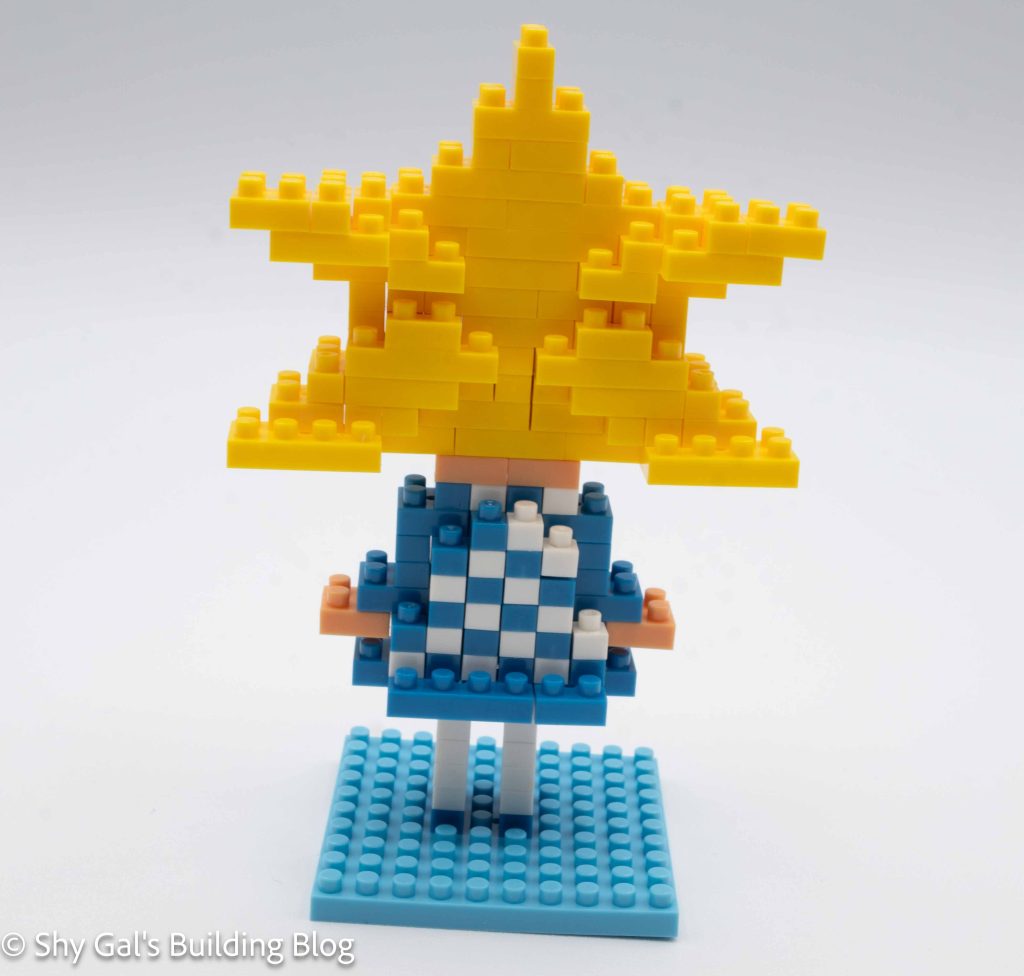
The head is by far the most complicated part of the build. The first few layers go up fairly straightforwardly. After a few layers, you begin adding all the points to her star-shaped hair. A few steps create the back of her head which are a bit hard to follow. The rest of the star points are created by adding layers to the top of the head section.
The body is straightforward if you are careful to make sure you select the correct color. It goes up in simple layers however, each layer switches off between white and blue. This creates the pattern of Sorakara-chan’s dress.
The final section is the baseplate. You only need to add her feet and legs to the final build.
The final step is to connect all the sections. Centering the body section is a bit tricky because the body is even and the space for the legs is odd. The head is easy to attach.
Things I liked:
I really like her hair and how many angles are created with the nanoblock
Things I didn’t like:
I wish the base was a different color because it makes for a lot of blue