Review of nanoblock Sitting Doraemon NBCC_074

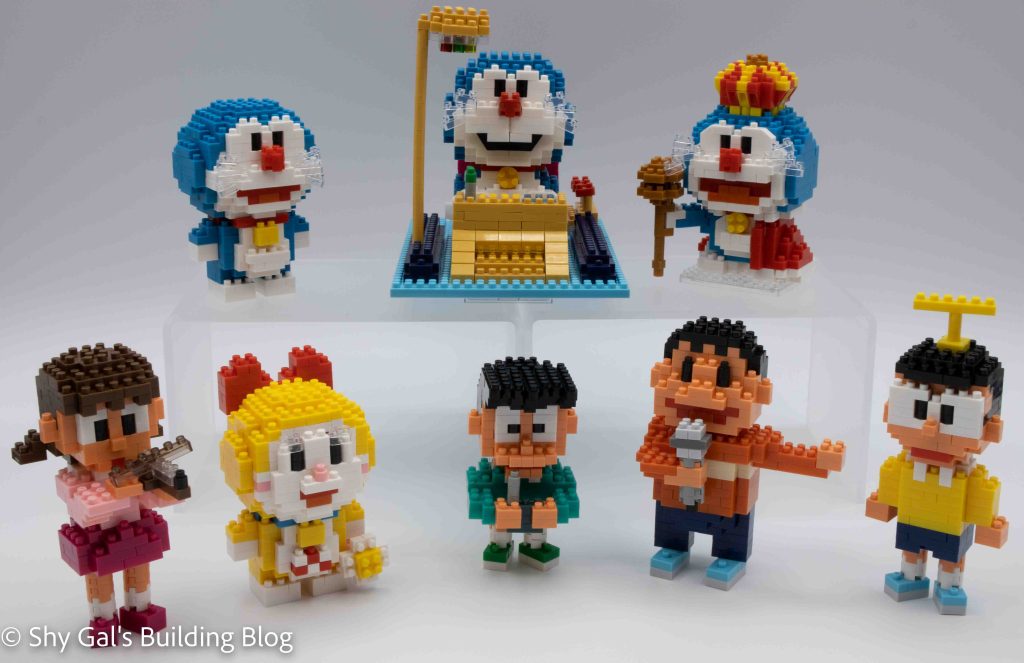
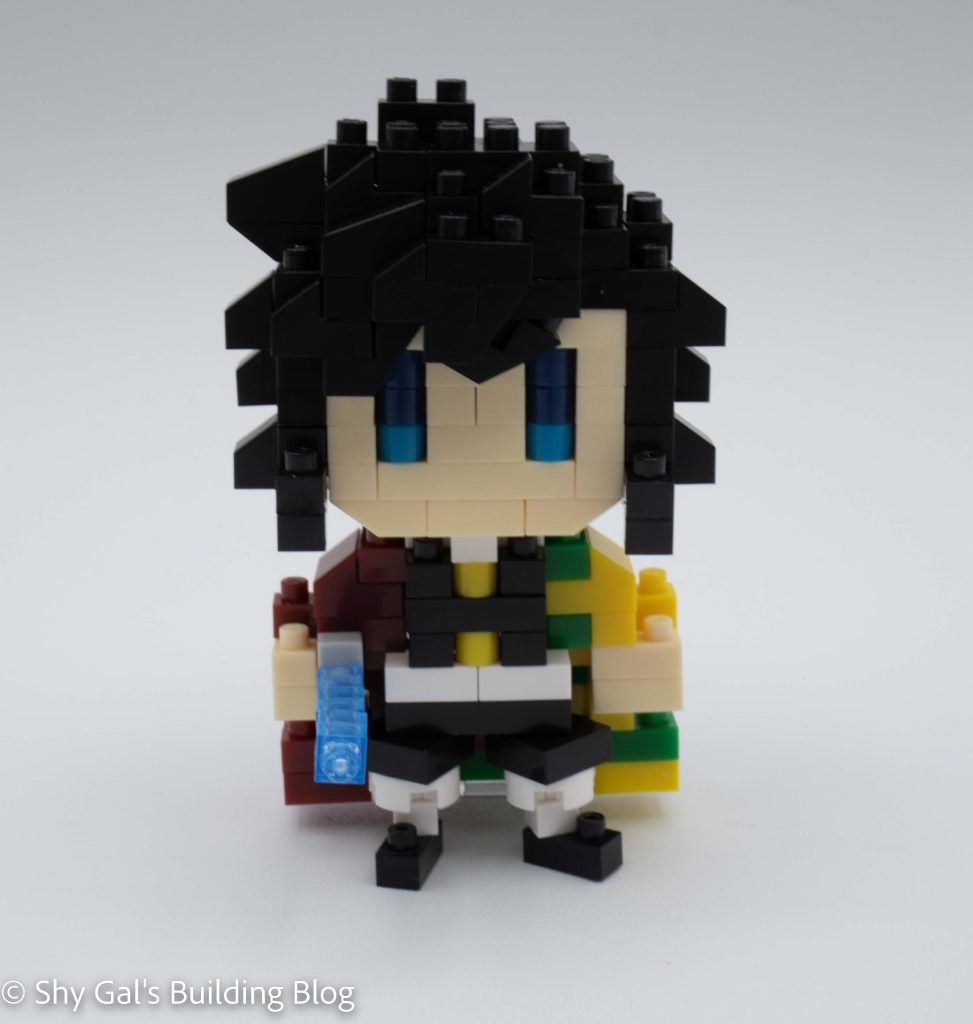
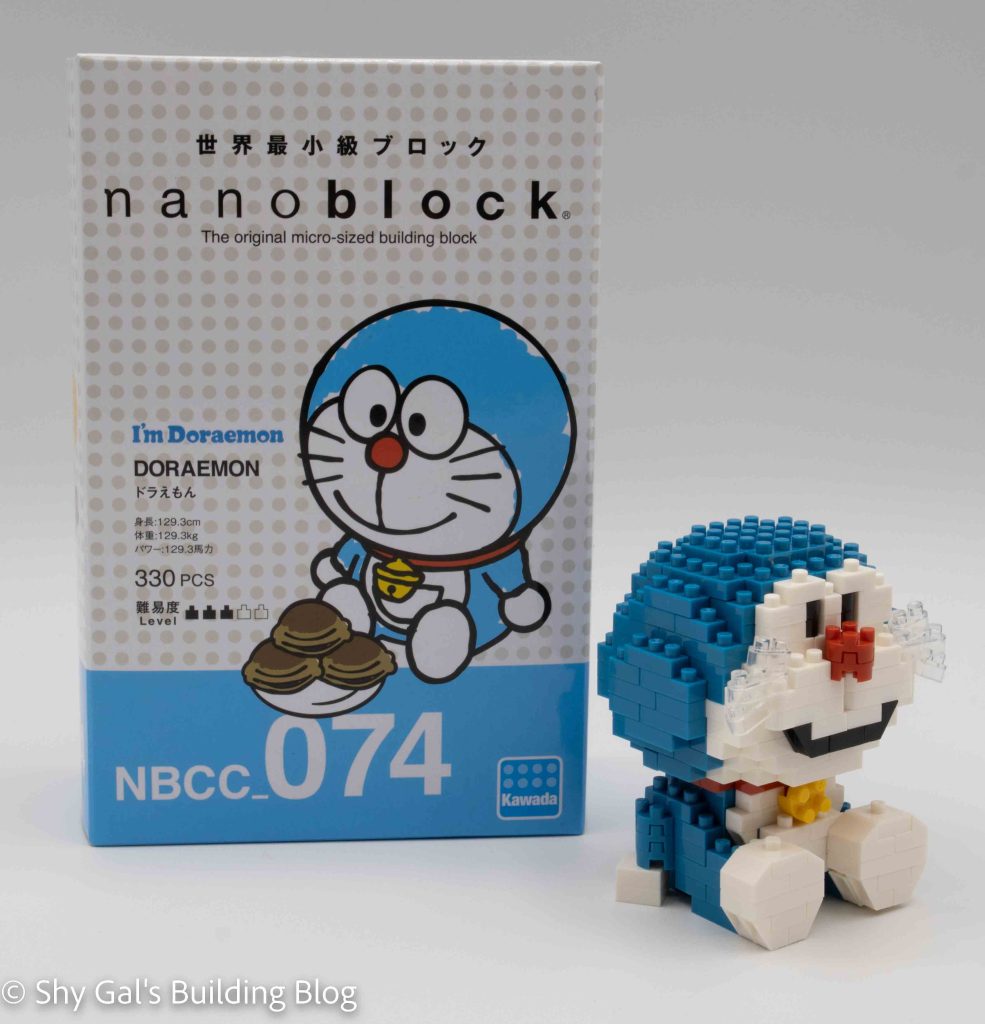
This post is a review of the nanoblock Doraemon build. The Doraemon is part of the nanoblock Character Collection. Wondering what else is part of the Character Collection series? Click Here for a list.

Number: NBCC_074

Number of Pieces: 330

Difficulty Rating: 3/5

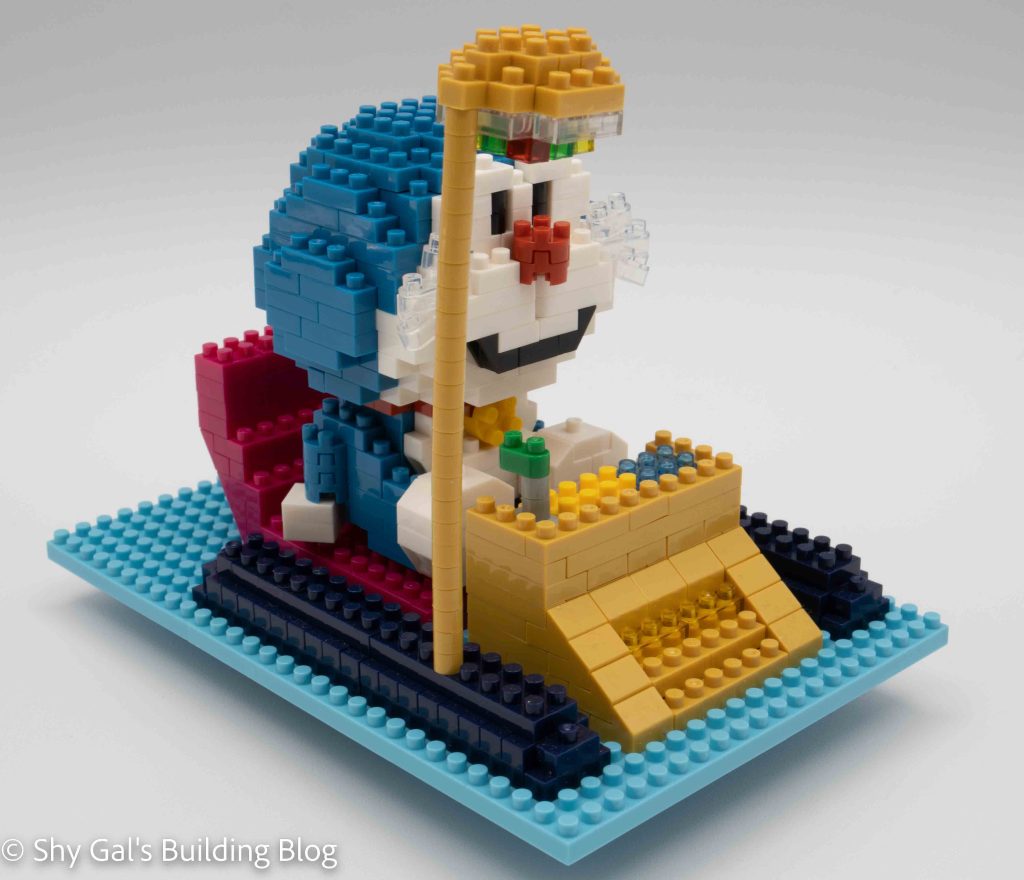
Doraemon is a little robot from an anime for little kids. He has sorts of tools that he uses to help a little boy. He holds a special place in my heart since it was the only TV show I could understand while I was studying in Japan. I bought this kit to have him sit inside the Time Machine build.

You begin the build by creating the body. You start with a blue base that makes up the body’s core. You then add the white and adding the details of the feet. Next, you add the little red brick that makes up the tail. You then build up the feet and body by adding layers. Eventually, you get to add on arms and Doraemon’s little bell. The last stage of the body is adding the red that both holds the head and forms the collar.

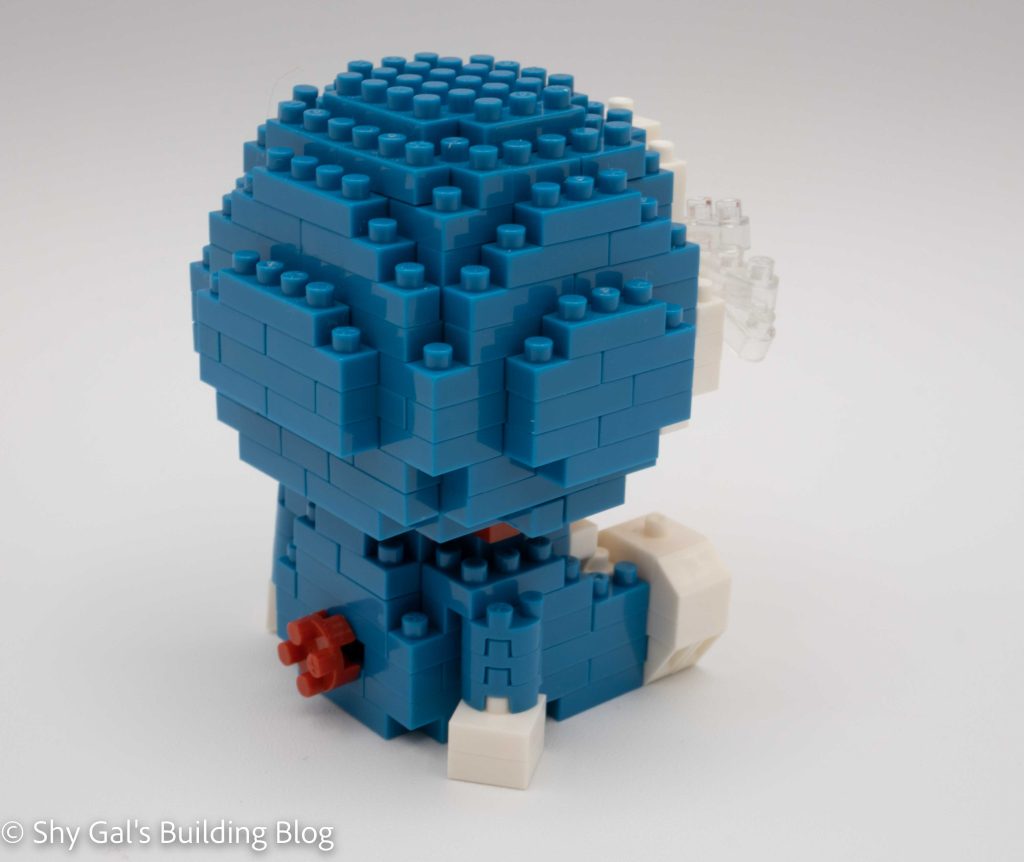
The next part of the build is creating the head. I was thrilled that I had my nanoblock pad for this build. This is because you regularly add to the base with pieces connecting on the second layer over the first few steps. Once you have completed the first and second layers, you build up the head like usual. It is a general sphere build where you build the outside with a hollow inside. As you make the head, you add the details of the eyes, nose, and eyes. The final step of Doraemon is adding his whiskers. These are tricky because you are setting them at an angle instead of stacking bricks. I found it easier to put the main brick on the model first and then adding the slanted bricks.

Overall I really liked the Doraemon build. I think he is highly recognizable with great coloring. I like that there are details like the curved feet and the bell.

Things I liked:

  • The amount of detail in the character
  • I really like that Sitting Doraemon fits in the Time Machine build (Shown above)

Things I didn’t like:

  • The base of the head would have been hard without a nanoblock pad

nanoblock I’m Doraemon Collection

Doraemon is a long-running Anime in Japan. There are several TV shows, manga, and movies. It’s been running for over 50 years.

Doraemon is a robot cat sent back in time to help Nobita become a better person. The show features Doraemon, Nobita, and the kids that Nobita interacts with. Doraemon also has a lot of gadgets to try and get Nobita to improve as a person.

Most of the builds featuring Doraemon and character are part of the NBCC line, but there are some in other lines.

Set NumberSet Character
NBCC_036Doraemon
NBCC_037Nobita
NBCC_038Dokodemo Door & Small Light & Take Copter
NBCC_039Gian
NBCC_040Suneo
NBCC_041Shizuka
NBCC_042Dorami
NBCC_074Sitting Doraemon
NBCC_075Nobita (Lying Down)
NBCC_076Time Machine

Review of nanoblock Raikou NBPM_089

Raikou build and box

This post is a review of the nanoblock Raikou build. Raikou is part of the nanoblock Pokemon collection. Wondering what else is part of the Pokemon Collection? Click Here for a list.

Number: NBPM_089

Number of Pieces: 250

Difficulty Rating: 3/5

Raikou front view

Raikou is one of the elemental legendary Pokemon along with Entei and Suicune from generation 2. It is the thunder elemental Pokemon.

The nanoblock builds for the generation 2 legendaries are all very detailed, so I’m excited to build them all. Raikou looked to me to have the most detail of the 3 builds.

The build begins with base layers to create the basics of the body. After building the first few layers of the body, you build the basics of the head and attach it to the body.

Raikou side view

After attaching the base layers of the head, the rest of the main body and head are built up in layers. When you add the ears, it’s hard to tell where exactly the bricks you are adding are in the directions.

Then it’s time to add details like fangs, legs, and tail. Each detail is fairly straightforward. The tail was a bit tricky because of the chaining, so it was hard to not press too hard, causing the bricks to pop off.

Raikou back 3/4 view

Things I liked:

  • I really like the amount of detail in Raikou
  • I think that the colors are super accurate for the Pokemon

Things I didn’t like:

  • There is some chaining which makes it hard to keep things exactly where I want the bricks

Review of nanoblock Kyojuro Rengoku NBCC_094

Kyojuro Rengoku build and box

This post is a review of the nanoblock Kyojuro Rengoku build. Kyojuro Rengoku is part of the nanoblock Character collection. Wondering what else is part of the Character Collection? Click Here for a list.

Number: NBCC_094

Number of Pieces: 200

Difficulty Rating: 2/5

Kyojuro Rengoku front view

Kyojuro Rengoku was a member of the Demon Slayer Corps in the Demon Slayer Anime. For more information about him, check out the fandom wiki page. For more information about the nanoblock builds, check out my collections page for links to other reviews.

This nanoblock build is split into 2 parts. There is the head and the body.

The head is lined up straight, so it is an easy base. Then you build the head in layers like a normal nanoblock build. As you build the head, you will add the details of the eyes. Kyojuro has long blond hair, which means that his hair is part of both the head and body build. You build the head in layers, and once it is complete, it’s time to build the body.

Kyojuro Rengoku back 3/4 view

In creating the body, first, you build the edges of the top, which is basically a bar of each color. You build the bar up until you add the arms and the rest of the body. This is also where you build an extra level of depth to be able to add the hair to his back. Once you attach the hair in the back, you add the hips and the legs. A stack of clear brick keeps the build from tipping over.

The final steps of the build are to attach the head to the body and to build and attach the sword.

Kyojuro Rengoku front 3/4 view

Things I liked:

  • how the long hair is created

Review of nanoblock Entei NBPM_090

Entei built and box

This post is a review of the nanoblock Entei build. Entei is part of the nanoblock Pokemon collection. Wondering what else is part of the Pokemon Collection? Click Here for a list.

Number: NBPM_090

Number of Pieces: 240

Difficulty Rating: 3/5

Entei front view

Entei is one of the elemental legendary Pokemon, along with Raikou and Suicune from generation 2. It is the fire elemental Pokemon.

The nanoblock builds for the generation 2 legendaries are all very detailed, so I’m excited to build them all. Entei looks the oddest to be because of the way its coat looks.

This build begins by laying out the entire body in layers. When I originally built the body, I wasn’t careful to read the instructions for which grey to use. This meant I ran out of bricks and needed to start the body again.

Entei side view

Other than the grey issue, the build was mostly straightforward. The head details are simply attached to the front of the body. I really like how Entei’s face turned out.

One of the final details that are added is the details of the smokey coat. Unfortunately, to me, his coat looks a lot more blocky than the actual Pokemon. I’m not sure how the coat could look softer and more like smoke.

Entei back 3/4 view

Things I liked:

  • The detail in the face

Things I didn’t like:

  • The fur on Entei’s back looks very blocky and not very soft

Review of nanoblock Shinobu Kocho NBCC_093

Shinobu Kocho build and box

This post is a review of the nanoblock Shinobu Kocho build. Shinobu Kocho is part of the nanoblock Character collection. Wondering what else is part of the Character Collection? Click Here for a list.

Number: NBCC_093

Number of Pieces: 220

Difficulty Rating: 2/5

Shinobu Kocho front view

Shinobu Kocho is a member of the Demon Slayer Corps in the Demon Slayer Anime. For more information about her, check out the fandom wiki page. For more information about the nanoblock builds, check out my collections page for links to other reviews.

This nanoblock build is split into 2 parts. There is the head and the body.

The head is lined up straight, so it is an easy base. Then you build the head in layers like a normal nanoblock build. As you build the head, you will add the details of the eyes. One of the most noticeable things about this head is the hair. She has hair framing her face, and her hair is pulled up into a bow in the back. As you build the head, you will add the details to create these elements in the hair. I also liked how the purple accents in her hair, but I wish they had used the true purple bricks.

Shinobu Kocho 3/4 back view

Next, you build the body. This is notable because there are several different colors in layers as you build up. In creating the build, first, you build the edges of the top, which is basically a bar of each color. You build the bar up until you add the arms and the rest of the body. Then you add the hips and the legs. This build has a nice detail in that the legs are at different depths. There is a clear brick to keep the build from tipping over.

The final steps of the build are to attach the head to the body and to build and attach the sword.

Shinobu Kocho 3/4 front view

Things I liked:

  • The details for the legs do not line up in terms of depth
  • The accents in the hair

Things I didn’t like:

  • I wish they had used the true purple instead of the more plum-colored bricks

Review of nanoblock Ho-Oh NBPM_033

Ho-Oh build and box

This post is a review of the nanoblock Ho-Oh build. Ho-Oh is part of the nanoblock Pokemon collection. Wondering what else is part of the Pokemon Collection? Click Here for a list.

Names:

  • English: Ho-Oh
  • Japanese: Houou

Number: NBPM_033 

Number of Pieces: 180

Difficulty Rating: 4/5

Ho-Oh front view

Ho-Oh is an unusual nanoblock Pokemon build because it has a difficulty of 4/5. I think it is because it is a challenge to build the wings and tail and getting things to line up correctly. The build has 5 major sections to this nanoblock build. There is a head, a body, 2 wings, and a tail.

The first step is to build the body. It starts with a base layer of white bricks. As you build the body in layers, you will add red for the top of the body and green for the neck.

The second step is to build the head. The head starts is a narrow layer of bricks, and then you build up the head in layers. I really like how the eyes are added to the head. The final step in building the head is adding the crown using yellow bricks. You attach the head to the body but be warned it will now fall over if you try and set it on the base.

Ho-Oh side view

The next step is to build the wings. The process is mirrored between the two wings. The wings are built by having bricks hanging over in each layer. I had some difficulty tracking which layer I was on when I set down the wing for a few minutes, and I picked it up again. I also had a hard time squaring up the white and green bricks. Each wing gets attached, and the build will sit stably when both wings are attached.

Next, you have a quick step to add the feet. It is very straightforward and clear.

The final step is to build the tail. It comes together by putting several small chunks together to create the idea of an open tail. Overall, each chunk is straightforward. However, I had some difficulty telling where exactly to attach to the chunk. I’ve also noticed that each chunk of the tail seems to be loosely connected, so it moves every time I move the build.

Ho-Oh bak 3/4 view

Things I liked:

  • There is a lot of detail for how early in the Pokemon collection this build is.

Things I didn’t like:

  • Overall the build just seems a little loose, and I’m worried about how well it will stay in place long-term. The tail has already shifted without me moving it much.

Review of nanoblock Giyu Tomioka NBCC_092

Giyu Tomioka build and box

This post is a review of the nanoblock Giyu Tomioka build. Giyu Tomioka is part of the nanoblock Character collection. Wondering what else is part of the Character Collection? Click Here for a list.

Number: NBCC_092

Number of Pieces: 200

Difficulty Rating: 2/5

Giyu Tomioka front view

Giyu Tomioka is a member of the Demon Slayer Corps in the Demon Slayer Anime. For more information about him, check out the fandom wiki page. For more information about the nanoblock builds check out my collections page for links to other reviews.

This nanoblock build is split into 2 parts. There is the head and the body.

The head is lined up straight so it is an easy base. Then you build the head in layers like a normal nanoblock build. As you build the head, you will add the details of the eyes. One of the most noticeable things about this head is the hair. In the anime, his hair is messy in a ponytail. As you build the head, you add these defining details to the model.

Giyu Tomioka back view

Next, you build the body. This is notable because there are several different colors on the top while most of the tops are single-colored. In creating the build, first, you build the edges of the top which is basically a bar of several colors. You build the bar up until you add the arms and the rest of the body. Then you add the hips and the legs. There is a clear brick to keep the build from tipping over.

The final steps of the build are to attach the head to the body and to build and attach the sword.

Giyu Tomioka front 3/4 view

Things I liked:

  • The detail in the hair was a nice change of pace
  • The added detail of having the various colors in the jacket

Things I didn’t like:

  • A downside of the colors in the jacket is less study than a normal nanoblock build

Review of nanoblock Lugia NBPM_032

Lugia build and box

This post is a review of the nanoblock Lugia build. Lugia is part of the nanoblock Pokemon collection. Wondering what else is part of the Pokemon Collection? Click Here for a list.

Number: NBPM_32

Number of Pieces: 210

Difficulty Rating: 3/5

Lugia front view

Lugia is one of the 2 legendary Pokemon from generation 2. Lugia is the mascot Pokemon for Pokemon Silver.

The Lugia build is the first build where the directions went onto the backside of the pages for a total of 46 total steps. Unlike a lot of builds, it isn’t broken down into smaller steps.

Lugia front 3/4 view

Some of the steps are hard to tell precisely where the bricks go on a layer. I found Lugia’s arms much easier to build than Charizard’s wings.

Overall I liked Lugia. I think its arms are a bit clumpy compared to the fluid arms you see in the anime.

Lugia back 3/4 view

Things I liked:

  • The coloring is fairly accurate

Things I didn’t like:

  • Arms are super clumpy

Link to order: Amazon

Review of nanoblock 2022 Snowman NBC_368

2022 Snowman pacakage and build

This post is a review of the nanoblock Snowman build. Snowman is part of the nanoblock Mini Collection. Wondering what else is part of the Mini Collection? Click here for a list.

Number: NBC_368 

Number of Pieces: 160

Difficulty Rating: 2/5

2022 Snowman front view

There are been several snowman builds that have been released over the years. The snowman released in 2022 is different because the snowman is made up of clear white bricks and glitter bricks. These are newer and uncommon bricks used in a few nanoblock kits. The clear white bricks create a translucent effect on the snowman, which is nice.

The build begins by laying out a base layer of clear white bricks. I started the build on my nanoblock pad. The body goes up in layers. In general, each step works on two layers at once. The final step of the beginning of the body is a ring outlining the top of the body.

2022 Snowman front 3/4 view

The next section of the body is adding the scarf and creating curves to close up the body. Several slanted pieces are clearly marked as to which ones to use. However, I had difficulty telling where to add a 1×1 brick to get the layer lined up. I was able to figure it out after moving bricks around.

The final step of the body is to add the mittens.

2022 Snowman back 3/4 view

The head begins with a base layer that I once again laid out on my nanoblock pad. The head goes up in layers. Again there are slanted bricks that I needed to make sure I used the right slope to build the head correctly. The head adds details such as eyes, nose, and hat.

The last step is to connect the head to the body.

2022 Snowman front 3/4 view

Things I liked:

  • The use of translucent and glitter blocks in the build because they are uncommon types of bricks

Things I didn’t like:

  • I’m not sure I like the solid white bricks edging on the hat. Since the rest of the build is clear the solids stand out