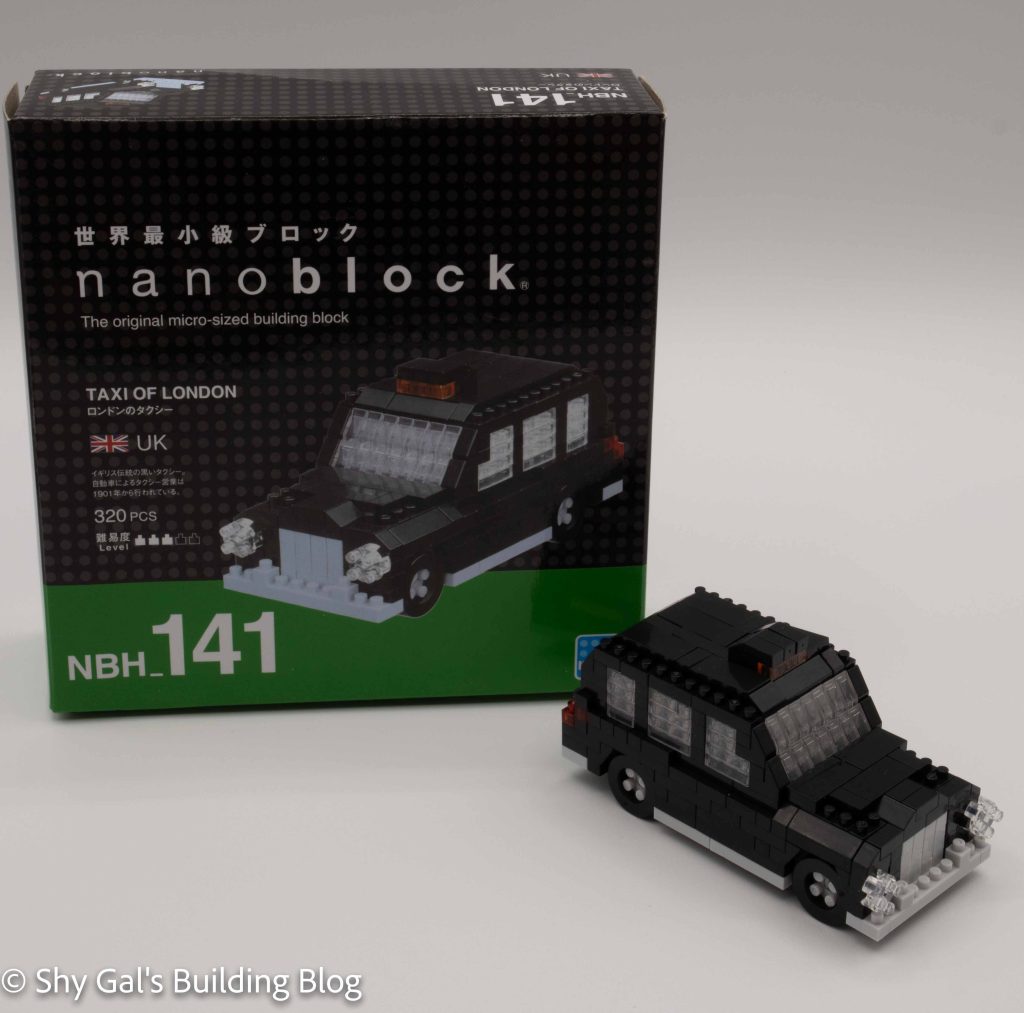
This post is a review of the nanoblock Taxi of London build. The Taxi of London is part of the nanoblock Sights to See series. Wondering what else is part of the Sights to See series? Click here for a list.
Number: NBH_141
Country: UK
Number of Pieces: 320
Difficulty Rating: 3/5
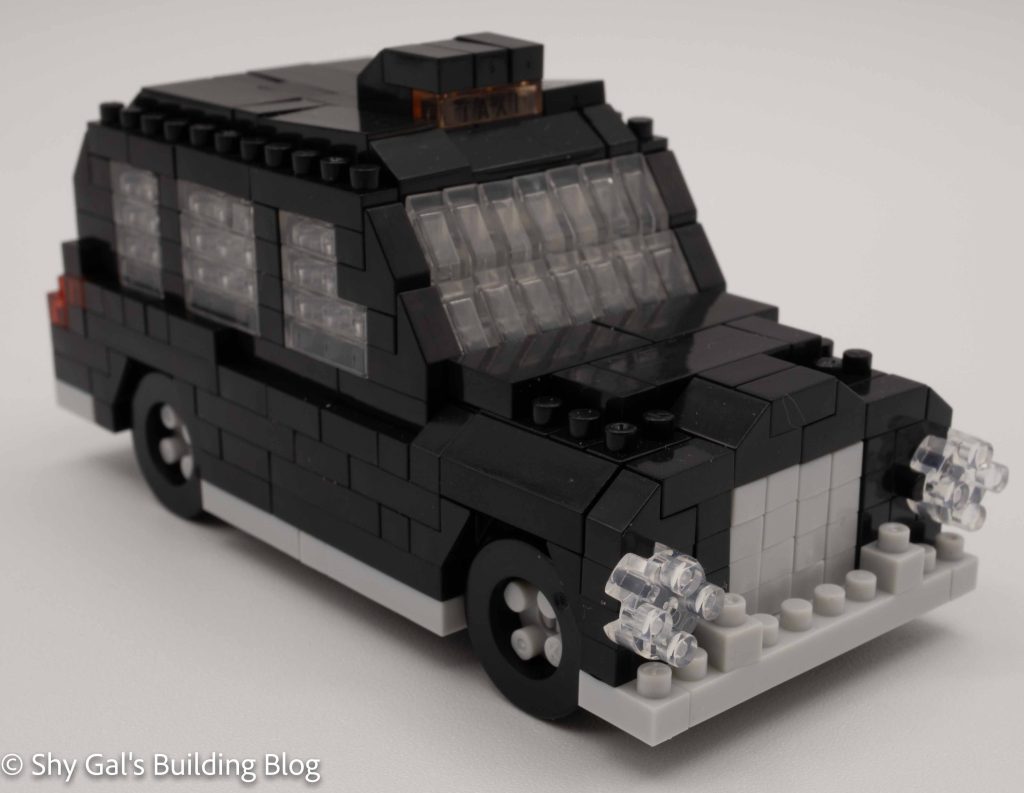
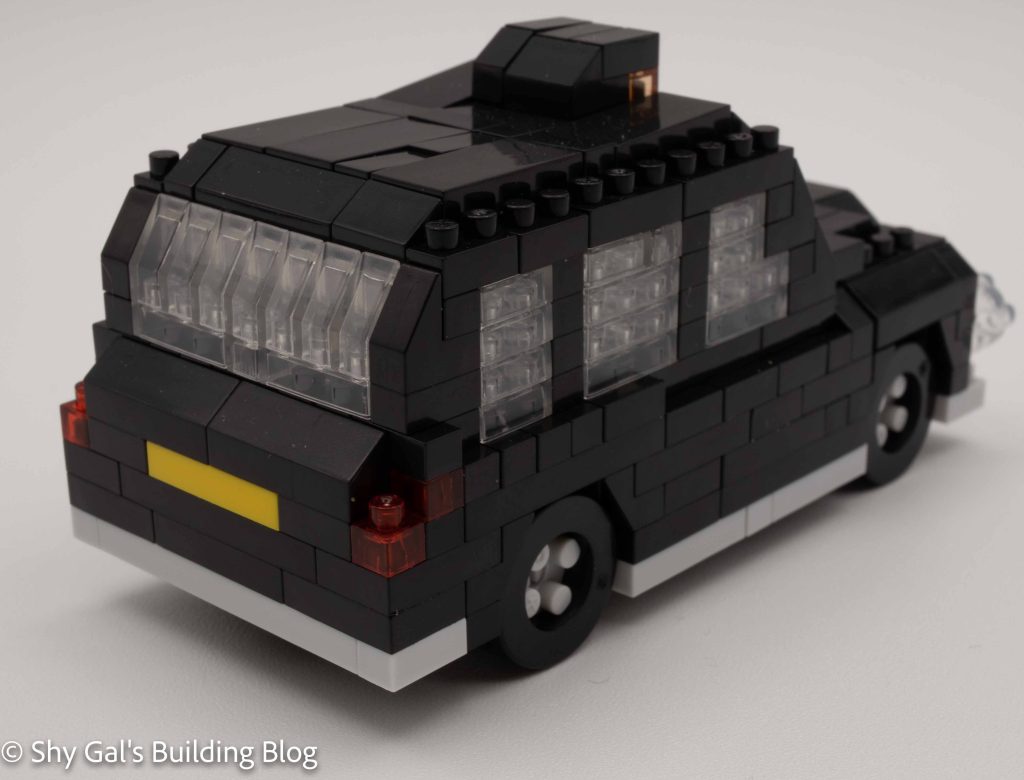
Overall this was a relatively simple build. Since the taxi is black, it was good practice to read directions that use the white lines between bricks, which I’ve had problems reading in the past. Overall there are a lot of little smaller builds that build up into one larger build. I liked the use of clear for the windows when and how the slant of the windshield is created.
I think that the taxi is a cute little build. I’m not sure that it looks like the London cabs I’ve been in; they tend to be much curvier.
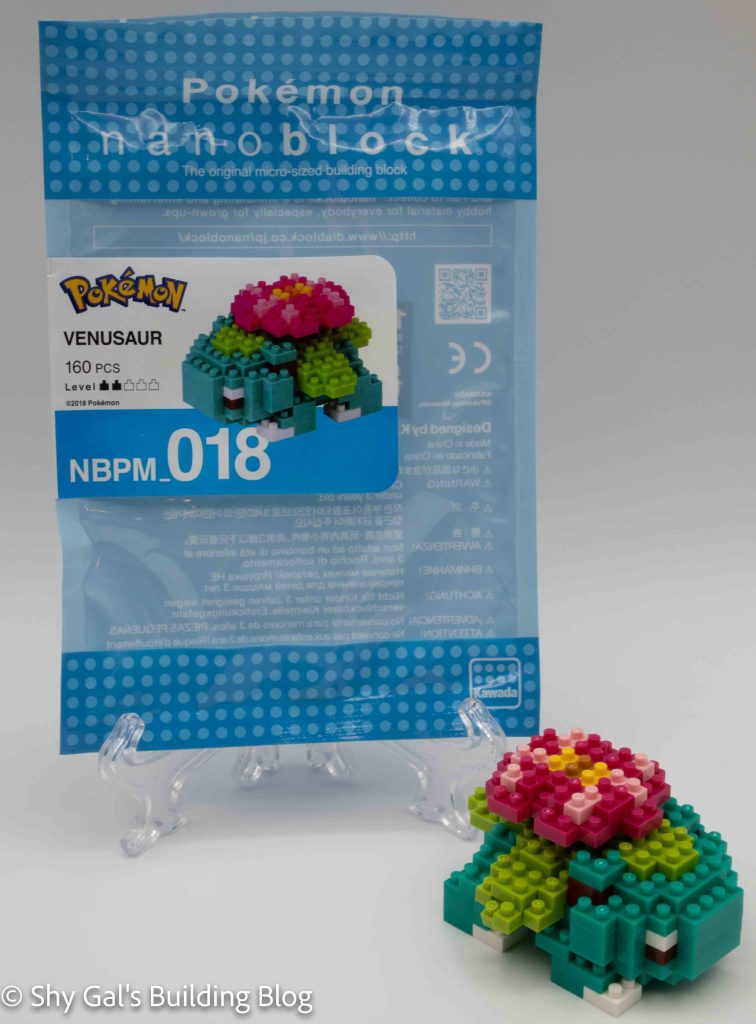
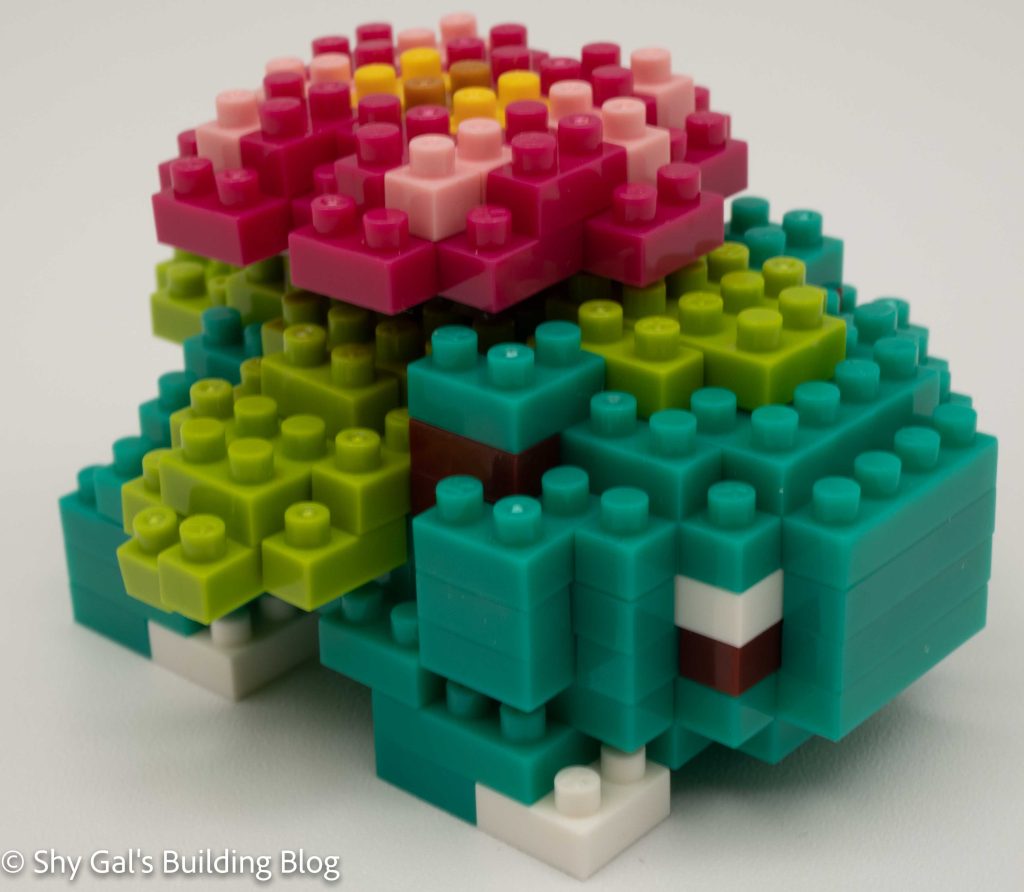
This post is a review of the nanoblock Venusaur build. Venusaur is part of the nanoblock Pokemon collection. Wondering what else is part of the Pokemon Collection? Click Here for a list.
Number: NBPM_018
Number of Pieces: 160
Difficulty Rating: 2/5
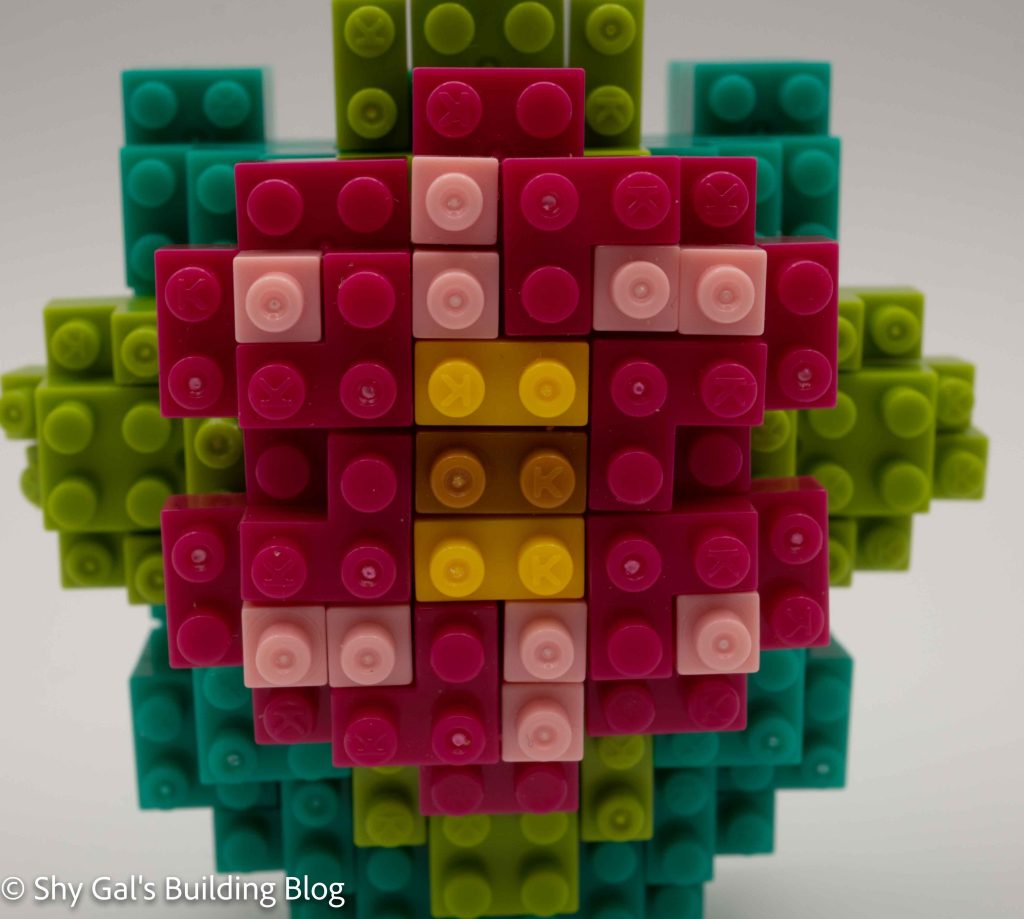
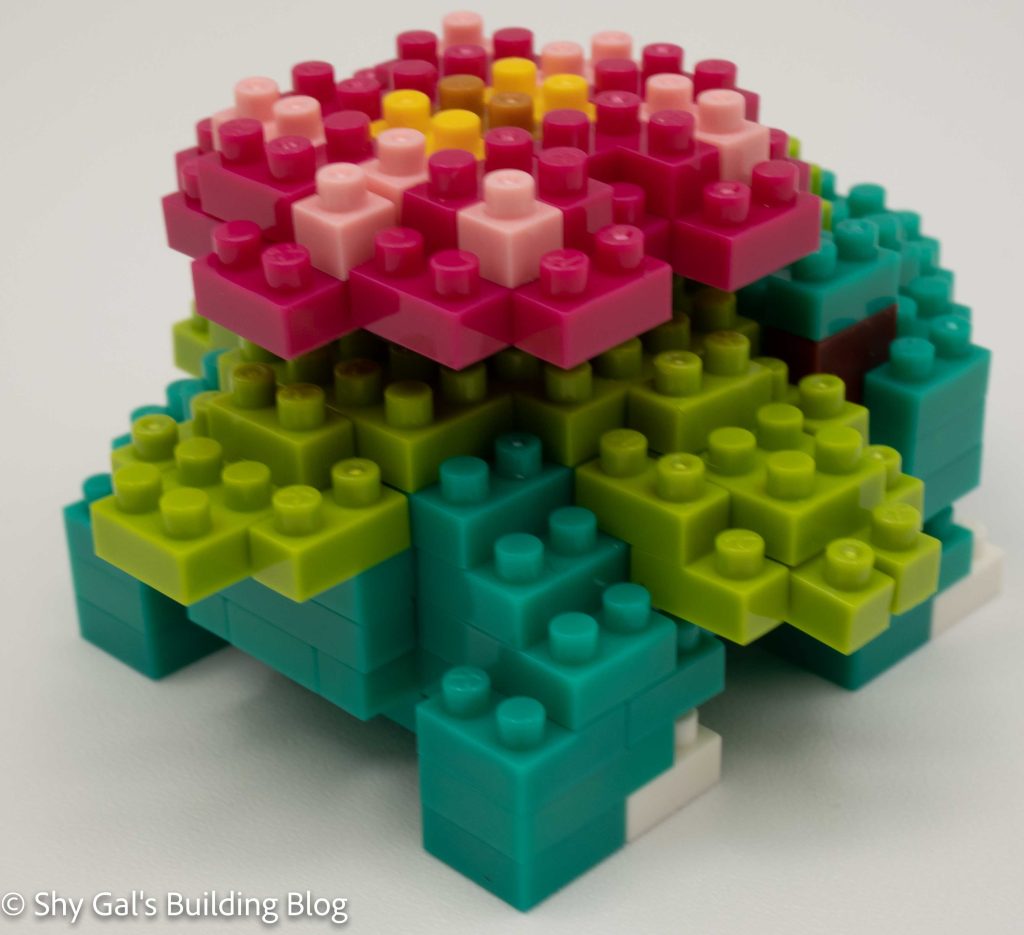
Venusaur is the 3rd evolution of Bulbasaur. At first glance, the build is more involved than the Bulbasaur build because of the detail in the flower on Venusaur’s back.
Overall I feel like this should be a 3/5 build since it is more challenging than most of the other 2/5s I have done. Overall there were 2 parts of the build I found difficult. In both of these spots, you build smaller pieces and connect them using a couple of single studs. The first step was difficult because of the size of the base and getting everything lined up. This was before I bought my pad so getting things lined up was a little challenging.
I liked how Venusaur turned out overall. He is super recognizable, which is excellent, and I liked how it worked and looked once I got it built.
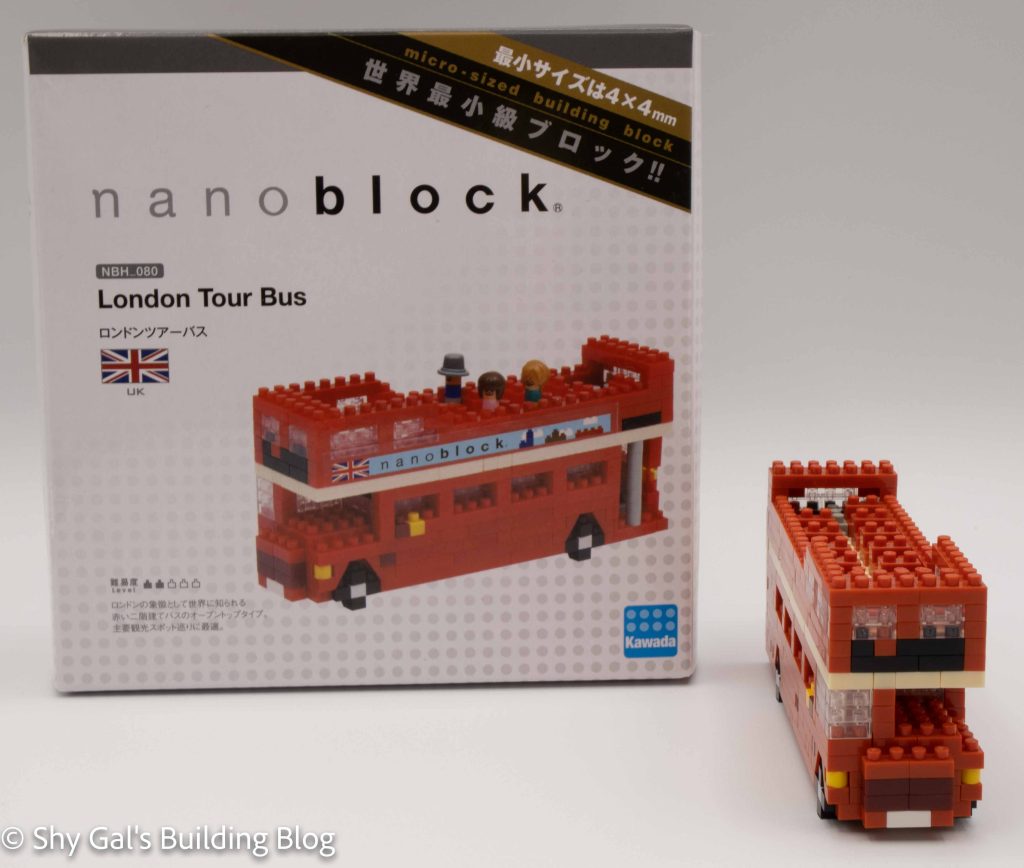
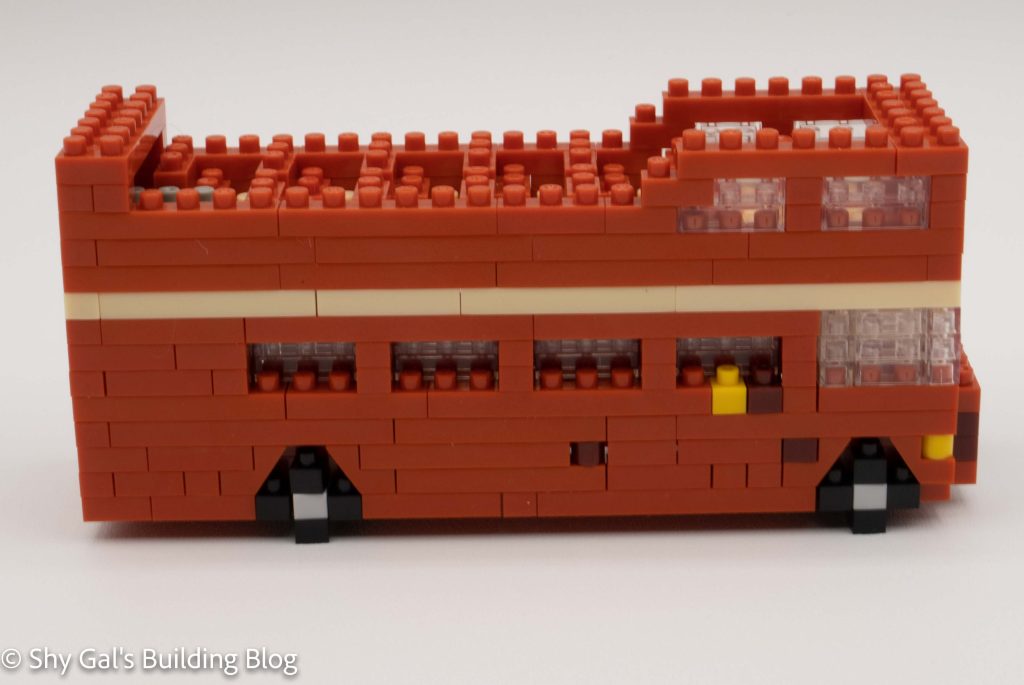
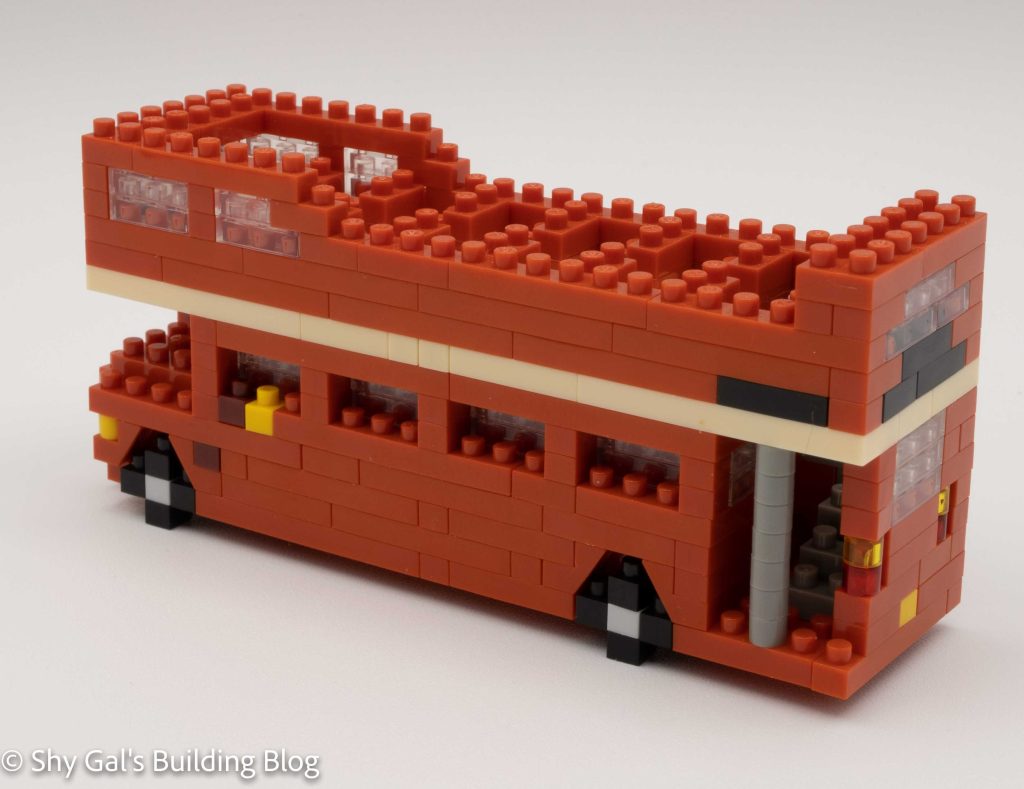
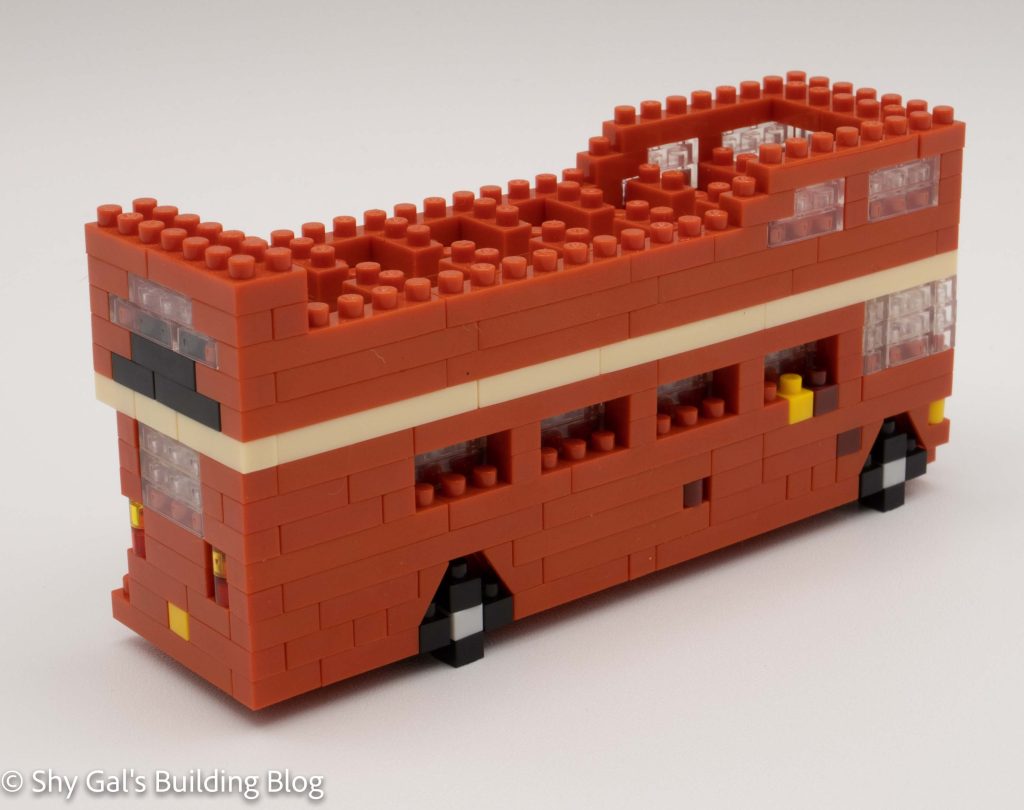
This post is a review of the nanoblock London Tour Bus build. The London Tour Bus is part of the nanoblock Sights to See series. Wondering what else is part of the Sights to See series? Click here for a list.
Number: NBH_080
Country: UK
Difficulty Rating: 2/5
It used to be that you couldn’t travel anywhere in London without seeing the classic double-decker bus. Over the years, they have slowly been replaced by greener single-deck buses. However, you can still find the double-decker tour buses all over. The bus rides are amazing on days with good weather with the open-top deck. While this kit says London, I have seen tour busses like this worldwide.
The first 6 steps are creating the central base of the bus. You then build the layers to build the sides of the bus. Each layer adds either red or details to the build. Eventually, you create the floor of the top layer. Then you add the seat bottom and seat backs. Then you add the walls to finish off the top of the build. Then you flip over the build to add the wheels. After building the London taxi, I was disappointed that the wheels didn’t move. The final steps of the bus part of the build are to add the poll at the back of the bus and the front of the bus. If you want to, there are people that you can add to the top of the bus. The last step in the directions is to add the stickers to the side of the bus. I did not add the people due to scale and didn’t add the stickers for the reasons in my post here.
Overall, I enjoyed the build. I liked the detail nanoblock adds with bricks getting from the bottom to the top with different colors. I don’t feel that the stickers would have added a lot to the build, so I didn’t add it.
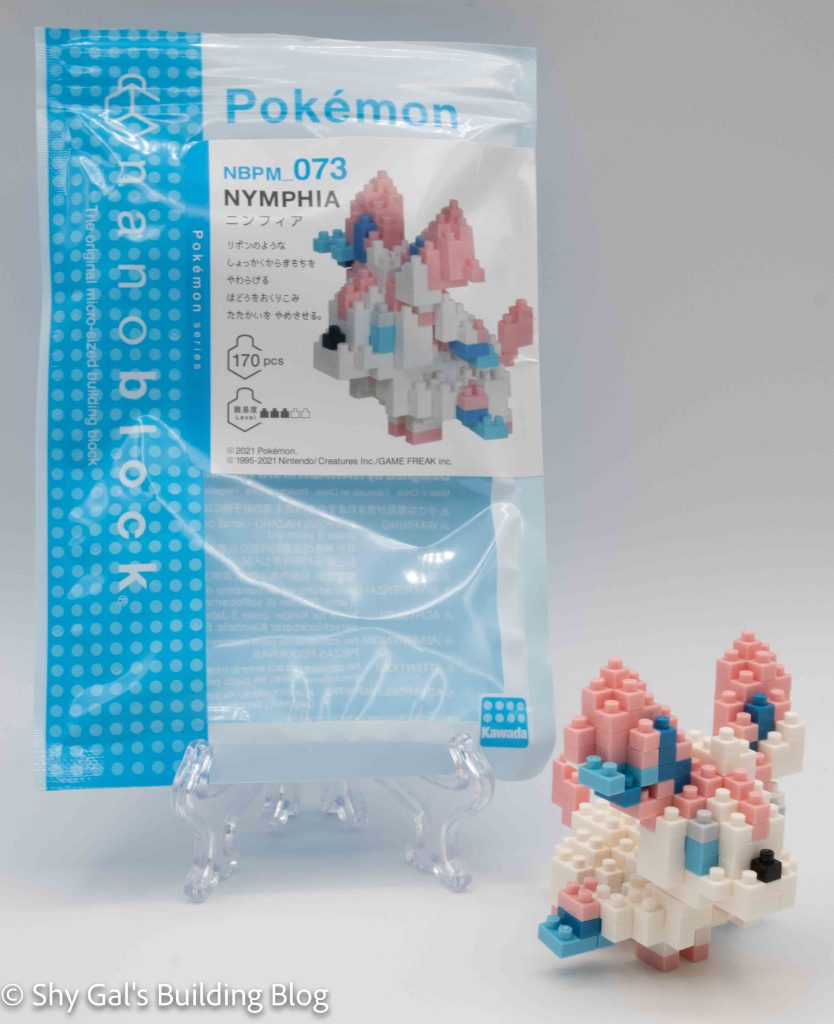
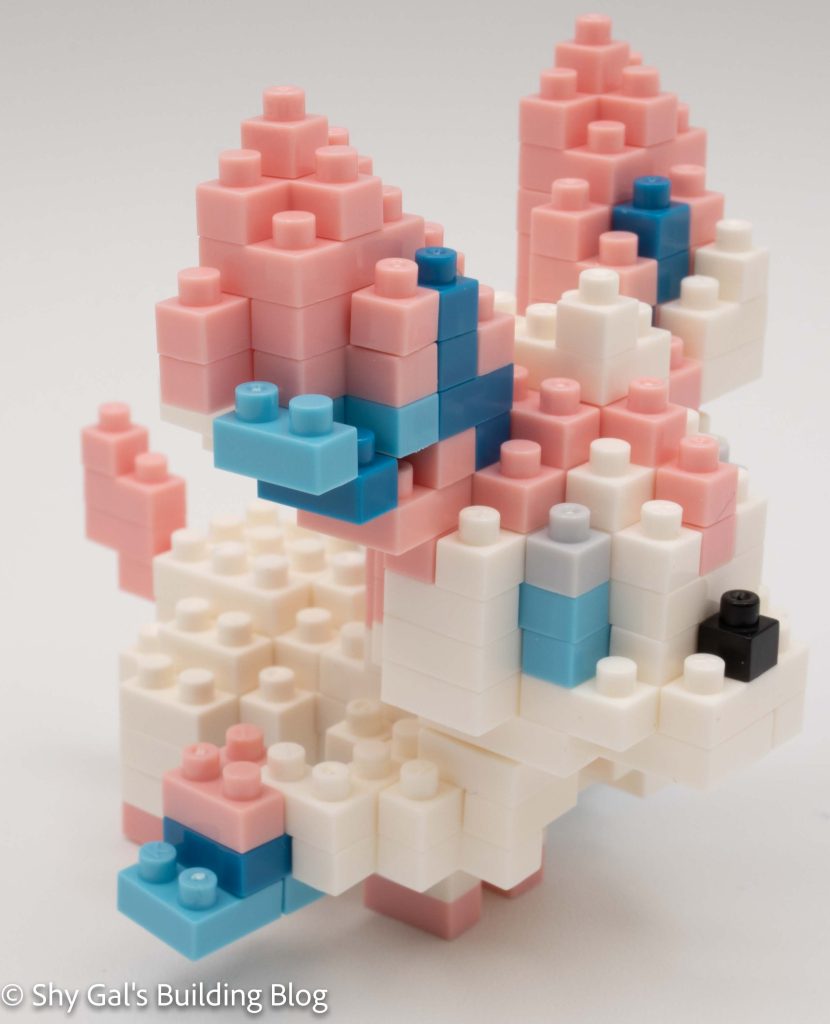
This post is a review of the nanoblock Sylveon build. Sylveon is part of the nanoblock Pokemon collection. Wondering what else is part of the Pokemon Collection? Click Here for a list.
Names:
English: Sylveon
Japanese: Nymphia
Number: NBPM_073
Number of Pieces: 170
Difficulty Rating: 3/5
As of this posting, nanoblock has released kits for all 9 eeveelutions. The builds have gotten more detailed as time has passed, so the first 3 builds are a bit simpler. I find that all the kits are recognizable for the pokemon they are supposed to be. Sylveon is the fairy type of eeveelution from generation 6. Sylveon is a white pokemon with ribbons with pink and blue tips.
After completing all 9 eeveelutions I had the most trouble with Sylveon due to a couple hanging bricks not wanting to stay in place.
This nanoblock build begins with a base of white bricks. You then build up a few layers of white and add the pink details. To finish off the body, you need to add a simple tail.
Next, you build the head. In general, the head is pretty straightforward other than the fact it isn’t symmetrical. The head begins with a white base like the body. You then add layers of bricks that add the details for the nose and eyes. After adding several layers, you add a stack of bricks to form the end of one of Sylveon’s ribbons. There are the bricks I had a hard time keeping attached for the rest of the build. Once you add on the stack of bricks, you continue adding the ears and the ribbons in white, pink, and blue bricks. Once the head is completed, you attach the head to the body.
The final steps are to add the final details. You add feet and the ends of more ribbons.
Overall I got frustrated with the build. While the directions were easy to follow, I had difficulty getting some of the bricks to stay connected. This can be a common problem with nanoblocks if bricks are only held up by a single stud.
Things I liked:
I love the amount of detail in the build
Things I didn’t like:
I had a hard time getting the bricks at the end of the head ribbon to hold.
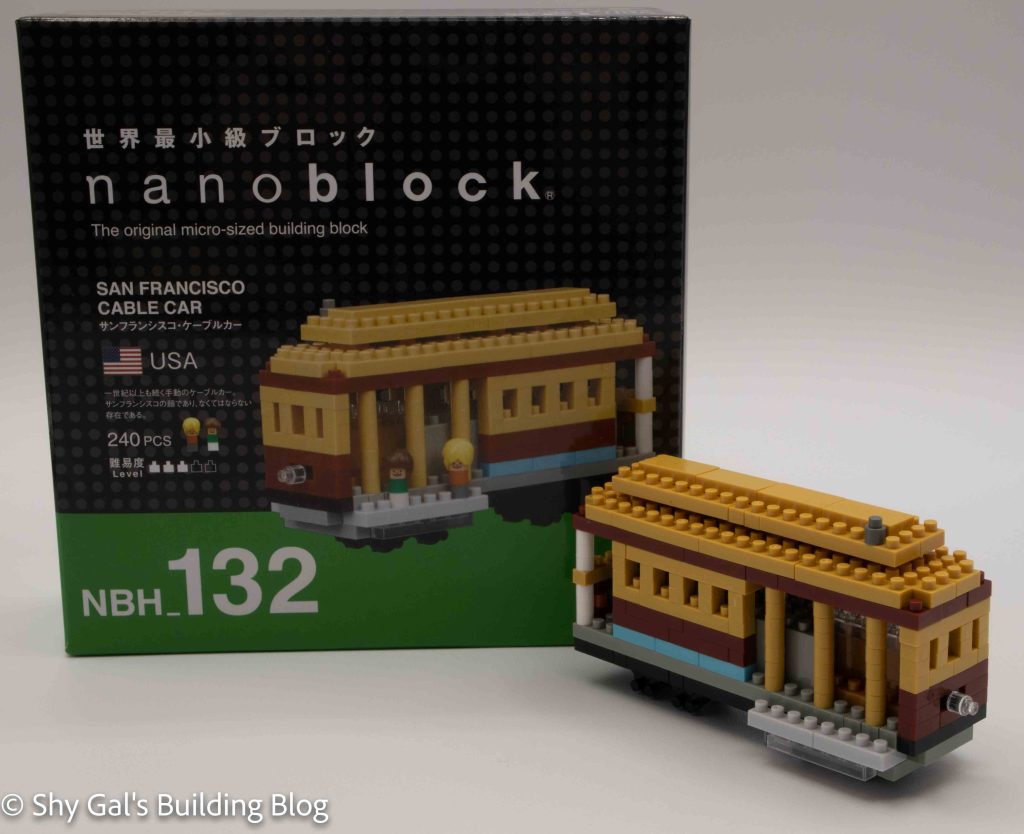
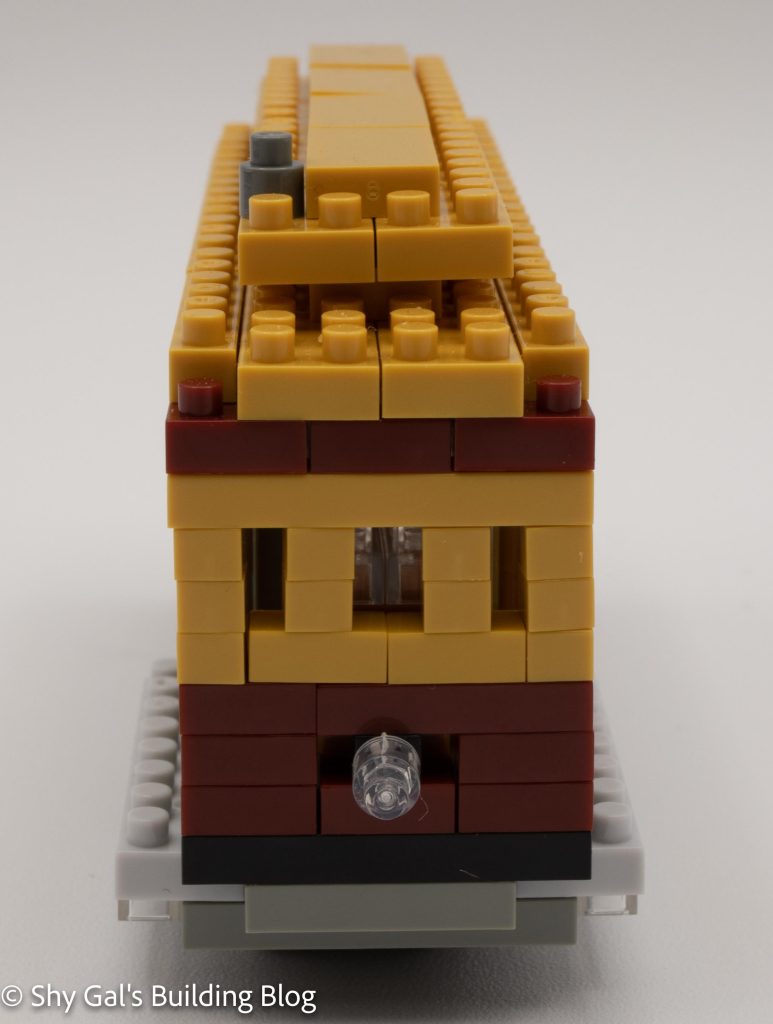
This post is a review of the nanoblock San Francisco Cable Car build. The San Francisco Cable Car is part of the nanoblock Sights to See series. Wondering what else is part of the Sights to See series? Click here for a list.
Number: NBH_132
Country: USA
Number of Pieces: 240
Difficulty Rating: 3/5
When you open the box, you will notice the block with the raised center, which is not a normal nanoblock. I enjoyed building around the outside of the brick, and it created all the windows. After making the base, you build the roof with some details. It was a little tricky getting the top attached since there were so many 1×1 stacks on the main body of the build.
Overall I think it is a nice build and fun. The colors are ones you don’t see in many builds, which is a nice change of pace.
Things I liked:
I really like how the colors and details look together
Things I didn’t like:
There aren’t wheels that spin
I don’t really like the people and didn’t put them on my model
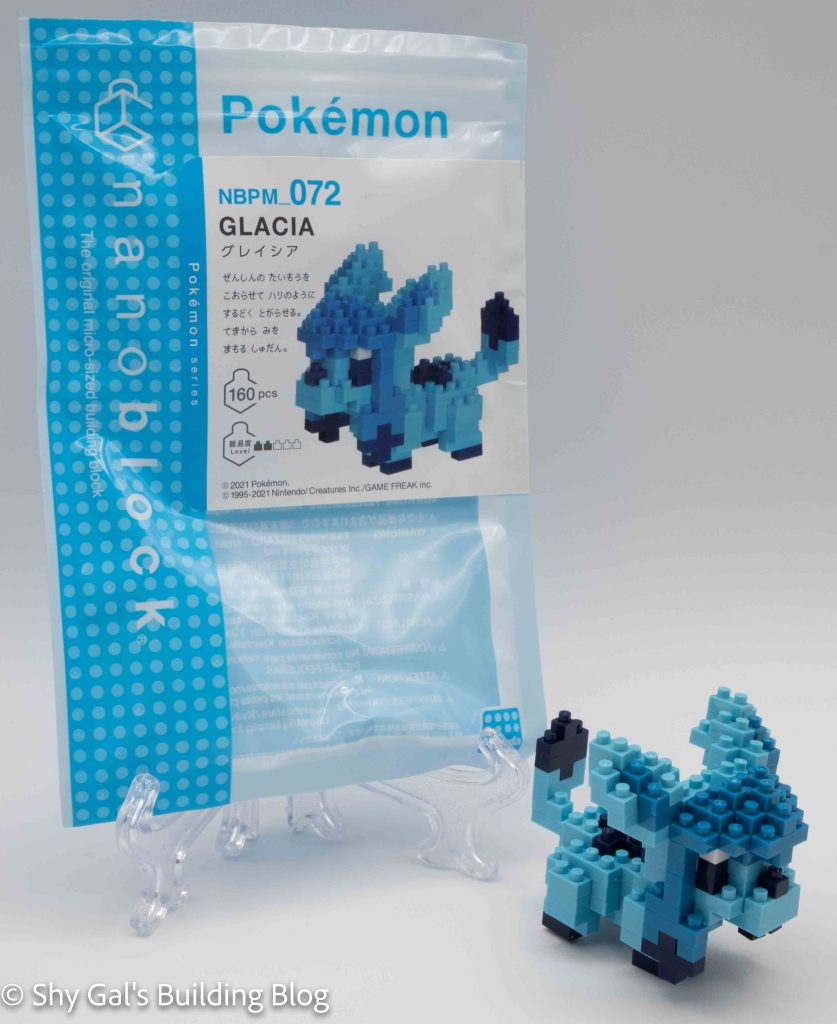
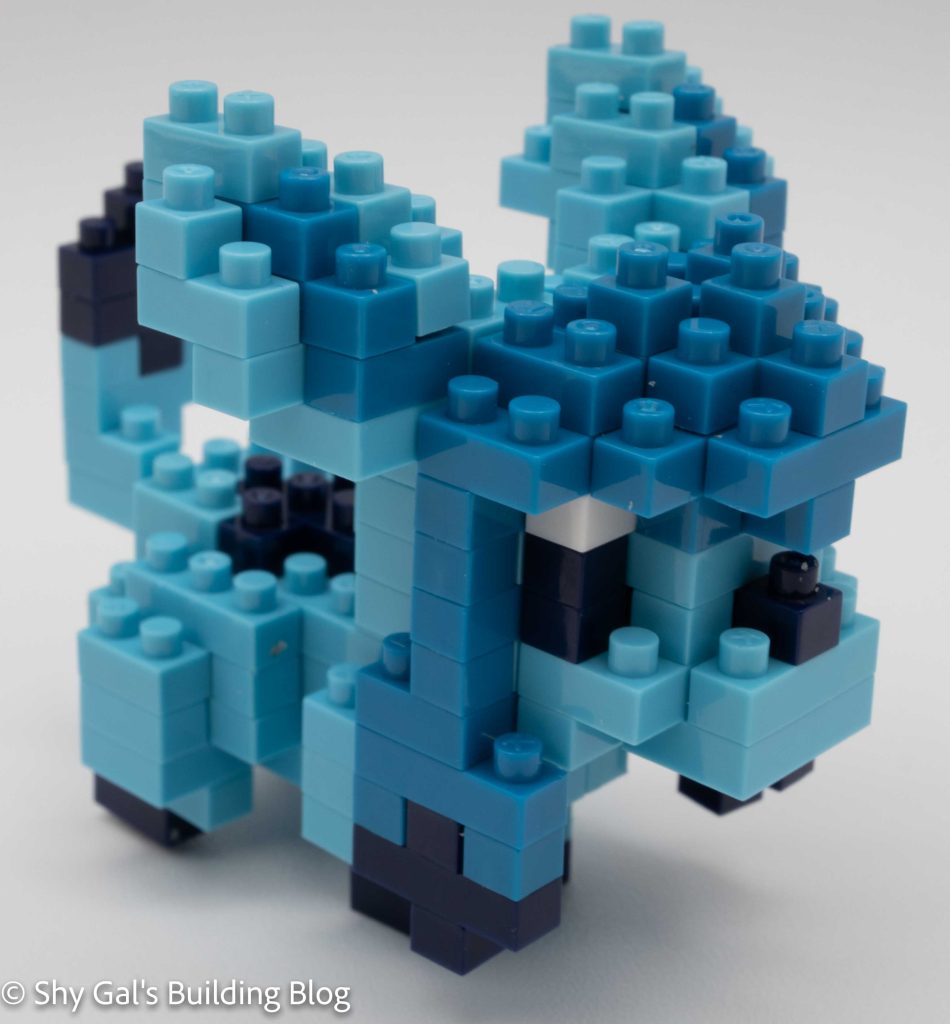
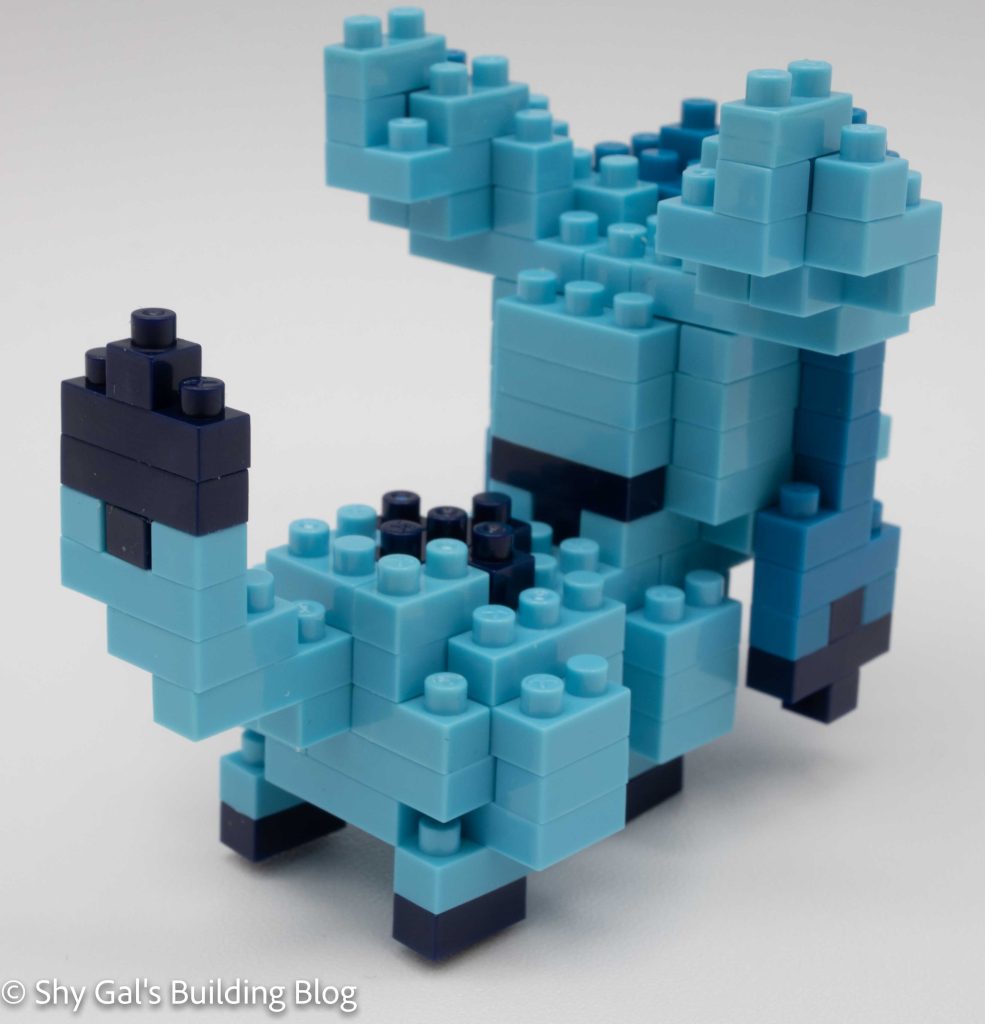
This post is a review of the nanoblock Glaceon build. Glaceon is part of the nanoblock Pokemon collection. Wondering what else is part of the Pokemon Collection? Click Here for a list.
Names:
English: Glaceon
Japanese: Glacia
Number: NBPM_072
Number of Pieces: 160
Difficulty Rating: 2/5
As of this posting, nanoblock has released kits for all 9 eeveelutions. The builds have gotten more detailed as time has passed, so the first 3 builds are a bit simpler. I find that all the kits are recognizable for the pokemon they are supposed to be. Glaceon is the grass type of eeveelution from generation 4. Glaceon has various shades of blue with triangular ear decorations and tail.
This nanoblock build is made of 3 blues, there is a navy, a pastel, and a cerulean blue. You begin the build by making a base. You build up the body in layers of blue bricks. Once you have built the body, you add the triangular tail.
The next step is to build the head. You begin creating a base of all three blues. Next, you build up the head in layers using the various shades of blue. Framing the main pastel blue of the head you add the details for the rest of the face. I really liked how they used the cerulean to frame and create the top of the head. Once you finish the head you attach it to the body.
The final step is to add the details. First, you attach the triangular ear decorations to the head. Then you attach the feet and you have a completed build.
Overall I really did enjoy the build. I really liked the amount of detail they put into the build.
Things I liked:
The creation of the ear details
Things I didn’t like:
It took a long time for the head to be solid and not falling apart
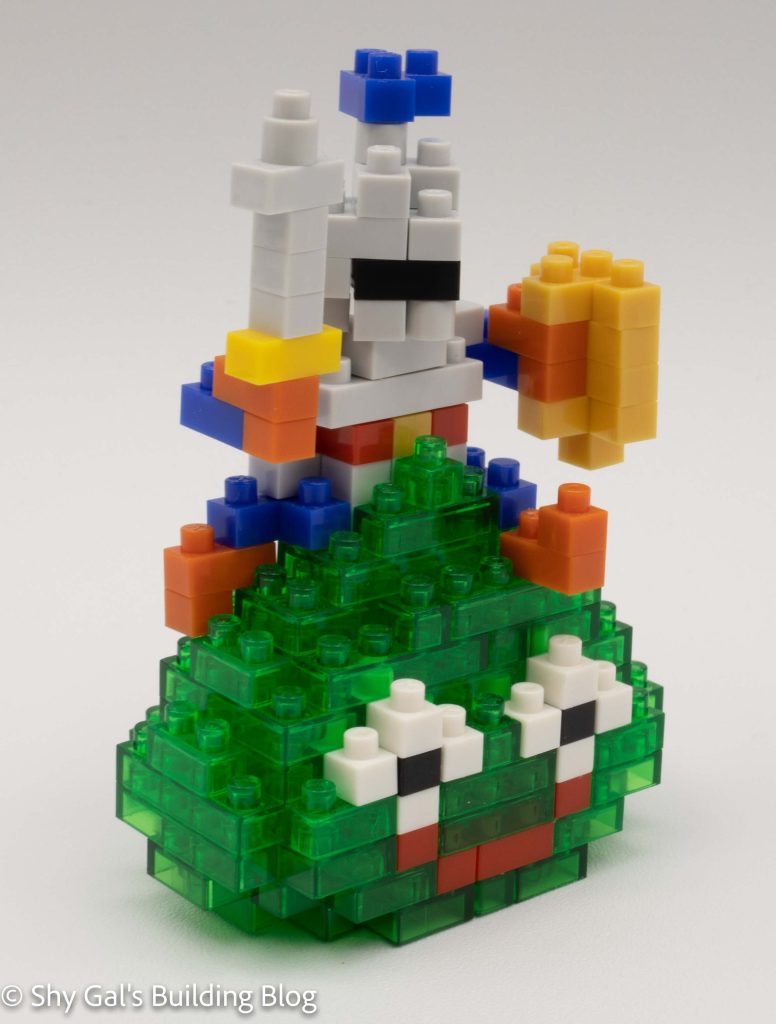
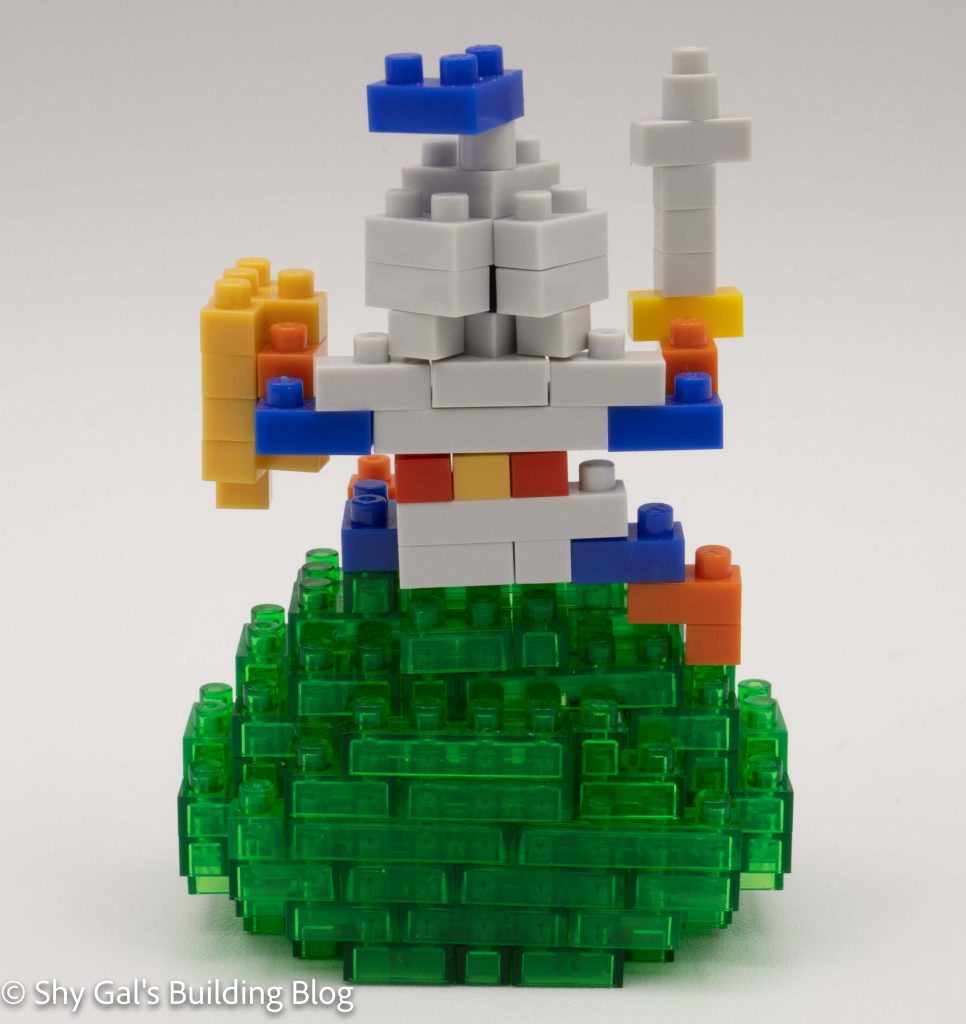
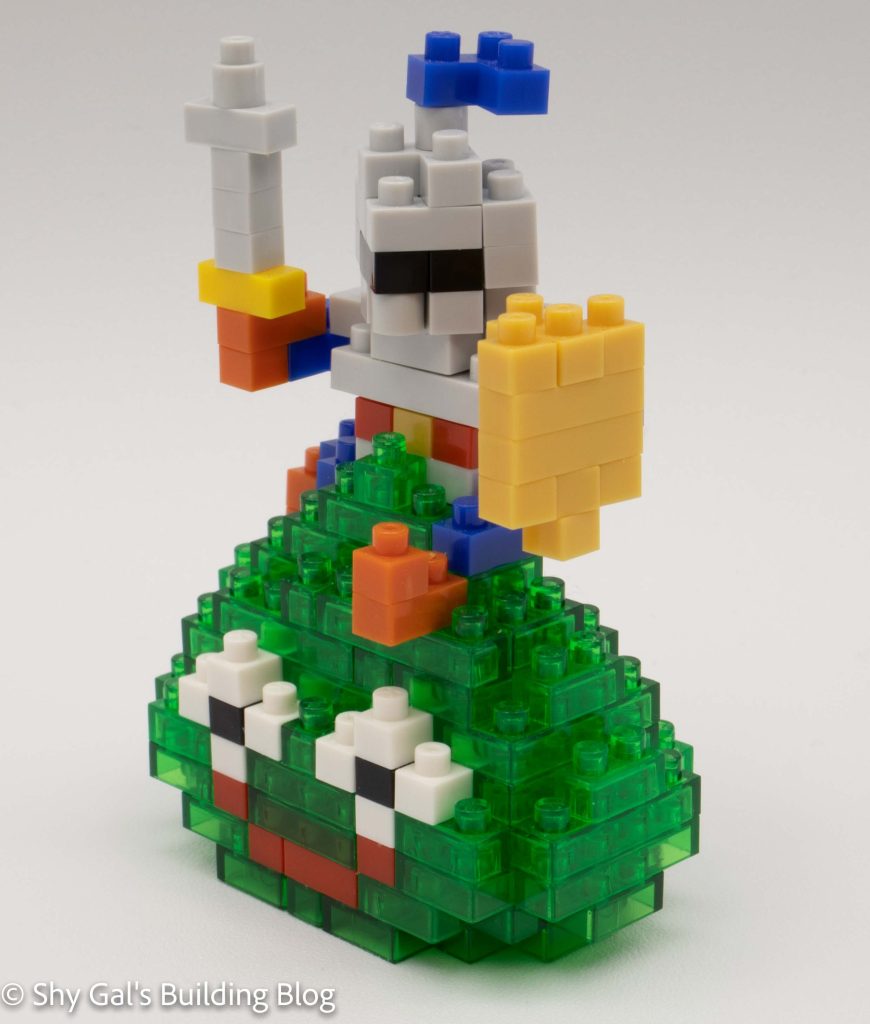
This post is a review of the nanoblock Slime Knight build. The Slime Knight is part of the nanoblock Dragon Quest series. Wondering what else is part of the Dragon Quest series? Click Here for a list.
Number of Pieces: 140
Difficulty Rating: 2/5
The Slime Knight is a reasonably common monster in the Dragon Quest series. It looks like a knight that is riding on the slime. When I initially looked at the set, I was worried that the kit would be super hard. I was pleasantly surprised when I got around to building how great the directions were. The build is made of 2 parts the slime and the knight.
The slime begins with a base, and you start building up like the other slime builds. In the second layer, you begin to develop the face of the slime. Over the next 4 steps, you create the rest of the face and close up the top of the slime. Starting in stage 6, you begin to build the knight, but you also add the final bits to make the slime a teardrop.
One of the things I really like about the knight is that none of its limbs are symmetrical. You build the knight on your almost completed slime. You start with legs going in two different directions. Next, you add the knight’s body. After making the body, it’s time to attach the arms. One arm holds a sword, and one arm holds the shield. Both arms have a ton of detail, so you can really tell what the knight is holding. The final detail is the head. It is seated at an angle, so it is lined up with the front of the slime.
Things I liked:
The amount of detail and how both sides of the knight don’t match
Things I didn’t like:
I don’t love the clear with the solid color on the slime
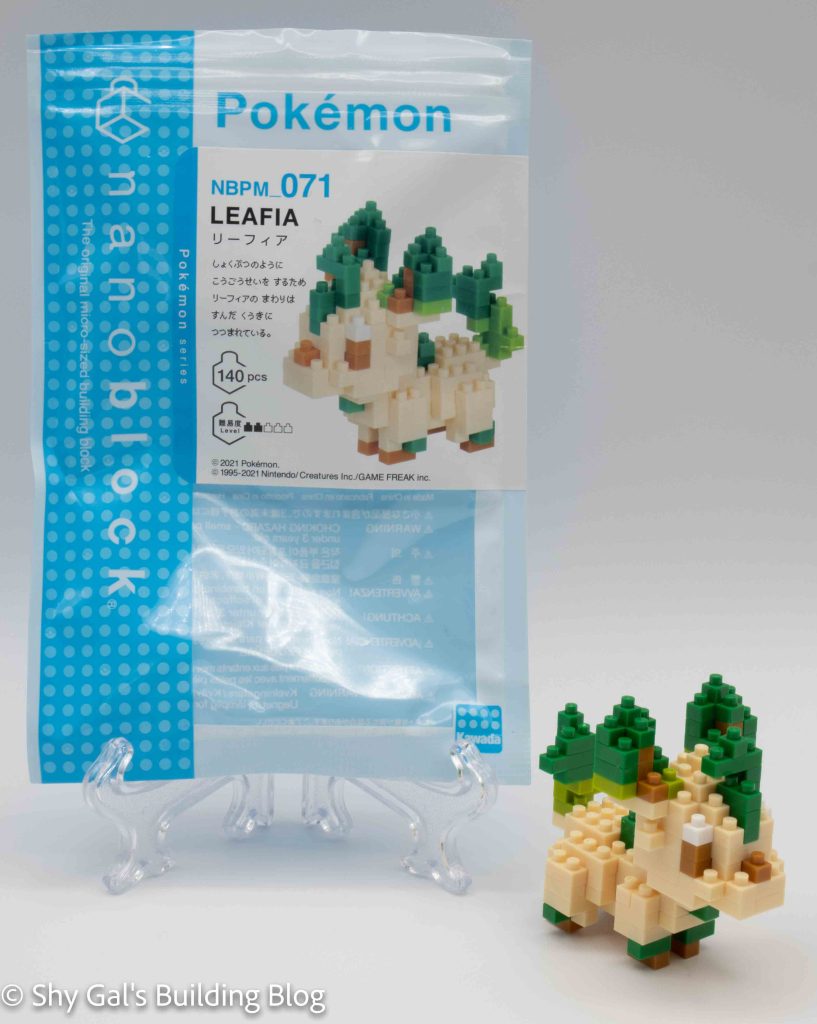
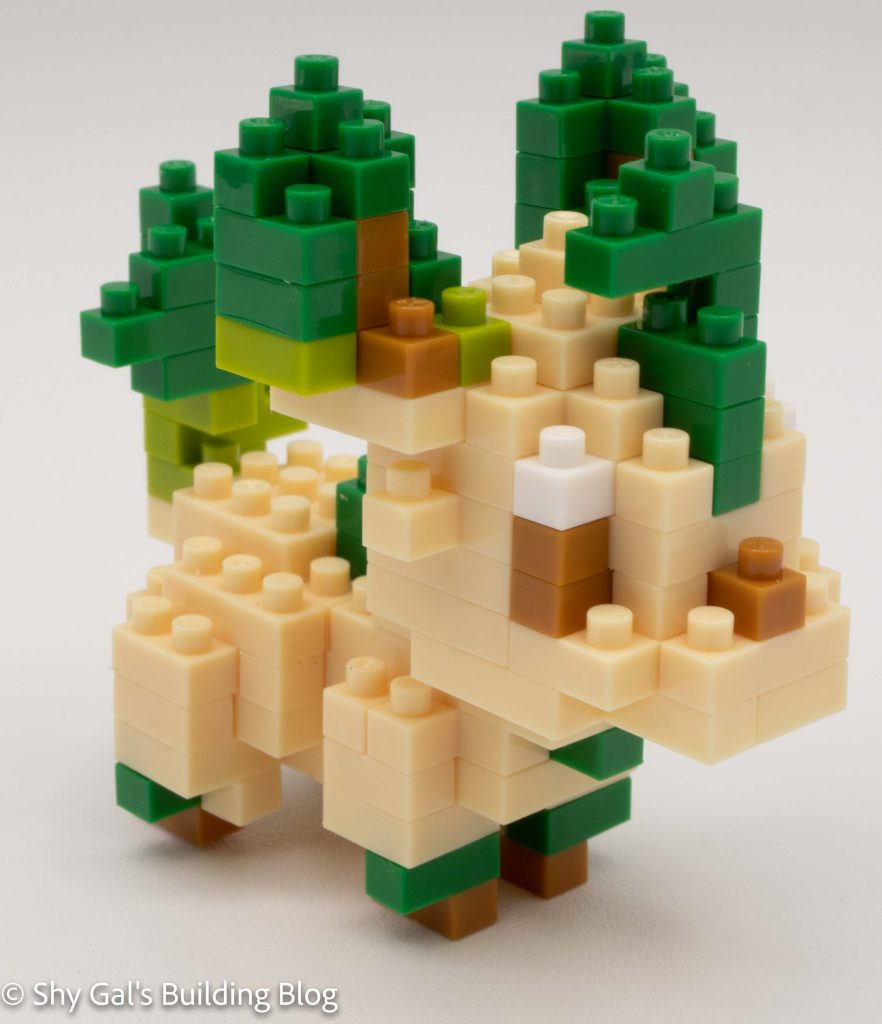
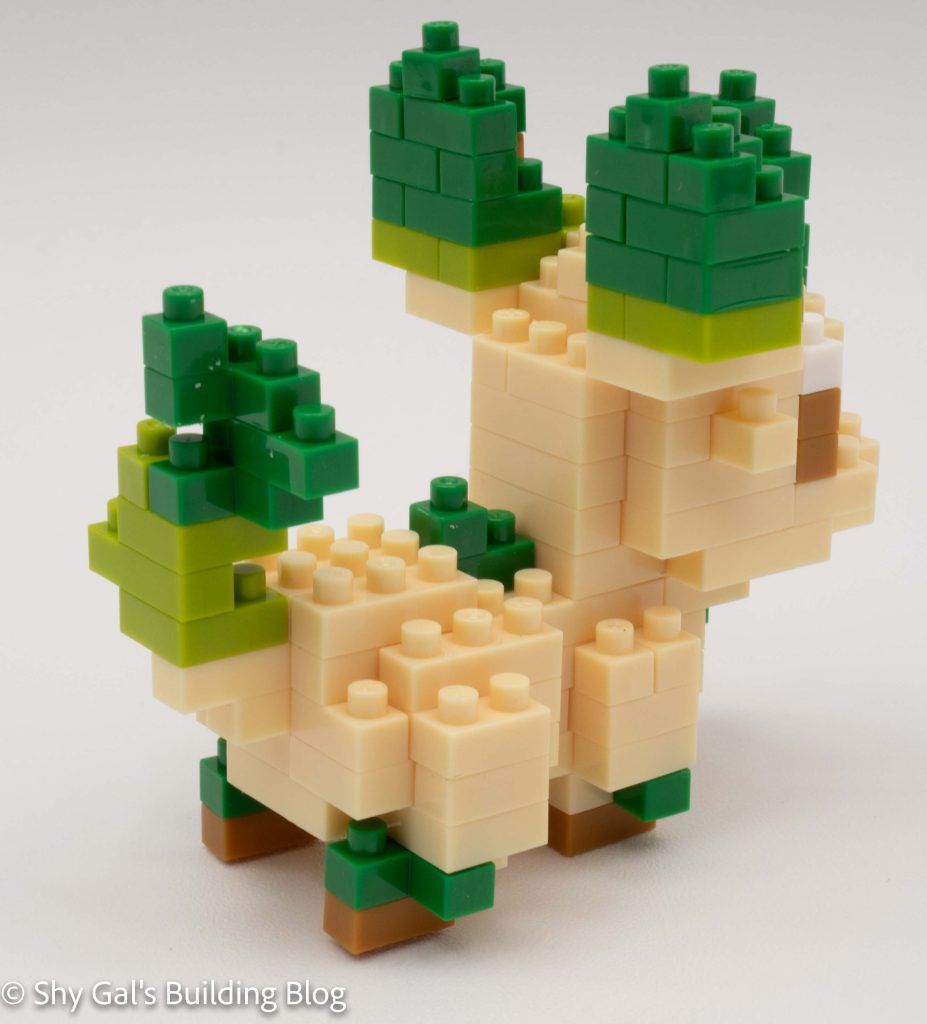
This post is a review of the nanoblock Leafeon build. Leafeon is part of the nanoblock Pokemon collection. Wondering what else is part of the Pokemon Collection? Click Here for a list.
Names:
English: Leafeon
Japanese: Leafia
Number: NBPM_071
Number of Pieces: 140
Difficulty Rating: 2/5
As of this posting, nanoblock has released kits for all 9 eeveelutions. The builds have gotten more detailed as time has passed, so the first 3 builds are a bit simpler. I find that all the kits are recognizable for the pokemon they are supposed to be. Leafeon is the grass type of eeveelution from generation 4. Leafeon is generally cream with leaves for ears and tail.
The nanoblock build begins by creating a cream base. You add layers of cream to make the body adding little details of cream. The final step of the body is to add the green two-tone leaf tail.
The next step is to build the head. Once again, you begin with a cream base. You add layers of cream but bring in brown, white, and cream for various face details. I had some problems adding the detail of the leaf in the center of the head because it liked to push down. Then you add the ears using 2 shades of green with brown, adding a centerline to the ears. Once you have completed the head, you connect the head to the body.
The final step of the build is to add the feet. They are a little hard to line up since the directions have the bricks upside down.
Overall I enjoyed the build. I really like how the 2 shades of green look in the finished build. I also liked how clear the directions were overall.
Things I liked:
The use of 2 shades of green to create the leaf effect
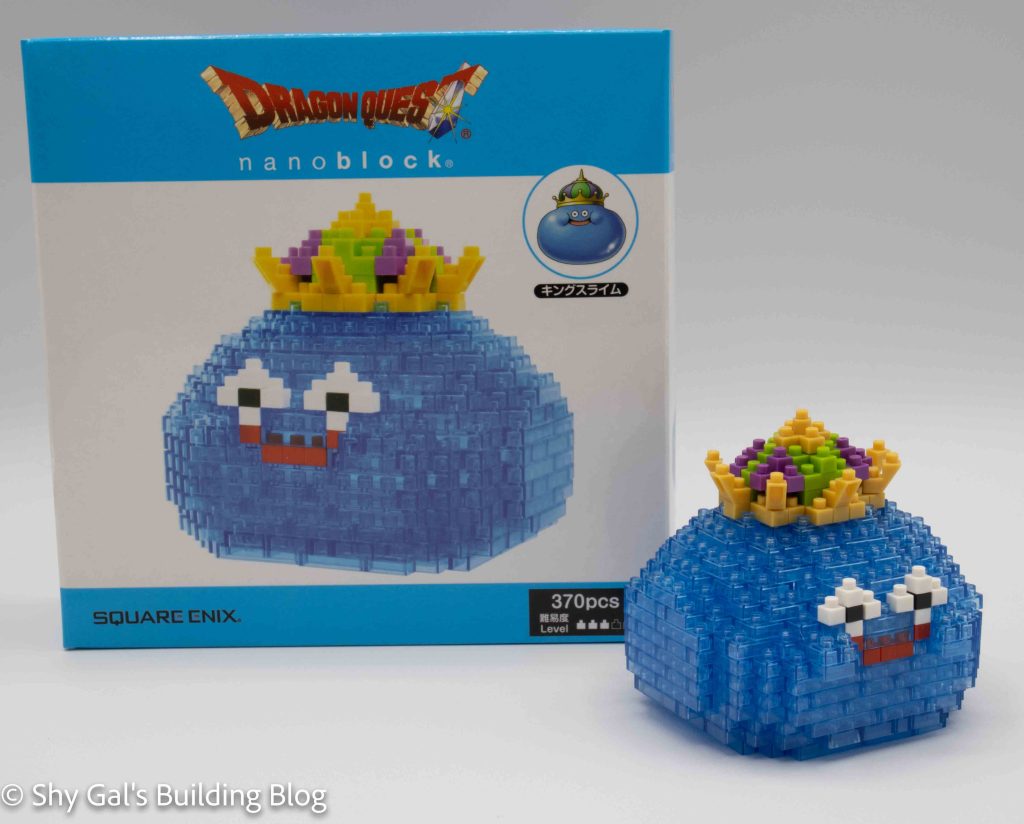
This post is a review of the nanoblock Slime King build. The Slime King is part of the nanoblock Dragon Quest series. Wondering what else is part of the Dragon Quest series? Click Here for a list.
Number of Pieces: 370
Difficulty Rating: 3/5
Slime Kings are giant slime. In some games, you battle a smaller Slime that calls friends. Once there are 5 or so Slimes on the battlefield, they merge into a Slime King. In other games, the Slime King is a monster you can talk and interact with.
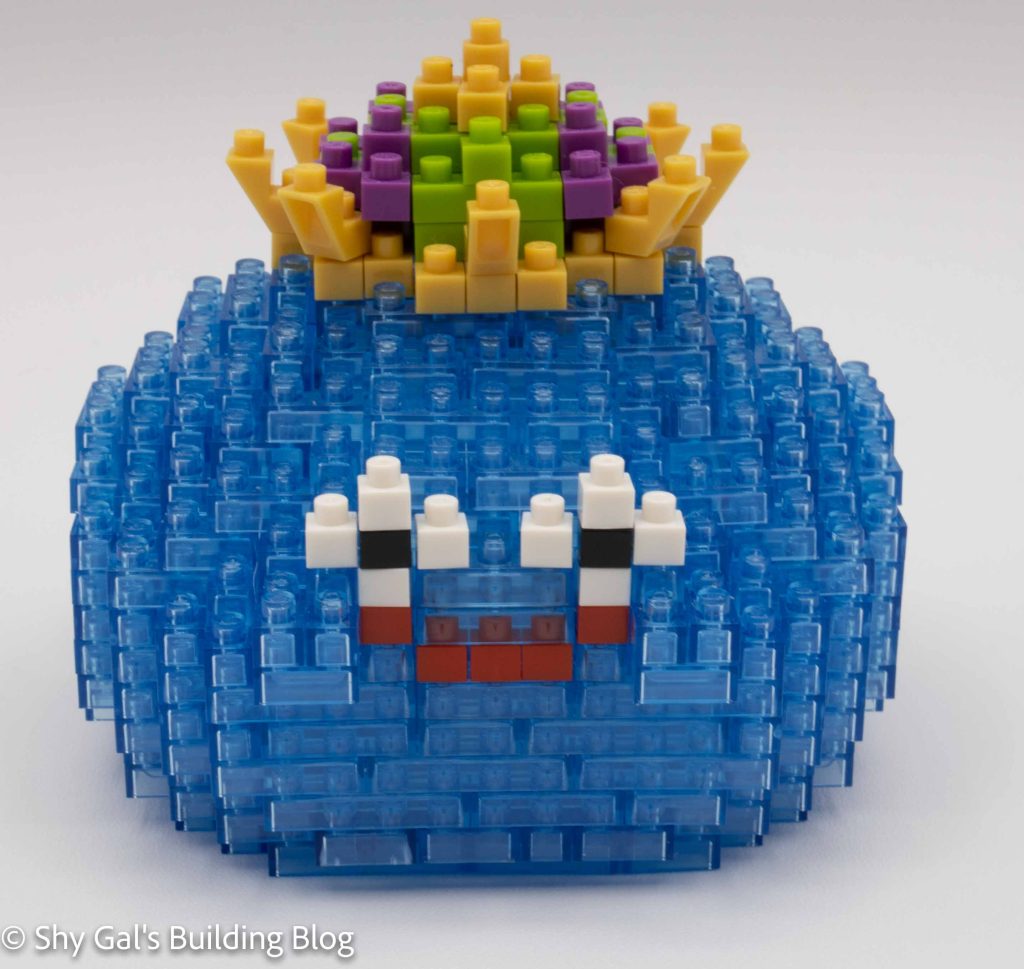
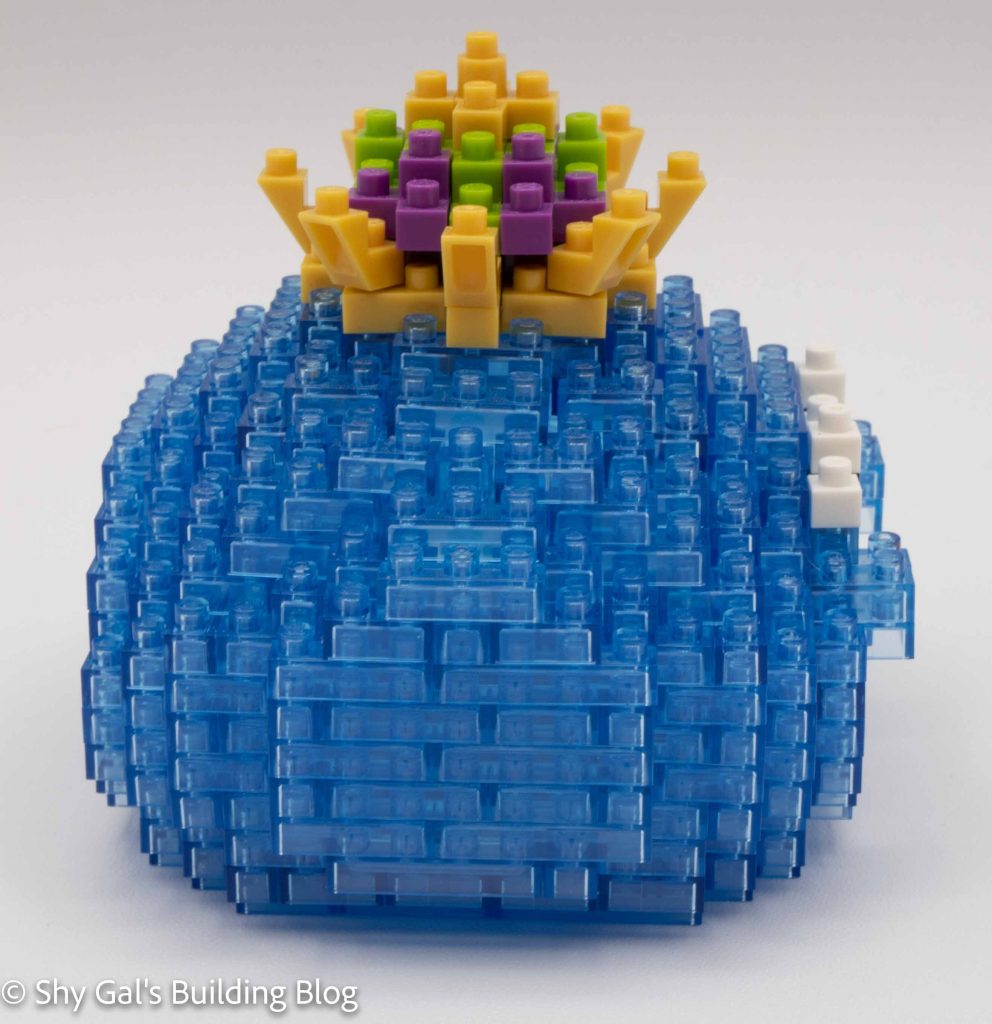
Like most of the other slime builds, this build is created with clear blocks. Regular nanoblocks are used for the face and crown. This build is similar to the Slime L build for the base. Over the first 5 steps, you lay out the bottom of the build while also making the second layer that holds the base together. After completing the base, you begin to add height to the build. You do this by tracing around the outside. You add a few layers of just blue to make up the fat body of the slime. Then you add the details of the face, including eyes and a mouth, in additional layers. After you add the face, you begin to close up the body. Once the head of the slime is almost closed up, it’s time to add the crown. You start with a layer of goldish yellow bricks to form the base of the crown. You then add the green and purple detail of the body of the crown. The crown is topped off with a gold detail as a finish.
Overall after completing the base, I found this build to be delightful. The base is tricky, along with some of the steps to close up the body. I feel like the build is highly recognizable as a King Slime. I really like some of their details to make it look right. This includes the coloring of his crown and the fact that they created puffed-out cheeks.
Things I liked:
The cheeks are puffed out, though it is a bit hard to see.